Learning a new skill and advancing in your sewing projects will be a lot more enjoyable with a few key tools and resources that can guide you in your journey.
Favorite Tips
Bridal Gown Sewing tip: If you are sewing on a bridal gown and you prick your finger on a needle or pin and you get blood on the dress, don’t panic! Saliva gets the stain out! Use a Q-tip, if you have one, to deliver your saliva right on the blood, or put it on directly! Works great!
Tip for the Bride: For years, I encouraged brides to pin 5 safety pins on their dress. Just lift the hem and pin the safety pins along the right side seam close to the bottom edge. This is to ensure that if a zipper fails or breaks, a spaghetti strap fails, a seam tears, etc., you’ll have help right away without having to find someone in a panic. Chances are, no one has needle in thread in their purse!
When our eldest daughter got married, a plastic ring on her bustle broke and I was able to use the pin as the new “ring” in a moments notice. So I’m glad I followed my own advice that day!!!
When Hand Sewing: The thread that first comes off the spool is the end that you should thread through your needle first. It helps keep the thread from twisting alot as you sew.
A few of my must-have sewing tools…
These make life easier as you begin to sew and you’ll find that you need them for a lifetime of sewing. Most items are under $10 which make them perfect gift ideas for your birthday, Mother’s Day, or Christmas.
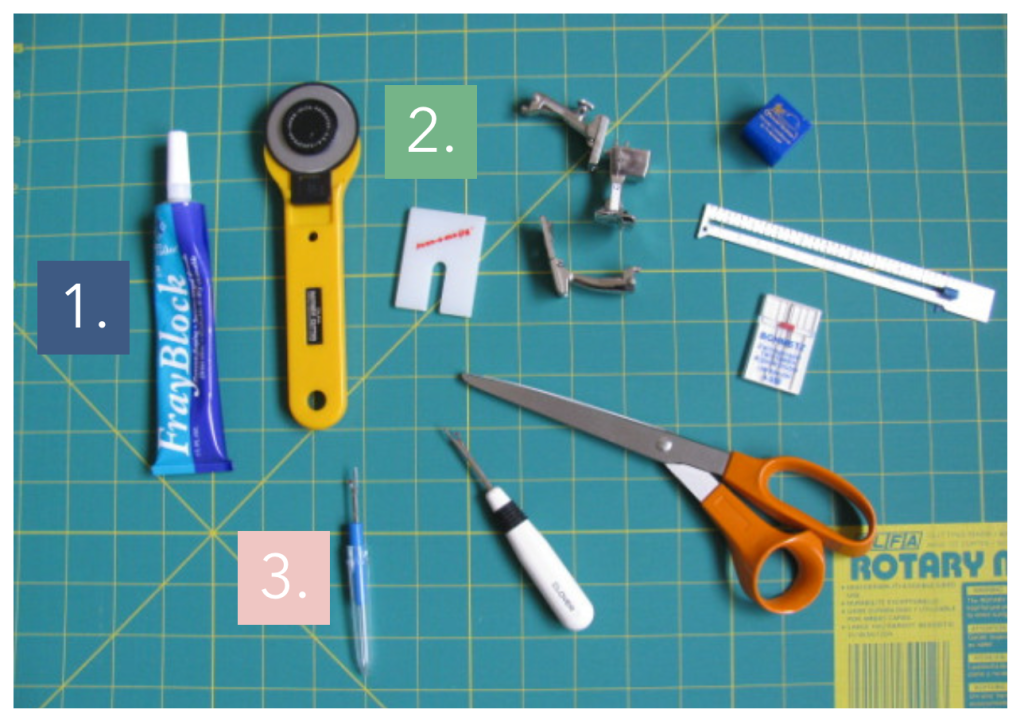
- FRAY BLOCK
Have you ever tried sewing on fabric that frays and ravels on you? There’s usually a big mess of tangled threads that get in your way. Many store bought garments pop out at the seams because the seam allowance was very narrow to begin with and the fabric started fraying.
So, let’s fix that. Learn more about Fray Block.
- JEAN-A-MA-JIG
If you are working on a denim project, you are going to want a jean-a-ma-jig. They are a small flat hard plastic gizmo that you use to help get over the big seam allowances that you find on jeans. Learn how to use one.
- SEAM RIPPERS
We all make mistakes and these help correct that human element in sewing. Seam rippers are made to be able to remove stitches without damaging the fabric you are working with. There are various types of seam rippers. Find the perfect one for your project.
- MAGNETIC PIN CUSHIONS
- LAST MINUTE GIFT IDEAS
- KEEPING YOUR NOTIONS HANDY
- MY SEWING ROOM
- ROTARY CUTTERS AND MATS
- MINI IRONS
- SEAM GAUGE
- BLIND STITCH HEM FOOT
- SERGERS…DO YOU NEED ONE?
- HOW TO THREAD A SERGER QUICKLY
- SEWING MACHINE NEEDLES, HOW TO CHOOSE THE RIGHT ONE
16. THREAD SHANKS
18. HOW TO THREAD A SERGER QUICKLY
Favorite books to accompany your learning…
Viewers, young and old! You need these books.
They are essential in learning how to sew. No sense trying to reinvent the wheel when the wheel rolls as good as these!
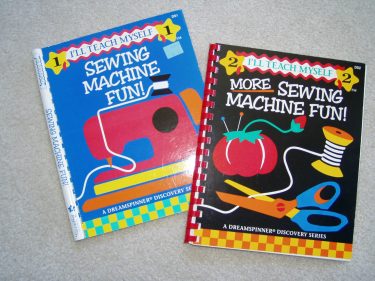
These books are amazing in teaching you how to sew. I used them to teach my girls starting at about age 8. But, even if you are an adult, just learning to sew, these are the books for you.
And don’t you want to know why?
First, the book teaches you about the basic parts of the sewing machine, so you’ll get to know your way around a machine…nothing difficult at all. But, I want to emphasize how important it is to know the parts of your sewing machine. I just spent some time with a beginner and she didn’t know the parts of the machine even though she had sewn in middle school. It was difficult to navigate the conversation because we needed to go back to the basics over and over and her time was short that day. So, do yourself a favor and memorize the parts of the machine and what they do. It will really give you confidence going forward.
Then, they get you started on practicing your stitches by “stitching” on lines without any thread in the needle….ingenious! Think about that. You don’t need to use any thread while you’re learning. You’re doing this exercise to maneuver the paper (but later you’ll be maneuvering fabric) under the presser foot, so this will give you the hand/eye coordination and the practice to become good at it before you actually sew on fabric!
I photocopied the practice pages from the book because if you “sew” in the book and/or make mistakes, there is nothing left to practice on because you used the pages in the book. Having several sheets gives you an opportunity to practice it well. Also, if you stop for a time and then come back to it, the book would already have been “sewn” in. And, The book is tricky to maneuver under the presser foot. Paper is much easier!
In addition, if you are teaching more than one person to sew, you can use one book for all your students!
You can also design your own sheets which would add to the level of difficulty or creativity. You can draw all sorts of lines, waves, circles, and shapes on computer paper to practice on.
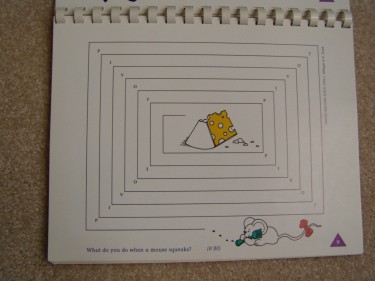
See? Doesn’t that look like alot more fun than the usual textbook sewing lessons?
Continuing on in the book, you’ll progress through several connect- the -dot exercises and word match games.
Then, before you know it, you are increasing your skill level! The book provides projects to learn and become proficient at the skills in a creative format (not just sewing two pieces of fabric together!) that results in a useful item for yourself, your child, or to give as a gift.
I’ve saved a few projects that my girls made when they were young. I think it will put a smile on their faces someday when they recognize the work they did, so save your own first projects and your kids as well!
The projects are perfect for kids and you can adapt them for adults as well. Use different fabrics and trims to make the look yours.
Book Two builds on Book One with more challenging projects and more fun!
Check them out for yourself here (Book One) and here (Book Two).
If your kids (or yourself) are more advanced but still needing some more projects, this book looks great for a little more advanced sewing:
Buy all three and start diving into the wonderful world of sewing and creating! And leave me a comment on my about page or on any post and let me know what you’re making these days!

Wow, Linda.
I just started teaching sewing to my homeschool group and we are using the Sewing Machine Fun #1. It’s challenging for me right now trying to coordinate everything with the kids.
Do you think I should be using my own sewing machine to teach them? Sometimes it gets kinda scary letting beginners use the machine.
Any suggestions?
Linda M.
Jacksonville, Florida
What a great thing you are doing teaching kids to sew and keeping the art alive! I would recommend that each child has their own machine so that you can all work on the items together, if possible. Perhaps you can put the word out to various groups, family memebers, neighbors and borrow as many as you need. Hope that helps. Keep us updated on your progress.
Our sewing class was great last week. We made the ornaments and the kids loved it because it gave them a sense of accomplishment along with a pretty neat gift. We even had one adult who was impressed that she was able to sew something cute. Hats off to Sewing Machine Fun #1.
Hey, that’s awesome! The timing with the ornaments couldn’t be better. What a great thing you are doing by teaching and making a big difference in the lives of those kids (and adult!)
Thanks for the book review – I’ll definitely purchase these!
Thank you so much for the time you have put in to this web site, it is a wonderful tool for learning!! I found you through your link on The Pioneer Woman’s site, one of my very favorite places to spend time.
I saw your tips for brides and bridesmaids and I wondered if I might add to your suggestions? I always try to bring what I call a ” bride’s emergency kit “. It is actually only one thing, but it has saved the day many times. It is a product most people have probably heard of called Dryel. It was created to allow you to freshen up your dry cleanable clothes in your own dryer, but it also contains an excellent stain remover.
It seems that inevitably just before the wedding, either the bride to be or one of her bridesmaids, spills something on their dress. When it happens, I take the bottle of stain remover and the absorbent pad and am able to remove most, if not nearly all, of the stain. You just slip the enclosed absorbent pad under the stained material and apply the stain remover sparingly to the spot, being careful to keep the liquid and pad away from their skin and yours. The pad absorbs any excess liquid and also provides a safe area to, using the top of the closed bottle, gently work the stain around until it disappears. The product really is amazing! And as Ree of ” Pioneer Woman” is fond of saying,”I’m not affiliated with this product and am not paid to endorse it. I could fall off the face of this earth and they’d never know it!”
Thanks again for the time and effort you so lovingly have given to guide my not so nimble fingers to sewing success!
P.S. Have the dress professionally cleaned after the wedding.
Hi Janet,
Thanks so much for your very helpful comment! Yes, I’ve heard of Dryel. My daughter uses it often and it’s in my laundry room as we speak, but I haven’t looked at it closely enough to notice the stain remover. Does that only come with certain packages? I appreciate your detailed info on how to clean the spot too and will put your info on the sidebar with the other info. Thank you!
Yes, isn’t Pioneer Woman a fun blog?
I’m glad this site has been helpful to you. I have enjoyed writing the posts.
Happy Sewing and thanks again!
Linda
I have been teaching kids classes with these books for 3 years! Actually my favorite ones are the “Best of…” There are 2. The first combines the best of books 1 and 2. The 2nd combines books 3 and 4. I make copies for the kids to sew on as well
Hi,
What level do you have to be at in sewing approx. before you can start doing alterations for money?
Thanks
Sarah
What level are you at right now? If you’re a beginner, I would say that you should be proficient at basic sewing techniques. Practice until you feel comfortable doing a certain alteration and your work is professional looking. If you’re not sure,ask a trusted friend or two to critique your work.