Once in awhile, you’ll buy a pair of pants that have a vent (or notch) in the hem like these:
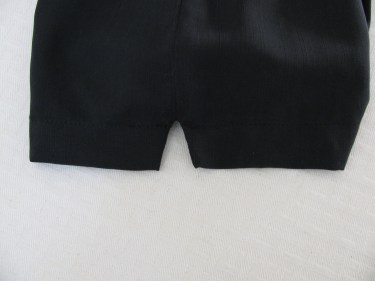
The vent is a slit that is located on the side seam of the pants at the hem.
You may want to hem those pants up, but you don’t know how to replicate that vent.
It looks intimidating, but hemming pants with a vent in them is not difficult.
Let me show you how.
The key to making a vent in the pants you bought, is to pay close attention to how it was done in the first place.
The hem I will show you today is the most common way they are done. I have seen a few other ways, but you’ll be able to figure it out once you understand this technique.
Ok, I am going to inspect the hem before I begin.
I look to see how it was sewn together. Once I begin taking it apart, I’ll make a mental note of each step because I am going to recreate each step in reverse order when putting it back together at the new hemline.
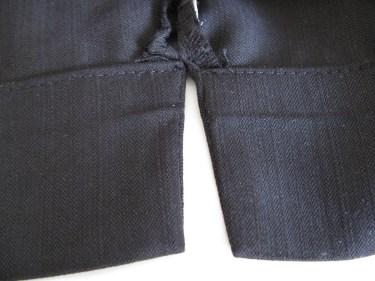
As you can see, these pants were machine top stitched. (Most hems with vents are not top stitched here. Most of them are stitched with a blind stitch hem foot.) When they are stitched with a blind stitch hem foot, it is difficult to see the stitches from the right side of the pants. We’ll cover that part later. Right now, just remember how the hem was sewn.
First, take out those stitches.
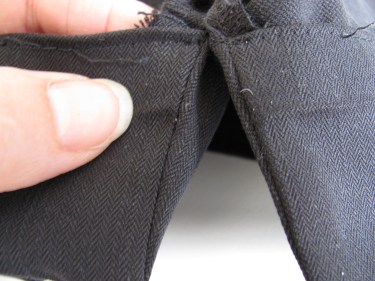
Next, take out those stitches that run along the vertical edge of the vent. To do so, turn the vent inside out. In the photo below, they are the stitches above my thumb on the left side.
They are also the stitches that are vertical on the right side of the vent below. You’ll be taking out stitches on both sides of the vent:

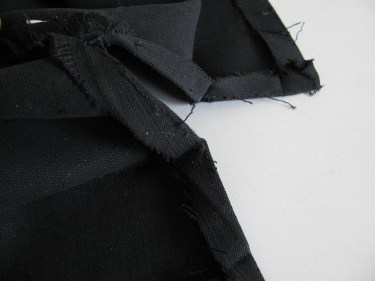
Once you rip out the stitches on both of the vents, spread the fabric out:
This customer wanted her hem to be 3/4″ higher than it was when she brought it to me.
So, I measured up 3/4″ from the original fold line and pressed a new fold line all the way around the hem:

Your hem may need to be taken up more than 3/4″. Just press up the hem by the amount you need.
Now, lay out all the material flat. Look from the left edge of the fabric over to the 2 1/2″ inch mark on the seam gauge. That is the total amount of the original hem. (We have added 3/4″ to that measurement, so the total now is 3 1/4″. )
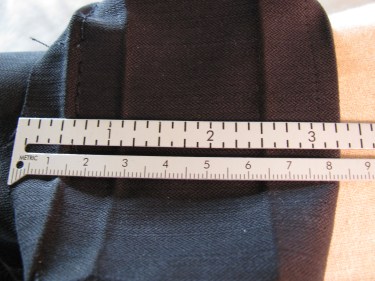
But, we want our new hem to measure 2 1/2″ again, the original depth of the hem, so that means we will cut off the extra 3/4″ from the cut edge.
***Usually, the amount you need to raise the hem is the amount you cut off of the cut edge of the hem.
Are you following me? Read that again if you’re not sure.
So, if you look at the photo, you’ll see that we are going to measure 2 1/2″ from the new hemline along the folded edge and cut off that extra 3/4″ from the cut edge:
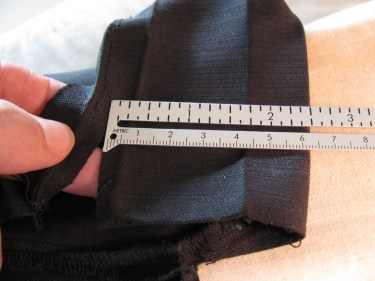
Here is the same thing below, but from a different view. I’ve unfolded the hem and you are looking at the wrong side of the fabric (below).
Cut off that extra hem amount as shown. Again, in this case it is 3/4″:

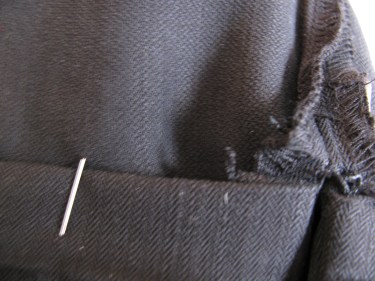
Now, using the new hemline that you pressed awhile ago, fold it back on itself so that the fabric is right sides together (see photo below). I stuck a pin in it to hold it together for now.
Do you see that I have turned up a small amount near the head of the pin? Turn that small amount up on the outside so you see the raw edge of the fabric.
You need to fold over a little for this vent because you don’t want a raw edge showing when you turn the hem right side out.
Do you see the original seamline that runs parallel to the pin, just to the left of the pin?

That is the seamline you are going to stitch on now.

Do this for both sides of the vent.
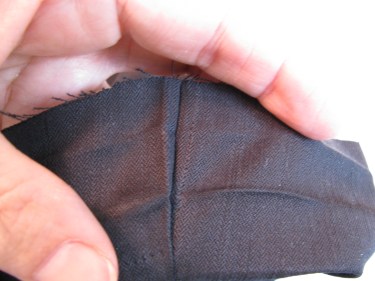
Now, when you turn the vents right side out, this is what they look like on the wrong side:

See how the top edge of the new hem is folded under instead of there being a raw edge?
Now look at the right side of the vents.
Meet the two folded edges of the vent together and see if they are the same length. The two points should be the same length as in the photo below:

If they are not, take out the stitches and refold them until they match and then resew them. Match them up again to make sure they match each other.
Once they match each other, press them so they lie flat.
Now to tackle the hem itself.
When I pinned this hem up, you can see that it doesn’t lie flat against the leg of the pants.
There’s more leg fabric than there is hem circumference. In other words, you are going to have a pucker or a bunch of puckers if you try and sew this hem now because the circumference of the leg is greater than the circumference of the lower edge of the pant.
That means I have some adjusting to do.
Remember the post, How to hem pants and skirts that are flared or tapered so that they don’t pucker?
Well, that’s what we have to do here. So, I’ll show you again.
On these pants, we need more material in the hem area so that it lies flat on the pants, right?
How do we get the extra fabric?
Well, let’s try increasing the hem circumference first.
To do that, turn the hem right side out again.
Sew from the hem fold out to the edge. Do you see the tip of the screw driver pointing to the diagonal seam I just made? Look just above the tip of the screwdriver:

Once you’ve added that little diagonal seam, rip out the original stitches that run vertically. (The ones that lie under the tip of the screwdriver.) Only take out the stitches from the horizontal fold line for the hem to the cut edge.
If you turn the pants over, you’ll see how letting out that old seam gives you a little extra fabric:
From the wrong side of the fabric, press that area flat.
Now, for this pair of pants, I just needed to turn the edge under and topstitch it.
When I took out the original hem, it left holes where the original stitches were. So, I am going to stitch over that original hem again so that you won’t be able to tell that I put a new hem in. (see photo below).

If your hem was not topstitched, you’ll want to hem it the way it was done originally. You may want to use a blindstitch hem or sew your hem by hand.
This is how mine looked when I finished:

Here’s a side view:

Remember to always press from the wrong side of the fabric or use a press cloth on the right side so as to protect the fabric from getting a “shine” from the iron.
Vents in slacks are too cute to just cut off.
Putting in new vents are worth the extra steps.
Give it a try!

What a brilliant website you have here – it is so helpful!
Having been sewing for many years and altering/ repairing clothes for family and friends for free, I recently decided to go into it professionally and am now taking in work from my local dry cleaners, which at first was daunting but I am now gaining in confidence in my abilities and know that if i come across something a bit tricky then it’s bound to be on sew for dough!
Sewing is something I love and it fits in so well with my young family (I can replace zips and take up hems whilst my 6 month old naps!). I have found your advice and tips invaluable – especially your gadget suggestions! What a great excuse to go shopping for all those lovely bits I’ve just got to have!!!
Keep up the fantastic work – I haven’t found anything like this on the internet – a big thank you!
So glad you like the website! Gaining confidence in your abilities is so important because the more you sew, the more confident you become.
I’m so glad to hear you love sewing and that it’s something you can do while you have little ones at home. I found that when my girls were teens, and they really wanted to talk, I was able to be very flexible and work around them. They don’t always want to talk and I wanted to be there when they did. Enjoy those little ones and your sewing!
thank you! this is exactly what i needed!
Yay! Thanks for letting me know!
What timely advice! I have 2 pairs of tapered, vented pants to hem for a customer. And felt a little like…ok, let me figure this out. Your instructions are clear and easy to follow. THANKS A MILLION! for making my life a little easier.😊
Oh, I’m so glad this helped you and you were able to follow these instructions! Win-Win!! Thank you for letting me know.
I am so thankful for your info on sewing pants with a vent. I have CML leukemia and thankful for my quality of life even though I have to take chemo every 12 hours – my husband is not well and I decided to take up alterations to try to help make ends meet with having to purchase a liftchair and other medical expenses, Thank you for your easy step to step instructions and photos – I wonder now how much I should charge for this alterations work. Could you give me some insight into that. appreciate your feed back. and thank you again for sharing your knowledge.