You may have a serger or overlock machine that doesn’t have automatic threading capability.
I don’t either.
But I’ve found a way that makes a nice shortcut, so I wanted to show you how to thread a serger quickly.
Until I learned this threading shortcut myself, it took so long for me to thread a serger and it became frustrating.
This makes it so easy.
I have a 3/4 thread serger, but you can adapt this technique to however many cones of thread your serger has. On my serger, two threads are threaded through the 2 needles and two threads make up the loopers. The loopers are hidden inside the machine and you can see them if you open up the bottom portion of your serger or overlocker. The thread from the loopers make the loops on the fabric that connect with the straight running stitches from the needles.
So, to change the thread to a different color, have your serger (overlocker) threaded already. (If it is not, be sure to read your manual and thread it correctly, the way your manual indicates.) Each machine is threaded differently and most have a color diagram to follow. I open the bottom cover of my machine and the diagram is located on the lower right side.

I was having trouble threading my machine so that it would serge a nice seam correctly. So, I tried threading the threads in a different order. With my machine, I have to thread the looper that is on the far right first.
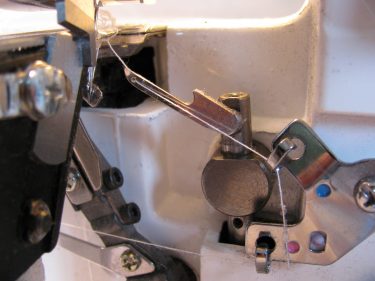
Then, I thread the one that is second from the far right.

My manual didn’t tell me this important information. So, if you’re having trouble threading your machine, my suggestion is to keep trying different sequences until it works and then write down what you did so you can repeat it next time.
As a side note, I recommend using one of these long handled pair of tweezers to help you thread your machine. They are like 6″ long, not the kind you use on your eyebrows!
Most , if not all, sergers and overlockers come with them. They are great at helping you reach into tiny places to thread the needles or the loopers.

Now let’s look at how to thread the serger quickly. (There is no shortcut to threading the serger for the first time, but after that, this technique will save you alot of time threading it in the future).
I also use the tweezers to thread the needles.
First, let’s focus on threading the loopers.
As you can see, my serger has black thread in it and I am going to change all the thread cones to a cream color.
First of all, cut the last two threads (the looper threads), which are on the far right of the machine. Do not cut them close to the tension dials. Cut them about 6-8 inches up from the tension dials or cut close to the cones of thread if your prefer.)
(My sewing machine is behind my serger in the last photo, so I hope that doesn’t throw you off.)
Next, cut the thread that comes out of the two needles. Cut it just under the needles:

In the above photo, do you see the thread tail (or thread chain) coming out of the needle area and headed to the back left side of the machine? Don’t do anything to it, just make a mental note of that because we will talk about that in the next few steps.
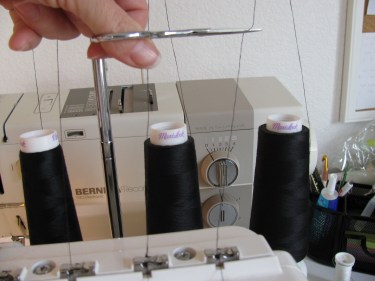
Now, take off those 4 cones of thread and replace them with 4 cones of the color you plan to use.
Thread all four threads through the telescopic thread stand first.

Remember the two black threads that you cut 6-8 inches above the tension dials?
You are going to take each one and tie it to the corresponding new thread cone with at least three knots. Make sure you tie at least three knots because you want the threads to stay together for the next step. Tie them tight using square knots.
Do you see the old black thread being tied to the new cream one? Do this for both of those black threads:

Next, set the two far right tension dials to zero.

Gently, pull the old black thread chain (remember in the photo above where I talked about the thread chain?) until you see the new cream thread coming out of the serger. To clarify this, you are going to pull the thread chain that comes out of the serger near the needle area. As you pull these black threads, the new cream threads are getting threaded through your machine so that you don’t have to do it manually. The knots that you tied should stay tied all the way through and you shouldn’t have any snags. If you do encounter a snag, check to make sure that your tension dials are set at zero and your needle threads have been cut.
You can see the spot where the black threads are knotted to the cream:

Sorry, that’s not the best picture, but hopefully, you can see that the black thread is to the left and the new cream thread is on the right.
*Be sure to set the tension dials back to the desired numbers for stitching.
Now, thread the two needles, following the diagram, with the corresponding threads.
You can’t tie the new colored threads onto the old threads when it comes to the needles because the knots won’t fit through the eyes of the needles. But, the needles are easy to thread.
You are ready to serge.
Wasn’t that easy?

You can actually thread your serger all the way through the needles, if you tie the two needle threads as square knots and very slowly sew and gently pulling the serged thread until all the colors have changed to your new color. Once in a while the needle threads will break if the knot is not tight enough or you are trying to sew too quickly.
I have tried to thread my needles that way, but the square knot doesn’t fit through the eye of my needles, so that’s why I thread the long way with just the needles.
I hope readers will try your way because it will save them more time and it sounds like every machine is different. Thank you for the tip!
fat loss factor program reviews
Hi would you mind letting me know which hosting company you’re utilizing? I’ve loaded your blog
in 3 different internet browsers and I must say this blog loads a lot
faster then most. Can you suggest a good hosting provider
at a reasonable price? Thanks a lot, I appreciate it!
I use GoDaddy
I like it whenever people come together and share thoughts.
Great website, keep it up!
Thanks so much for the feedback, Jerome. I’m so glad you wrote in and let me know it has helped you and others comments help too!
Linda
Wow that was strange. I just wrote an extremely long comment but after I
clicked submit my comment didn’t show up. Grrrr… well I’m not writing all that over again.
Regardless, just wanted to say superb blog!
I’m sorry that happened
To you. Comments don’t go directly on any more because I’ve been getting so much spam lately. Thank you for your nice comments. I really appreciate them!
Nice post. I learn something new and challenging on blogs I stumbleupon every day.
It will always be exciting to read through content from other writers and
use a little something from other websites.
Used your instructions to re-thread my serger. Perfection! Thank you so much!