
Update: October 19, 2020
Do you know what a gusset is?
It’s an inverted triangular (or diamond shaped) piece of fabric inserted into a garment to make it fit more comfortably.
If you’d like to put gussets in pants or a top that has sleeves, look at this post on How To Put Gussets in Pants or Shirts.
This post will cover how to put gussets in an area where two seams intersect. These triangular gussets are usually found in a strapless dress or a dress or top that has straps, but no sleeves.
When adding gussets to a strapless dress or top, you will usually have two gussets….one in each side seam, even if you have a zipper on the side.
You know you need a gusset, when you are zipping up a dress or skirt and it won’t zip up all the way.
(There are other instances where they are needed, but we’ll focus on this problem for now.)
If your dress is really tight and you can’t zip it up over the bust, I’ve written a post that teaches you how to put a corset back in your dress , but not every dress needs a corset back.
If you need to enlarge a bridesmaids dress, for example, by a few inches and you want all the dresses to look the same from the back, you’ll want to put in gussets instead of a corset back.
I have had a few e-mails asking how to enlarge a garment that’s too small.
And I get several customers each year that need this alteration as well.
In August, my daughter came back home for the weekend to be a bridesmaid in a friend’s wedding and the bodice of her dress was too tight to zip up.
She ordered it in the same size as the one she tried on in the bridal store, but the one that came in didn’t fit the same as the one she tried on. And of course, there wasn’t time to get another dress.
Unfortunately, this is a common problem.
So, with about two hours to spare, I knew what it needed.
You guessed it: gussets.
This long thin pie-shaped insert is a gusset:
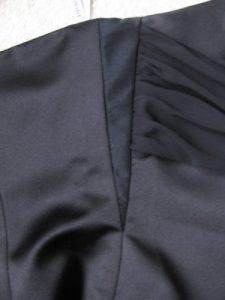
Just so you know, the gathered fabric to the right of the gusset is a tie that was sewn into the dress and it tied around the waist.
Here’s what it looks like with the ties pulled away from the bodice:

Chances are, your garment won’t have ties like this, but if it does, you don’t have to take them out.
Just ignore them and forget they are there.
Unfortunately, I forgot to take pictures of the gusset-making process when I added these to her dress, because I was in a hurry to get them done before the wedding.
So, today I’ll show you how to make these gussets using mostly diagrams.
Read all of the instructions before you begin so you are familiar with the process.
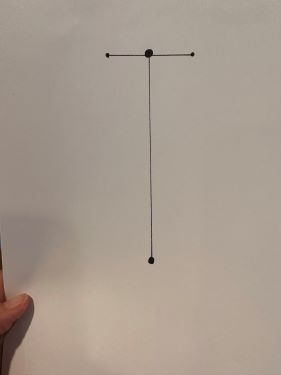
Here is a diagram of the back of a dress and what this dilemma looks like. The 2 black vertical lines toward the top of the diagram are the spaghetti straps:

To do this alteration, you’ll need to take two measurements.
The dash lines below show what measurements you’ll need to take:

Let’s say that the opening across the top is 4″ and the measurement down the side of the zipper to the zipper pull is 5″.
Jot your measurements down.
Grab a piece of computer paper (or something of similar size.)
Make a big dot at the top middle of the paper (shown in the diagram below).
This mark will symbolize the center back of the dress. (Notice, we are using the gap in the middle back of the dress to figure out what size gussets will be sewn in the sides of the dress.)
Take the top measurement (in this case, it was 4″) and divide that number in half.
You’ll be making two gussets: one for each side seam of the dress, so that is why you divide the number in half.
In this case that means 2″.
You are basically going to add 2 total inches to the left side of your dress and 2 total inches to the right side. (Adding them up equals the 4″ total that you need to make the dress fit.)
Now we are going to make one of the gussets first.
Measure out to the left of that main dot one inch and make a second dot. Now, measure out one inch to the right of that first dot and draw another dot, just like in the photo below.
Then, measure down 5″ from the first dot (or whatever your second measurement is) and make another dot.
Connect the dots with a ruler like this:
As you can see, the measurement that is horizontal, represents half the opening you have in your dress along the top (because this is only one of the two gussets.)
The vertical line represents the opening you have from the top of the dress down to the zipper.
Make sense so far?
Ok, now draw a line from the outer dots to the bottom dot like this:

This represents your gusset without seam allowances.
Now, we’ll add the seam allowances.
I add a half inch to the sides and bottom of this triangle, like this:

****Whether you have lining in your garment, or not, you’ll need to place the top edge of this triangle on the fold of the fabric scrap you have chosen to make your gusset out of.
Otherwise, if you didn’t place it on the fold, you’d have a raw edge at the top. (Sometimes, when the garment has a seam in the armhole, then I’ll add a seam allowance to the top edge and cut two pieces out and seam them at the top edge before inserting the gusset into the garment.)
But I try to avoid that step if at all possible. Most people can’t see the top of this gusset anyway.
If I don’t have to add the seam allowance at the top edge, I’ll cut this triangle out like this:

Again, to me it’s much easier to have a fold at the top edge of the gusset I make.
This means you need to pay attention to how much fabric you need to make the gusset out of.
I try to match the gusset fabric to the main fabric of the garment as best I can, from the scraps I have around the house.
Many times my customers think that if I take a few inches off the hem of the dress, I’ll have enough to work with, but many times I don’t. Most of the time, that hem scrap is curved and I don’t get a full triangle piece when I place that pattern on the fold of the scrap.
You may have to go and buy a small piece of fabric (a quarter yard is usually plenty) that matches.
Once you do that, place the top edge of the pattern you just cut out of paper on the folded edge of the fabric and cut it out along the lines.
Press the top edge of the gusset piece with an iron to set that fold.
Many times, I’ll iron on interfacing on the inside of the back piece of that triangle. (If you do use interfacing, you can make it the size of the interior of the pie piece without seam allowances if it is iron on interfacing. If it is sew in interfacing, use the entire gusset pattern to make the pie piece and then stitch it onto the gusset piece before proceeding.)
The interfacing will add some stiffness and body to the gusset piece. I don’t iron on interfacing to the front of the triangle piece because many times it gives it a very stiff look or a bubbly look, instead of the soft satin look. Adding interfacing to the back should be enough added support for the gusset.
Now, mark the seam allowances on the gusset pieces.
Mark those dots on the gusset piece too (except you don’t need to mark that center back dot.)
Now, set aside the gusset pieces and pick up your garment.
Looking at the garment where the side seam meets the underarm, you may have understitching there.
See the horizontal stitches in the photo below?

I’ll take out twice as many as I think I need to work in that area.
Take apart the side seam.
You may have boning in there.
Remove it and mark which way the boning came out. You don’t want to get it in backwards or upside down when you put it back in.
Then, take out the side seam stitches, only and exactly to the 5 inch mark (or whatever your measurement was…no more!)
Lay the gusset (right sides together) to the right side of the dress, matching the seam allowance line of the gusset to the stitching line of the dress.
Match the top dots to the top edge of the dress.
Match the bottom dot to the 5 inch mark, right at the point where you stopped when you took out the side seam.
You’re only matching and sewing the front edge of the gusset right now. (However, if your garment does not have lining, you can match the entire folded gusset to the seam allowances now.)
Using the original seamline as your guide, stitch along one side of the gusset, starting at the fold area and sewing down to the 5″ spot.
Backstitch and cut your threads.
Now, stitch along the other edge of the gusset from the top fold down to the 5″ spot again.
Check to make sure you don’t have any bumps or haven’t caught any stray fabric in that seam.
If you have done that, rip it out and restitch it.
If you don’t restitch it, it won’t lay flat on the outside of the dress.
Next, pin the other end of the gusset to the lining, matching it in the same way you did the original end.
Stitch. Then, double check your stitching again.
If you need to put boning back into the dress, add it to the side of the gusset that is closest to the back of your dress.
You can stitch through the boning (if it’s not the heavy plastic kind.)
If it is the heavy plastic kind, you can make a casing in the side seams by stitching the outer edge of the gusset and that back side seam.
Then, slide that boning right down into that casing.
Then, I push the seam allowance to the back and tack that casing to the lining, if necessary, so it doesn’t move.
The gusset should look and lay flat.
You shouldn’t need to iron it at all.
I like that, because many bridal or formalwear garments are made of un-iron-able (is that a word?!) fabrics.
Now, sew the other gusset into the other side seam of your garment.
If you measured correctly, this dress will be perfect!
So, here is the photo of it again:

If the top edge of your gusset looks a little wavy, don’t be alarmed.
When you, or your customer, or family member puts it on, that waviness will disappear.
Most likely it’s wavy because it is a fitted garment and it’s not on the person yet.
Now, have them try it on and you’ll be the new hero because they can zip it up!
It looks great, and they can now breathe easy and so can you!

I used a similar method on a dress that fit everywhere except the waist (sucks to be a ‘rectangle’ shape). The gusset was diamond shaped, with the widest part (horizontally) at the waistline and one point towards the underarm and the other towards the hemline.
Yes, I forgot about diamond shaped gussets. Thank you!
I would never have thought using gussets for this purpose. I’ve used them in underarms and in jeans crotches (for bikers). I love this! I can remember at least two dresses I’ve turned away because I hadn’t thought of this. Thanks!
I haven’t used them on jeans or slacks, so that’s another great application. Thank you!
GREAT blog on gussets! They are the best kept secret/magic trick in the sewing world. I have used them for costuming to enlarge items and after the show I can take it out and return to the original size! Sometimes it is a very hard thing to explain, but you really did such a GREAT job!
Thank you, thank you!!!
I think you made a great point, that I didn’t think of…you can put the garment back to its original size again, if needed. Thank you for your sweet comments!
I agree…I read both posts for gussets and corsets. Your explanations and pictures are awesome. I will be altering three dresses with corsets for my wedding in October. I was sent the wrong size bridesmaid dresses and they are not returnable. Your instructions are a lifesaver! Thank you for taking your time to do this for us!
Thank you so much for your kind comments. It confirms the idea God put on my mind 7 years ago to help people learn how to do alterations. I’m so glad these posts were helpful to you. Thank you for letting me know. Have a wonderful wedding!
Sewing over and over again in the crotch of a pair of men’s suit pants has left a ton of stitches going every which way and it is very unsightly. Could I cut out the over-stitched fabric an replace with a gussett more or less to “replace” the fabric and sort of “start all over again”? Thanks…
Yes, you sure could. In the crotch area, as you probably already know, you’ll need to make it a diamond shape, instead of a triangle. Don’t forget to add enough seam allowance to that diamond! (That is usually the part I forget and then I have to start all over again.)
how could i adapt this to when making a corset that doesnt fit in the bust area
I did a diamond gusset on a long sleeved wedding gown that was a perfect fit except that the poor bride could not raise her arms because the armholes were too tight! She needed 4″ added at the armhole.
In this case, the gusset point started near the waist and extended into the sleeve nearly to the elbow. Had to take the sleeves mostly out then inserted sheer covered solid gussets in the bodice and sheer gussets in the sleeves. Then reinstalled the sleeves. Fortunately, there was enough fabric in the hem to do all this.
the traditional belt closing on a winter jacket will not stay buckled. The little “stick” will not stay in the gromets. Replace buckle ?? or could I find a plastic locking type for a 2 – 3 ” belt?
could you sew the buckle “in place” and put some large press studs on the back in the appropriate spot. That way you get the look of the original buckle fastening but without the headache of it coming undone all the time.
I recently had a situation like this. Upon closer examination, the “loop” end that fastened to the buckle was very loose, causing it to wiggle around on the bar of the buckle and come out of the grommet. I squeezed the loop tighter with a pliers, thus eliminating the problem.
What was the loop made of?
The entire buckle was made of metal. The loop I am speaking of is on the end of the prong, where it wraps around the frame. I just looked up the proper names for parts of a belt buckle so I could use more clear language 🙂
Thanks, Pearl, just hadn’t seen a buckle associated with a gusset before. Would love a photo if you have one. Thanks!
I was just replying to the post from sewlace@avvanta.com about a buckle. It didn’t look like it belonged with gussets, but I didn’t know where else to share the information, which I thought could be helpful.
I did something on a grander scale for a vintage evening dress that was perfect apart from being two sizes too small for me! I put panels of toning bridal satin/matte on alternate sides fabric (I can never remember the name of it) all the way down the dress and used the surplus to renew the decorative facing round the top so it all toned. A new evening dress for a bit of time and total cost of less than £20!
That sounds like a successful and beautiful dress! Thank you for sharing your expertise here!
Linda
I need such easy directions for inserting an underarm gusset – this one was easy, underarms not easy. Any chance of getting another article on inserting underarm gussets?
thank you! saved my daughter’s halloween costume! 🙂
I have a dress that has the zipper on the side. Can I still use the gussets with a zipper there? How would I do that? Thanks in advance!
I would only alter on the non-zipper side, personally, following the wonderful directions above. Check the hem for spare fabric or go for a ‘best match’ to tone in with the existing fabric.
Thank you! It is so helpful to have such detailed tutorial!
Yes, you can. I f you look at the diagram I drew on that post, you can see that a gusset would fit in right next to the zipper. Just treat the zipper as if it were the side seam. Does that make sense? Your gusset will be right next to the zipper.
Hope that helps, Linda
On Wed, Feb 27, 2013 at 4:53 PM, Sew for dough
Thank you! Now You mentioned it, I realize the zipper didn’t need to be in the center. Somehow I just had the idea that everything need to be symmetrical and I was even thinking that I need to split the zipper side of the gusset in 1/2 and put the zipper down the middle.
Thanks you again for the wonderful tutorial! It makes my day knowing I can wear my dress after all.
I need to add space in the hip area of a long evening dress. Would you suggest a corset back, a gusset, or something totally different? From looking at your tutorials it seems that both the corset and the gusset work best when the bust is too small, but I have the opposite problem.
I thought about adding a long, narrow diamond – shaped insert at each side seam, but I don’t know if I will need to cut the original dress and, if so, how! I’ve also thought of inserting fabric all the way down, like Lizzychimp mentioned in her post, but don’t really need the extra width above or below the hips. Any suggestions or guidance? (I’m not a professional seamstress!)
Thank you.
Pat
Pat, you are right on target! Don’t do the corset as those are generally for above the waist problems. The long narrow diamond shape gusset is the answer! DON’T cut the dress at all! Just open up the side seams and use the original seam lines as guides when you sew the gussets in. I do have a post on how to put gussets in. Just type in “gussets” in the search box on my website. I’m sorry I am not able to send you the direct link right now. Let me know if you have trouble finding it. Don’t worry, you don’t have to be a professional seamstress to put gussets in!
Thanks! Linda
Thank you, Linda. I have inset the gussets and it worked great!
Pat
Oh, that’s great to hear, Pat! Thanks for the update. I knew you’d have no trouble at all with them.
Do you use the same gusset method for a sleeveless dress? (Inserting the gusset under the armhole). Or is there an adjustment that must be made in the shoulders?
No, you shouldn’t have to do anything with the shoulder unless there is a fitting problem in the shoulder.
My daughter bought a wedding dress last year… Decided to get married this just but there’s one problem …. She will will be 8 months pregnant … She wants a corset but never did one… Should I leave the sides out or do you have a better idea for me?
Could you explain what you mean by leaving the sides out? Thank you, Linda
You are a lifesaver! I live in Egypt and have started to make a lot of my own clothes by hand, like I learned in the convent in Ireland when I was 8 years old! The women here keep breaking my sewing machine I decided to hand sew instead. I have a few arongs I bought in Spain about 15 years ago and decided to turn them into light tops, (it gets pretty hot here!) but I keep misjudging my bust width. A case of denial probably! (They can’t have fropped THAT much. I’m only 51!).So I had to undo seams to enlarge them. Spent the whole day sewing and trying to reinvent the wheel and then found your blog!!! Even the comments were great. Gussets and diamond gussets. Just what I needed. Thank you so much!
Oh, I’m so happy to hear that it helped you all the way in Egypt! I am amazed at how many people log in from all over the world each day, even from countries I have never heard of. If you can’t find a post, type the topic into the search bar on any page and hopefully you’ll find most anything you need.
Happy sewing!
Hope you are still checking this page. I’ve copied a famous brand name of yoga pants to make as a present for my neighbour’s daughter who is over 6 ft tall and wears a size 4T but they are still too short (gorgeous legs that go on forever!). I’ve given the original pants back after I made my pattern but I can’t for the life of me figure out how to insert this diamond shaped gusset. Help!
Hi Starr,
I don’t have time to write a post on it, but if you open up the seams at the intersection of the crotch area, you’ll have four “surfaces” on which to pin this diamond shape gusset to. Pin each side of the gusset to each section of that opened up crotch area and you’ll have it. I won’t be able to spell it out for you until Monday, so if it is still confusing to you, write me back and I’ll write it out on Monday (hopefully, or Tuesday for sure!)
Linda
Oh, many thanks! I’ve been trying to attach the gusset to one inside leg before I sewed the leg seams and of course I have no notches and it’s very confusing as to placement. What you’ve said makes sense so I’m going to try that now. Why do I always make things so complicated???
I’ve tried to put a picture of my finished gusset on here but I don’t seem to be able to do that. I did, however, finish the gusset and although it’s not perfect, it’s functional and not bad for my first attempt. I thought I couldn’t do it until I put the crotch of the pants over my pressing ham to help support it as I pinned the stretchy fabric to the stretchy skinny legs. Thank you for your help!
A huge thank you for this easy to understand tutorial. My friend is getting married in three months. She gave me a dress for the occasion that she had decided against. Gutted it was too tight up top and there I find your fabulous tutorial. I shall go to the ball in a stunning dress. Thank you so much xx
Oh, this is great news! Thank you for leaving a comment an letting me know.
Excellent website and clearly written for even amateurs like me. I wanted to ask if a gusset would be possible to add to a bridesmaid dress that will not fit the bridesmaid as she will be 6 months pregnant on the wedding day. Thank you
A gusset is one way of adding room to a garment, so if a gusset makes sense in the spot you need it, then, yes, it is possible. Have you read my post on putting in gussets?
Hi! Thank you for the post. Pretty simple to follow for someone that is just learning about gussets. I just bought a dress online without trying on first, uh oh, and now think I will have to make some alterations if I want to wear it. It is a strapless, empire waist dress that has elastic around the top part of the dress to make the strapless stay up. I am finding it tight in the bust but also where the seam is placed to create the empire waist. I would like to add gussets to make the tight fitting top a little less constricting. How would the elastic effect putting in the gussets for added room? I am actually thinking of taking the elastic out all together and either replacing it with a thicker elastic (as I feel the tiny elastic makes me bulge over the top of the dress) or just making the top fit correctly with the gussets, taking out the need for an elastic anyways. As a newer sewer, do you think adding gussets would help and what do you think about my elastic situation? I am adding a link to the dress but if this is against your blogs policy I apologize and will remove it. http://www.modcloth.com/shop/dresses/along-the-road-home-dress. The picture might help to show you what I am working with. Thanks!!
Cute dress!!! Yes, take out the elastic first and see if you can out in a larger piece of elastic that isn’t so tight. That is an easier fix. If that won’t work, then put the gussets in without elastic. Hope that helps!
I have a dress that I need to expand from the top to the hips, should I make a big long gusset, or put one at the top and one by my hips?
Also, would it be easier to just add a panel to each side of the zipper since I need it to go down so far?
I think one long gusset should be fine. If you already have a zipper in the back or side of the dress, you shouldn’t need an additional one.
Thank you for responding so quickly, I have very little time to finish!
Thankyou so much for posting this up, I was thinking the only way I’d be able to ever fit in my dress would be to have the back cut out and use some stretch jersey but you made me have at the side seams to try and work out some gussets and much to my delight there was just enough excess side seam so got away with having to do none! Your easy to understand instructions through gave me the confidence to try and do it myself (rather than rely on a dressmaker) and to even hand stitch it, so pleased with the result. 🙂
Thank you, Katie, for letting me know how this helped you. I’m glad it turned out so well. I love these kind of comments because your success builds confidence in your work and that’s what I’m striving to teach, along with the techniques.
so very happy I found your blog. I am new to the alterations business (but have been sewing since I was a girl) and my first customer needed a dress made bigger. Internet search here I came. I remembered my mother doing this but could not remember the name. Bless You for coming to my rescue. My customer was so pleased.
Thanks for letting me know, Vicki. Glad my blog has helped you and your customer!
I have a sleeveless dress that is too tight from the underarm to just past my hips. Is it ridiculous to add a 3″ piece of matching fabric to the entire length of each side with the triangle bottom at the bottom of the addition?
It is not ridiculous if you don’t mind what it looks like. But you are correct in your thinking, because that is what you’ll need to do. I’m not sure about the 3″ measurement. You’ll be the best judge of that, but your thinking is spot on!
Thank you for such a detailed explanation! I have yet to do this, but now I have a need. I have to alter my own bridesmaid’s dress that fits really well everywhere except the bust. This is exactly what I had in mind, but wasn’t quite sure where to start, thanks to you, I’m looking forward to giving this a try.
hi, i bought this dress online and the waist is too tight, i feel i need about 1/2-3/4 for it to be comfortable, it zips up but its a bit tight, do u think if i rip the lining inside it will have extra for the dress to be let out.
http://www.promgirl.com/shop/dresses/viewitem-PD1301611
I don’t know what your seam allowances are like, but try taking out as much as you can on the seam allowances before you tackle the lining.
i have a dress, that has a layer of lace over the top of it – going to be impossible to find matching lace – i need about 2 inches bigger from the waist to the bust (maybe a little less). there is no extra fabric in the dress. any suggestions? i think i could find some material for the underneath fabric, but the lace won’t be matchable. dress has a side zipper and a slit in the front thigh. the lining material is a little stretchy and i think the lace overlay is too (it also has sequins on the lace), but not enough to zip it completely. it is the most beautiful thing i ever saw – i cried when i tried it on the first time – because i looked amazing! but then it wouldn’t zip and my tears of joy turned to tears of sadness. the dress is out of stock and i can’t get the next size up. i’m a size 2 in regular clothes. any help would be appreciated
Hi there, thank you for posting these instructions! I know this is an old post but I’ve got a bridesmaid dress emergency and am stuck with a dress that won’t zip up and the wedding is next week 😦 so really hoping to fix this myself!
I’m a newbie at sewing so please forgive me – but how do I add a gusset to the lining? I understand your instructions up to “Next, pin the other end of the gusset to the lining, matching it in the same way you did the original end.” What did you mean by “the other end”? Once the gusset is stitched into the outside of the dress what ends do I have left? Do I need to create 4 gussets – 2 for the 2 outer fabric and 2 for the lining?
Please help!! Thanks!
EMERGENCY HELP needed!! The gown I’m trying to enlarge (add zipping room to) won’t zip past the lower back. Will gussets fix this problem and if so, do I need to make them longer? I think if I can get a total of 2 inches, the dress will zip but it stops so low that I wasn’t sure if adding gussets is the right solution. PLEASE REPLY thank you in advance.
Hi Christy,
It depends on the dress and how it would look to add gussets. I don’t know what your sewing experience is, but you might also consider this post:
https://sewfordough.wordpress.com/2010/02/02/adding-a-corset-back-to-your-wedding-dress/
I hope that helps!
Linda
Getting ready to add gussets to a bridesmaid dress with a zipper in the side wish me luck. Will show results.
Hi Linda,
Have you ever made jeans larger by adding a gusset? I added two side gussets to two different pair of jeans with not so great results. The gussets don’t lay flat on the body and pants dip in the back. Someone suggested adding the gusset to the center-back. Do you think that might work better?
No, I’ve never tried that before. I’m not sure why the gussets didn’t lay flat and the pants dipped in back. Maybe you could send me a picture of what you tried. I’m not sure if the gusset in the center back would work better. What was wrong with the slacks in the first place?
If I have to let out a pair of pants, I see where the best part is to let out, I could see doing a gusset on the back rather than the sides if there isn’t enough fabric. Most men’s formal or office wear trousers have some spare fabric but jeans don’t have much. I open out the back waist/seat seam and see what I have to work with, then look what I can put in. I look forward in the meantime to see your photos.
Glad my explanation was helpful!
I am actually kind of short (5’7″) so I’m not sure if long-waisted is the issue… I first thought that my style had shifted away from lower rise jeans (suggesting that I feel less comfortable in a lower rise today than I did then) but I’m not sure this is the case– I had begun to shift to higher rises by the time I purchased these (~5 yrs ago). If these pants are a few sizes smaller than I would buy today, they also probably have a shorter rise than jeans of a larger size. Perhaps I need to adjust the rise with the diamond gusset you suggested. I’ve been wearing the AG pair today (with the two side gussets) and keep feeling the back sink, which feels super annoying! The waistband doesn’t lay flat on my body — maybe the center-back gusset would have been a better choice for this particular pair.
I can see that the more I practice at this, the better I will get. I appreciate the encouragement and guidance! I am unbelievable determined to get this right! I feel like once I do this successfully, I can replicate it for multiple pairs going forward. How great would that be!
After using the gusset method detailed in your blog post, it has been a privilege being able to talk with you about different ways to utilize it. Did I mention that I drafted the pattern like you did in the photos? I took a month long sewing class and my instructor was so impressed. I am so grateful! She said it was an ambitious project too.
I’m hoping you can buy a larger size pant next time, so that if you need to alter them, you would take them in at the waist, not have to add gussets to them (because this is such a time consuming alteration.) 🙂
Thank you Linda and Elizabeth for the response! I will expand.. So let me first start off by saying that I’ve been working on two pairs of jeans which I will refer to as AG and Topshop (the brand names). The problem that I have is that they no longer zip up / button up nor do the waistbands close. I’m not exactly sure why this is — if it is a matter of weight gain or preference change (i prioritize breathing now, lol!) but I was hoping to be able to add fabric so they will fit me as I am right now. Here are some pictures I uploaded to my google drive, in case you prefer the visual over my written explanation to follow or want to see later on: https://drive.google.com/open?id=0B_vT9mUmgoiZQmg4WDJtUFQ3eTQ
I’ve done some investigating.. Looking at my work more closely I believe the issue of laying flat was caused by a mistake I made. There is an extra seam in the waistband next to the gusset on the AG pants (Topshop ones too, but that is another topic) because I didn’t cut inline with the side seam, so I added additional fabric so the seams would match up. I’m now wondering if it would have mattered and if this was the right thing to do. I am now realizing that the the AG were fine in the respect to the dipping in the back; it was the Topshop pair that experienced this problem.
The Topshop pair seem to develop an issue that they would not stay put on my waist and the back would dip. This is impossible to show you now as I opened up the center back seam over the weekend to attempt to add a gusset there instead to see if the fit would be better (I now regret this) . My thought was to add a center back gusset and remove the side gussets which I hoped would produce a better fit. Now I am thinking the center back gusset looks kind of weird (you can see in the pictures) I fear that I am just causing a lot of work and frustration for myself. All this self-doubt isn’t helping either!! I took a sewing class and my instructor recommended redoing the topshop pair with my improved sewing skills (she helped me with the side gussets on the AG pair and i think they look nice). I guess I feel like I’ve been sucked into this project and it will never end! I have to decide what will be my next step forward.
I hope I haven’t shared unnecessary details here, I fear I may be ranting a bit and post is getting to be too long; i like to write.. It has been cathartic for me to write this stuff out and hopefully helpful to someone else who is just starting out. I just really would like to finish this project already and it seems impossible! Oy!
No worries on the longer explanation. It helped me understand what you’ve been working on. The photos were very helpful too. I will say that this is not a “beginner” alteration and I admire you for taking it on! The other thing that needs to be said is that it’s not easy to work with denim when you’ve got such a big job to do, so kudos on that as well. I think you’re on the right track. It looks like your side gussets were more successful than the center back gusset. I think the reason that the center back gusset didn’t work on the Topside pair, is that the pants have a shorter rise to them than your body does. Have you been told that you are long waisted? I think that’s the case here. It may mean in the future, that you have to stick to brands that have a longer rise.
In the meantime, maybe you can take in the center back gusset just a smidge on one of the vertical seams and see if that closes the gap for you. Or, take out the center back gusset and put in side gussets like you did on the AG pair (only if you don’t mind the time it takes to redo it.)
The other thing that might help in the future is to put a diamond shaped gusset in the crotch area and position it so that the width of the diamond adds to the rise of your pants (front and back).In other words, the diamond should lay on its side. That would add fabric to the rise without adding to the length of the pant. Does that make sense? Just a thought.
Keep up the good work. There’s no reason you should feel any self doubt. You’re doing a great job! Alterations is all about practice. The more you do them, the more confident you’ll get!
Thank you thank you thank you for a wonderful trick! Although I am not new to sewing, I am brand new to alterations, I needed to make my dress fit at the top for a party this weekend, there was now way I was going to lose three inches in a week! So I did this….. it worked first time! Fab tutorial, no faffing about, straight to the point! Loved it, I am now no longer afraid of doing an alteration, ( the seam ripping was really scary!) your blog has become one of my favourites. Much love x
Wow, Rebecca, thank you for your gracious comments. You made my day! I’m so glad this helped and you were able to wear your dress this weekend!
Thank you! Great stuff!! How much should I charge for doing this?
You will want to see how long it takes you and multiply that by your hourly rate. I am hoping to write more about pricing soon. Hope that helps.
I admire your posts, and I wanted to comment and offer you kuddos on wonderful content and information!
Hi! Thanks for the great idea! The dress I need to alter is a sequinned ballgown. There is extra fabric from the hem so that isn’t a problem. The tricky part though is, there are no side seams. The entire top is made out of a continuous piece of fabric and there is boning inserted. Any idea how to extend the bust and waist? Will appreciate the help!
Is the dress strapless or does it have sleeves? Does it have a zipper in the back?