
When a garment is really too tight in the crotch area of a pair of pants, yoga pants, leggings or jeans, or in the underarm area of a shirt, you might want to add a gusset.
A gusset is typically a diamond or triangular shaped piece of fabric that is sewn into one of those areas to give some extra room to the clothing.
(If you need extra room in a strapless dress or a dress or top that has straps, you’ll want to look at the post on How To Put Gussets In a Dress or Top.)
However, this post will show you how to put gussets in pants or shirts. We will focus on diamond shaped gussets that are inserted into an area where four seams intersect. They are usually found in pants or the underarm area of a shirt that has sleeves.
For this type of gusset, you’ll need to make a diamond shape gusset, and I’ll show you how.

The gusset shape and size will be determined by how much extra room you need in the crotch area or the under arm area.
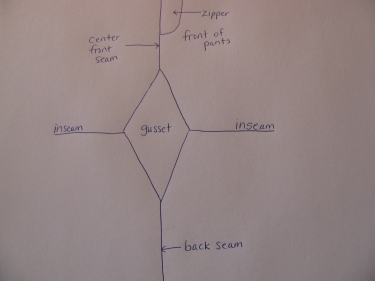
To be more specific, in a pair of pants, the gusset is sewn into the intersection of where the inseams meet the center front and center back seams of a pair of pants. It is the lowest point of the pant before you start into the leg area.
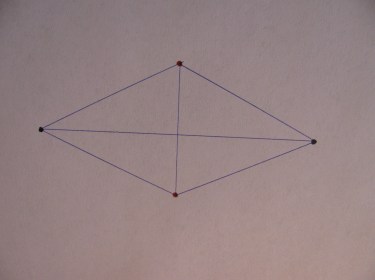
This is a view of the underside of a pair of pants after a gusset is put in so you get the idea of what they look like:
In the under arm area, the gusset is sewn into the area where the under arm seam and the side seams meet the sleeve seams. It would look basically the same as the photo above only it would be located in the armpit area and there would be no zipper!
(You may have guessed by now that I am going to use diagrams exclusively on this post because I think they might be easier to follow than actual photos.)
Read through all the instructions before starting. This is not a difficult alteration, but you will want to be familiar with all the steps before you start.
To begin with, have your customer try on the slacks and then provide a mirror so they and you can see what you are looking at. (If this alteration is for your own pants, you also should try your pants on in front of a mirror.)
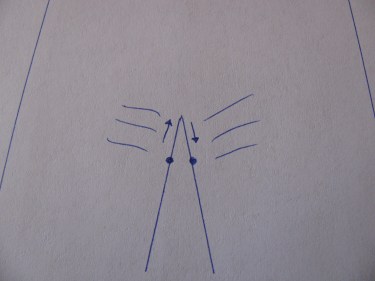
If the pants are too tight in the crotch area, the fabric will bunch and pull and you’ll see horizontal lines or folds of fabric that seem to originate from the crotch area.

A rule of thumb here for any garment: tight “pulls” of fabric always “point” to the problem. So, in this case, the tight pulls “point” to the crotch area.
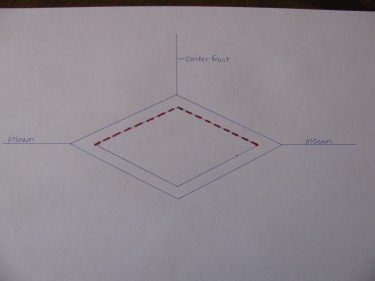
Measure from the lowest “pull” line on the left side of the pants to the lowest “pull” line on the right side of the pants. The diagram below illustrates where to measure. That will give you one measurement of the gusset. Let’s say it is 3″. Write that measurement down.
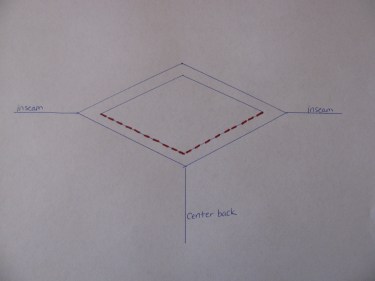
I used to also measure the crotch length of the customer which looks like this: (CF stands for Center Front and CB stands for Center Back in the photo below):

But, I have found that pants do not sit at the natural waistline very often anymore and each customer likes their pants or slacks to sit at a different place in the front and in the back. So, ask your customer to tell you how much more they want in the front and the back to make the pants fit and feel better.
Let’s say the customer wants 2 more inches in the back and 1 more inch in the front.
You’ll need a total of 3″ for the vertical measurement of your diamond shape.
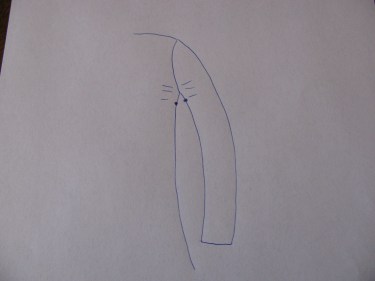
The same rules apply if you are measuring for an under arm area.
The first measurement in the under arm area is how much more they need in the arm circumference and then how far it is between pulls:
Once you get those two measurements, (for either the crotch area or the under arm area) you are ready to draw a gusset pattern on paper.
Even if you don’t want to add any to the crotch length, (or the arm circumference), you’ll need to, in order to make the diamond shape. In that case, it could be a skinny diamond by only adding 1/2″-1″ to the crotch length area. (I will only be referring to the crotch alteration from now on, but apply the principals to the underarm if that’s your alteration.)
Let’s say you need to increase the crotch length by 2″ and the width by 3″. (Again, you could have any combination of measurements, based on the measurements you need, so your gusset shape most likely will differ from mine. Yours could even potentially be a square shape.)
Here is how I would make the gusset. Mine needs to be 2″ high by 3″ wide.
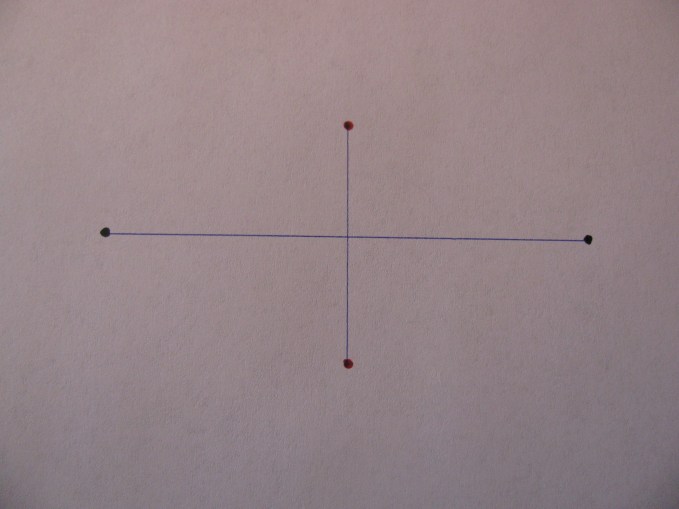
So, I get out a ruler and a piece of paper and draw 2 dots representing the increase of the crotch length measurement (shown below by the red dots..mine is 2″). Then, I draw a vertical line between those two dots (below).
Then, I use the ruler to find the middle point of that line (In my case, it is 1″). Because the measurement along the inseam from pull to pull is 3″, I draw a black dot 1 1/2″ to the right of the midpoint and a black dot 1 1/2″ to the left of the midpoint. Next, draw a horizontal line connecting the 2 dots (represented below… mine is 3″ total).
Then I draw the diamond shape by connecting the dots like this:
This diamond shape is the base of your gusset shape.
Next, I add seam allowances to the diamond shape. This is very important. If you don’t add them, your gusset will be too small.
If you are feeling a little unsure of the size of the gusset you made, or this is your first time making gussets, add 1″ seam allowances all around the gusset shape. Doing this will give you some added room to adjust it later, if you need to, without having to make another gusset.

(Just so you know, on the garment itself, you will be using the original seam allowances to stitch on when we get to that point.)
Cut out your paper pattern.
Next, cut your gusset out of any scrap of fabric that matches your garment, as close as possible. It may be difficult to get it to match exactly, but get it as close as you can.
Mark the stitching line (1″ in from all the edges, if you made a 1″ seam allowance, otherwise, mark it at 1/2″) on your gusset. You can use a piece of chalk, washable marker, or hand stitch a running stitch to mark it.
Finish the edges of the gusset with a zig zag stitch or use your serger. This will prevent the gusset from fraying as the garment is worn and washed.
Next, you will open up the inseams (do not open up the crotch seam!) in the garment where you will put the gusset in. So, my measurement was 2″.

Only open up exactly the amount you need and back stitch those openings well with your sewing machine so that they are anchored well and they don’t open up any more.
Next, you will stitch one continuous side of the diamond to one side of the pant opening. Right sides together!
Make sure you line up the correct side of the diamond to the correct side of the pant (center front, right leg, center back, or left leg). You want your diamond to be in the correct position when you’re all finished sewing.
Also, be sure to line up the drawn stitching lines on the gusset to the original stitching line on the garment. The seam allowance on your pants may be 1/2″. If your gusset has 1″ seam allowances, the edges will not line up evenly and that’s ok. Just be sure to match up the gusset seam allowance to the pant seam allowance and pin well or baste between the dots on the gusset. This will be explained further below.
Use the original stitching line of the garment to stitch the garment and the gusset together being sure not to catch any part of the gusset in the stitching as you go.
Be sure and stitch only from dot to dot. Do not stitch the diamond piece all the way to the gusset edges. The corners of the gusset should always be loose. If they aren’t, the gusset will not fit properly.
In the diagram below, the wrong side of the gusset is facing us. The right side of the gusset should face the right side of the pants. (Right sides together before you sew).
Stitch the next side of the diamond in the same manner:
Both seams should be sewn tight. If there is any open area, stitch it up being careful not to catch the gusset in the seam.
Now, you should have a perfect gusset!

If the gusset is too tight, take out the stitches and use a smaller seam allowance on the gusset which gives you more room in the gusset.
If the gusset is too large, take in more of the gusset with even larger seam allowances on the gusset.
Once you get the fit correct, stitch over the original seam again. This will secure it and keep it from coming undone in the future.
Update: February 1, 2018: I’ve received some really great questions about specific situations concerning gussets….
First, a reader asked if you need to pay attention to the grain line of the fabric when cutting out and sewing in the gusset. Here’s my answer:
Personally, I don’t think it’s critical to pay attention to grain lines unless you are working with a stretchy material. The lengthwise grain of the fabric has the most stretch and should be placed in the same direction as the inseams (side to side in the diagram on the post.) Don’t use the bias as the bias is too stretchy and the weakest part of the fabric. It will stretch too much, and in some cases leave a bulge in the gusset over time.
Second, a reader asked how to stitch over the thick intersection of jeans where the inseams meet the center front and back seams. Here’s my answer:
There is an amazing tool called a Jean-a-ma-jig and it makes this job so much easier. Check out this link on How to Use a Jean-a-ma-jig. If you don’t have time to buy a Jean-a-ma-jig, fold up a scrap of fabric to the thickness of your pants and use it like a Jean-a-ma-jig according to the post I wrote on How to Use a Jean-a-ma-jig.
You must also know how tough your sewing machine is. If you are having trouble sewing on denim, you may want to hand walk your needle over the thickest part of the intersection. To do that, just stop sewing right before you get to the thickest part and use the fly wheel located on the right side of your machine and turn it toward you (and keep turning it) until you’ve “walked” it over the hump. It should still be pretty secure and that way you don’t break a needle. If you need to trim the seam a bit before you sew, just be sure you’re not taking out too much fabric and not leaving enough to hide the raw edges inside the seam. Top stitch over the original stitching line.
Congratulations, you’ve just accomplished making and inserting a gusset!
Now, for those pants that are too baggy in the crotch area, here is a post on How to Take in the Crotch Seam on Pants.

Excellent description on putting these in!
Other common uses I’ve found are by bikers (there’s an entire company that makes gusseted jeans for bikers) and yoga pants.
Yes! Thank you, Theresa! I was just reading about those gusseted jeans a few days ago. Thanks for making that connection. 🙂
The gusset can be a real life saver. Thanks for the great tutorial. I’ve saved it for future review.
Thanks, Deborah, I appreciate your kind words. It’s not an alteration you typically do very often, but when you need it, it’s good to know how. Have a great day!
Great explanation and diagramming. I have a problem with the legs of slacks riding up or the inseam twisting forward. This is especially prominent in knitwear. Would a gusset in the crotch alleviate this problem or is this problem adjusted elsewhere in the garment; like enlarging the thigh measurement of the pattern?
One additional question concerning gusseting for singers (opera) and dancers. I’ve heard that gusseting is used in corsets for lung expansion and dancers/skaters for extreme stretch without breakage. How much is allotted and where or how is it applied to the garment without causing it to be too loose for proper fit.
Hi AJ, thank you for your comments and questions.
As to your first question, do you have a photo or can you send me a diagram of what you mean by the inseam twisting forward? And as to the leg of the slacks riding up, where do you feel that..in the thigh area? Just looking to clarify before I answer.
As far as the gusseting in corsets for singers and dancers, that is an excellent question. I have a distant relative who used to design and make ice skating costumes and theater garments. Let me reach out to her and see if I can get an answer for you soon!
Thank you! This is a timely post for me, as I was just beginning the journey to add gussets to jeans for both myself and my husband. The tutorial is great, but you don’t mention if one should pay attention to grainlines, bias or stretch direction when cutting out the gusset. Any tips on that? Also, is there a good way to finish the seams (especially on thicker fabrics like denim) that might reduce bulk, help them lie flat and/or help prevent any chafing (especially if you’re going to be cycling, horseback riding, or otherwise very physically active while wearing the finished product.)
Thank you again for this one. I do love your site. You’ve helped me learn a great many useful things.
Thank you! These are great questions! I’ll answer at the end of the post above.
Thank you so much for the quick reply/update. I only have two pairs each for “practice”, and I wanted to take the gusset fabric from the lower edges of the legs (most need hemming that much anyway or are going to become shorts, and on some pairs I want to take them from bootcut to straight or skinny legs as well) to make sure of a fabric match (denim being a bit difficult that way.) The extra info will mean I’ll get where I need to go faster and with better results. Much appreciated!
Oh, you are so welcome! I’m glad it helped and I hope you have plenty of fabric left over from the hems to do the job because that would be a perfect match, as you said. Have fun with your project!
Re: the seams–I forgot to request suggestions that don’t involve a serger and can be done on a regular home sewing machine, please. (Serger suggestions might be grand for anyone else with a similar question and a serger, but I don’t have access to one.)
Another great question. I added the answer to the post as well. I must have been in a hurry when I wrote, because I always finish the edges of my gussets. So, thank you once again for your insightful questions!
Thanks! I have referred to your tutorials several times. You make things very easy to understand. I consider myself an advanced sewer, with your tutorials I really am!
Aww, thank you and thank you for letting me know! I’m so glad they’ve been helpful.
I NEED TO MAKE A SKIRT WIDER AT THE HIP AREA ONLY. WHAT IS THE RIGHT METHOD OF DOING THIS.
Hi Maria,
That is a good question. If you have a large seam allowance at the hip, let it out gradually, but most pants don’t have a large enough seam allowance to do that. If yours does not, the only other way is to put in a gusset, but that most likely won’t look very good. Your best bet is to buy a pair of pants that fit in the hip, but you may have to take them in at the waist.
Fantastic tutorial. Thank you. It is always good for a refresher techniques and to learn how others solve design/alteration needs.
Thank you, Amy. I’m glad you found it helpful!
The drawn pictures are so easy to follow, thank you! I tried laying out pieces of napkin to help me visualize what it would look like and ended up with a triangle in each quadrant (on the original garment). Do I just trim off the triangle points after sewing the gusset? How does the gusset add 2-3 inches, I am ending up with same measurements when laid flat?
Hi Magdalene! I am sorry I did t see your comment until now. If you are putting gussets in some pants, the gusset should have a diamond shape, not a triangle shape. Could you send me a picture or two of what you are dealing with so I can understand better? Thank you! My email address is: TheSewingGarden@gmail.com
This is the best gusset tutorial I have seen. It has clear wording and pictures. Thank you so much.
Thank you so much! I’m glad it helped!
Hello i’m 6,7 feet tall and i’m a big guy, i been looking for years for shorts/pants for me that have the gusset, if you could please tell me a link or a brand that sells these i would be soooo happy
I honestly don’t know of any pants you can buy that have a gusset in them. Sorry about that. You might be able to ask your local seamstress to add them in your pants.
Duluth Trading Company has ballroom pants in a lot of different styles. They also put gussets in a lot of their shirts. my husband is 6’4” and we buy all of his pants from them, and most of his shirts because those gussets make a world of difference for him.
I’m sorry, but I don’t have a link. I’m sure if you Google it, you can find what you’re looking for.
I bought a new dress, extreme sale- no returns or exchanges. It buttons up and the 3rd button down, right at the bust, is very tight and pulling open. I think an underarm gusset might work? I could also take the material from inside a yoke on the back or the pockets to make the diamonds. Thoughts? Thanks for this tutorial.
You’re welcome! Yes, I think that is a good solution for your dilemma. If the dress is sleeveless, use a triangle gusset. If it has sleeves, use a diamond shape. I have posts on both of those shaped gussets.
I’m not sure if the lengths are enough for someone so tall, but have you tried Duluth Trading Company or Arborwear?
https://arborwear.com/ and https://www.duluthtrading.com/
These do specialize in work pants, but you might also be able to find out what else is out there currently with a google search. Try “gusset crotch pants” and go from there? Good luck!
I don’t have a sewing machine. What kind of hand stitche/s would you recommend I use for my top’s gusset? Thanks!
A back stitch would probably be your best bet. I don’t have an example on my site, but I’m sure you could find it if you Googled it. If you can’t find an example, just make tiny running stitches and that should hold up well.
Thank you for your tutorial. Have you ever tried an underarm gusset with two-layers to minimize visible armpit stains?
Hi Cindy, I am glad you liked the tutorial! Yes, I have done a double layered gusset in an underarm area. Here is the link for that tutorial:
This is brilliant. I spent years wearing climbing trousers, which come with a gusset. After doing so most conventional trousers felt far too restrictive! My grandad always said modern trousers don’t have enough ball room
Thanks
Thank you for your kind comment, Oliver. I’m so glad it was helpful!
Brilliant tutorial – i have started to make jeans and have’nt got the crotch correct, so put a gusset in underseam and it’s so much better, i now need to figure out where to alter my pattern.
Oh, this made my day and is such a good “question”! Once you’ve made the gusset and you love how it fits, then extend your seams onto the gusset and where they intersect shows you the lines for you to alter and add to your pattern. Just be sure to add seam allowances where necessary so you don’t end up losing that amount of fabric when you sew the seams.I hope that makes sense. I will probably do a tutorial based on this question to show what I’m talking about. So glad the instructions helped you!