This dress came from a mother of a groom and it needed to be taken in in the bust area, so I’d like to show you how to do that.
You can use this technique on strapless dresses as well.

Do you see the pins in the side seam? There are pins on the other side seam as well.
I generally like to take a dress in at the side seams. If you take an equal amount in on both sides, the dress will hang correctly.
Very rarely do I have to move the back zipper. I will if I have to, but it really doesn’t happen that often.
Just be sure that if you take in the back zipper, it doesn’t pull the side seams toward the back of the dress causing it to hang improperly.
Can you see how we are going to take out more fabric at the top of the side seam than we are at the bottom of the bust area?
Here is the dress laying down on the table. I run a measuring tape down the side seam from the top. On a sheet of paper, I mark down “L” for the left side of the dress and “R” for the right side.
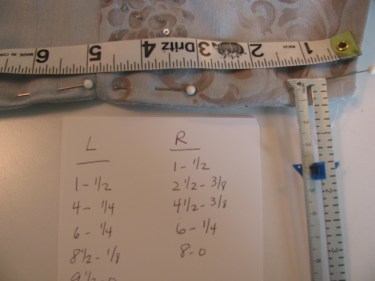
Once I have the measurements from along the tape measure written down, I use the seam gauge to tell me how far from the side edge of the fabric the new seam should go and write that measurement down.
This happens to be the left side of the dress, so we’ll do those measurements first.
Do you see how I have pins at the 1″, 4″, 6″ marks, etc? There’s no science to this, it’s just where I happened to stick the pins when my customer had the dress on.
In the photo above, do you see how I am going to take in 1/2″ at the one inch mark? At the 4″ mark, I’ll take in 1/4″.
Once you have these measurements written down, take all the pins out. Eventually, we will be working on the inside of the garment.

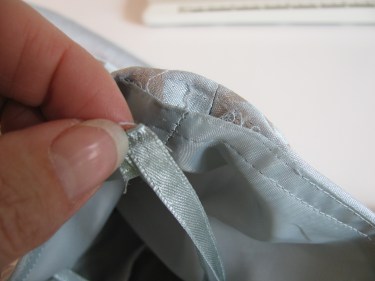
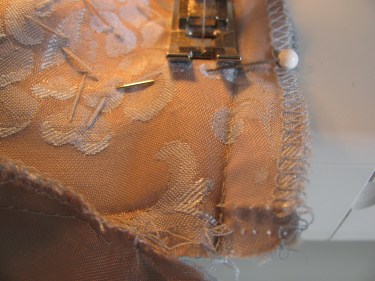
The photo above represents the interior of the dress. You are seeing the top edge of the dress where the hanger ribbons come out.
I need to use a seam ripper to gently pull out the stay stitching threads (be careful not to cut the fabric!) at the top of the side seams where the outer fabric meets the lining. This dress has two rows of stitching. Most dresses just have one row.
If you are going to take in an inch of the dress at the top, be sure to rip out about 2 inches of stay stitching so you’ll be able to work inside the dress easily.
See the ribbon? Those are the ribbons the manufacturer attaches to the dress so that you can hang the dress from these ribbons instead of the straps. (In this case, you could hang the dress from the straps since they are so wide.)
If you have spaghetti straps, be careful. They can stretch out if you hang the garment by the spaghetti straps. Use the ribbons to prevent that problem.
This ribbon is sewn into the dress at the top of the seam. Sometimes, you’ll find these ribbons sewn into the side seam an inch or so down from the top of the side seams.

So, in this case, gently take them out with a seam ripper.
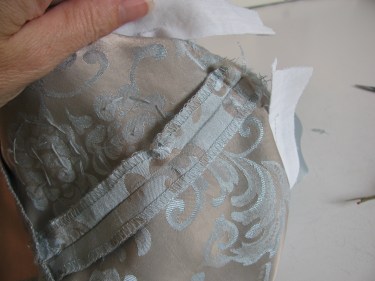
In the photo above, do you see that the two rows of stay stitching have been removed?
Now, it’s time to take apart the seam that holds the lining and the outer fabric together.
In the photo below, do you see that I have taken out the ribbons and the seam above them has been taken apart?
Now, turn the garment right side out.
Sometimes, there are a few stitches holding the front fabric to the lining fabric. Just cut those threads being careful not to damage either the front of the dress or the lining.

Usually, there is not this white interfacing fabric, but in this case there is. It is there to add stability to the area. I just cut across it as shown. We’ll lap the ends over each other later.
I have a little extra step I need to do.
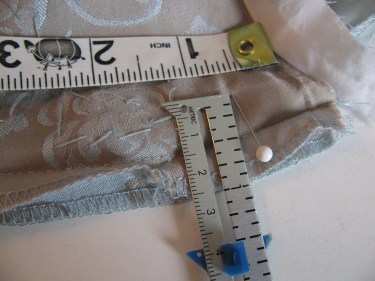
If you look at the very first photo above, you’ll see that I pinned the dress from the patterned bust area down into the solid colored blue fabric. This means that some of the alteraion is occuring below that horozontal seam and we need to open up that seam to make the alteration. If we didn’t do that, it wouldn’t lay flat in that seam area when we were finished.
To do this, slide your seam ripper or small pointed scissors under the serged stitches to the right and left of the seam as shown and rip them out. (This is the waist seam).

Take out the stitches on the seamline

This will give you a hole like this:

We’re going to alter the seam I have in my left hand (the skirt part) and the one to the right of my hand (the bodice section). Now, work with one of those side seams at a time. We’ll start with the bodice section (the print fabric) first.
Refer to the paper where you wrote all the measurements you transferred earlier.
Pin according to those measurements. If you are working on the left side, follow the left side measurements.
Where I put the pin into the fabric is my new guide for sewing the new seam. You may want to draw a line down the side if that helps you. Be sure and use a washable or soluble marker made just for fabrics. There are other options as well. You could use a tailor tack if you’d like.
Now, sew, using the pin’s entrance into the fabric as your guide to sewing the new seam. Don’t run over the pin, though. Take it out just before you get to it.
Remember to wear eye protection. I just had a needle explode on me the other day and I was so glad I had some glasses on!
Do you see how the two new seam lines will match up when we sew them together in the next step?

Take out the original seamline with a seam ripper and press the seam open. If there is too much material, you can trim it. If you trim it, you might want to finish the new cut edge with a zig zag stitch or a serged edge.
Now, take that same intersection and put the new stitched seam lines (the waist seams) right sides together facing each other like this:

Stitch them together using the original seam line as your guide. Finish the edge if you like.

Now do the exact same thing to the lining by putting pins at the correct spots from the top edge of the dress down through the waist area and stitch a new seam line. Take out the old seam and press the new seam open.

Up at the top edge of the dress where the lining will meet the dress fabric, you will fold the ribbon in half and stuff it into the hole (below).
Make sure you line up the raw edges of the ribbons to the raw edge of the dress and lining. (The photo does not show them lined up.)

Lay that intersection flat and pin it if necessary to keep it from slipping.
In this case, I did not let the interfacing get caught into the seam. Move it up out of the way. But in most cases, you’ll want to add that interfacing back into the seam before you stitch it. It can overlap. It won’t show from the right side of the dress.
Stitch across the intersection like this:

This closes up the seam. If you turn the garment right side out, you’ll see how the ribbon is in the correct place:

We are now going to stay stitch the edge of the dress. This will keep the layers from popping up under the arm pit area. To stay stitch, slide the garment onto the sewing machine with the dress fabric to one side and all the rest to the other side (this includes the lining and inside seam allowances). Just push them all to the lining side of the dress. Be careful not to get unwanted fabric caught up under the presser foot as you sew.
When I sew, I like to put the dress to the left and the lining to the right:

Restitch those two rows of stay stitching.

I could have sewn over the ribbon on both rows, but that was not how it was done originally and, I want it to look like it did when she brought it in.
I just reattached a few beads that were loose with some matching thread.

You can tack the lining to the bodice fabric underneath if you want to keep it from shifting while you wear it.
Here’s how the finished product looks.
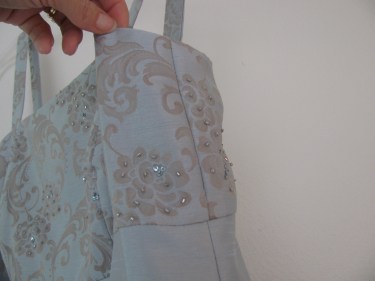
Now, doesn’t that look beautiful?

When taking in a side seam more than an inch, you run into the problem of uneven seams at the intersection between the lining and the fashion fabric. Does one create a new seam line when sewing or closing everything back together?
Yes, you need to create a new seamline most of the time, I just eyeball it. It usually means that you have to take out a few more understitching stitches on either side of the opening so that the new seamline flows well. Does that make sense? Let me know if it doesn’t.
Linda
I am so very happy to have found your website. I have sewn many a pillow, curtain panel and quilt and have just begun to sew garments for myself. I so enjoy sewing, but consider sewing and altering garments far beyond my meager skills.
My 40th birthday is coming up week after next and my dear husband has planned an incredible getaway for us. Alas, as with every woman, I have nothing to wear!
I found a sassy little leopard print cocktail dress in my closet that is just a tad too big. Living in a rural area, it’s just not feasible that I can take the time to go to an alterations professional, so I was thinking I would do it myself.
I had planned on putting darts in the dress to take it up. Yes, darts. Needless to say, I think your gracious blog has just saved me from sassy dress ruination! I’m going to tackle it tonight. Wish me the best!
Thanks again,
Bev
Thank you for this wonderfully easy explainantion of how to do this. Many times in the past I lazily just took up both lining and fabric leaving it untidy and bulky. This was much easier than I expected and it looks nice. Thank you again! Stephanie
After reading your blog I built up the courage and advertised a little bit. I am now getting very nice alteration work from a local bridal boutique. I know more or less what to charge per hour but am not sure approx how long it would take to make the “mother of the groom” dress with a lining smaller as well as the time to take for a jacket as per your alteration for narrower shoulders. If you could give me an idea how long you take then i can have an idea as the boutique would like a plus minus quote so that they can quote the customer.
ps thank you again for this very helpful blog. Kirsten
I don’t make (construct) garments for others, and it all depends on all the details involved. I’m sorry, but I don’t like to estimate because of the detail factor. I would look at the pattern and estimate how much time it takes you to do each step. Hope that helps!
thank you so much for the reply, I meant I am altering a mother of the bride dress, sorry for not being specific and i realize asking such a question would be unfair as one never knows what goes into the alteration, I will quote them per hour, as am going to see them tomorrow.
That sounds like a good plan!
I am currently altering a formal for a friend…long story but now my church seems to think that I am some incredible seamstress because of a minor previous (brilliant, if I do say so myself) alteration…but just for 2 items…ugh. Now I am faced with taking a size 20 dress into a size 14 or 16. How do you deal with taking in so much when the front of the dress goes up and the back of the dress goes down? I hate lined items!
See if this helps:
http://sewfordough.wordpress.com/2010/01/01/taking-in-a-dress-thats-5-sizes-too-big/
I have been sewing a long time and typically do not like to do alterations. I decided I would like to try the alterations for my wedding dress with the help of sewy buddies. Not too crazy as the length is great,bodice back is lace up and it is sleeveless. This article is actually more than my dress although there is boning in the side to deal with after taking in the bust.
Thank you for this tutorial. I am trying to alter a similar but unlined dress with a zipper at the side seam. How would you recommend I do it?. The dress fits beautifully otherwise!
Hi SG. Thank you for your question. I am a big fan of not altering the zipper unless I absolutely have to! So, if you have less than an inch (total) to take in, I would just make the adjustment on the non-zipper side of the dress. First, pin the excess on that one side and see if it brings the dress too far to one side. If it does, you have two choices. First, you can make vertical darts in the back of the dress, if that looks good. Second, you can take out just enough of the zipper area to make the alteration and then sew the zipper back in. If you have any trouble, or this is too confusing, send me an email with a photo of the dress and we can converse by email. Thank you so much! TheSewingGarden@gmail.com