Have you found an old quilt at an antique store, or in your attic, and you love it but it has areas where it is worn out and dirty? Are there holes in it that need mending?
No need to worry. You’ve come to the right place. I’m going to teach you how to repair and care for a vintage quilt! Perhaps, it is a newer quilt. That’s ok, the process is exactly the same.
First, you need to know that it is important to mend the quilt before you wash it, rather than the other way around.
Washing it first might make the tears worse, even if you don’t agitate the fabric much.
I’ll talk more about washing a vintage quilt at the end of this post.
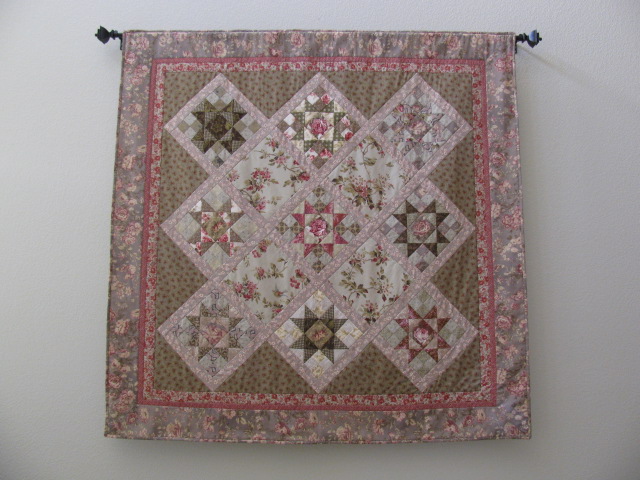
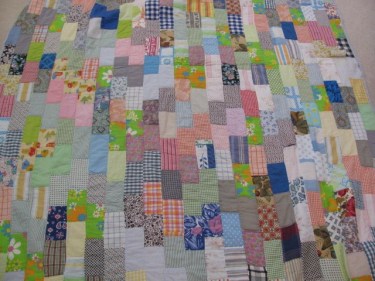
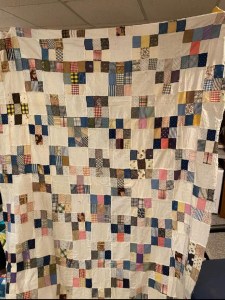
Now let’s talk about a few different styles of quilts so that you get an idea of what you are repairing. Patchwork quilts are made of many small pieces of fabric that are sewn together in blocks and those blocks form a certain pattern that has a specific name. The pieces within the quilt are usually square, diamond, triangle or rectangular in shape. Here are a few photos of patchwork quilts:


There are also applique quilts. Applique quilts usually have many pieces of different shapes and sizes and are stitched to the background piece(s) of a quilt. These shapes are often flowers, leaves or stems.
Here is an example of an applique quilt:

The quilt below is called a Crazy Quilt because the pieces do not create a distinctive pattern. They are cut from random sized pieces and sewn together in random fashion.These quilts were quite common at the end of the 1800’s and were often times made of silk fabrics:

These photos give you an idea of the various pieces that a quilt might have. Yours will most certainly be different, but the process of repairing the quilt will be the same no matter what quilt you have.
Lets begin by fixing a quilt! In my example, I am going to use a patchwork quilt.
This is a quilt my grandmother made. I am not sure of the date, but my guess would be that she made it around 1960-1970.
It might not fit the definition of vintage, but it is old and it is very sentimental to me. I love the colors and I remember many of them because she used them to make shirts for her and my grandpa from them. Your quilt may have some sentimental value to you as well or you may just love the pattern and fabrics!

Upon a closer look, this quilt has several pieces that are wearing out and torn.
This quilt has a mixture of 100% cotton fabrics and also fabrics that are a cotton/polyester blend. How do I know? Why does it matter?
Just like the shirts in your closet, you can usually tell the difference between all cotton and a blend. Generally, the cotton fabrics have a thicker and slightly rougher texture than the cotton/polyester blend fabrics. The blends are smoother to the touch. The cottons also generally wrinkle easier.
Most importantly, the all cotton fabrics wear better and last longer than the blends. So, if this quilt is special to you or you are repairing it for a customer, choose 100% cotton quilting fabrics whenever possible for the repair work.
If you have a quilt like this one with many varied fabrics, you might have the right kind of fabrics in your stash to choose from. If not, take the quilt with you to your nearest quilt fabric store and see if you can match the colors. It might mean that you visit several stores before you can find what you are looking for. My last resort is to buy online in this case, because color matching is very difficult from a computer screen. Another option is to ask a sewist friend if they have any scraps you can have from their stash.
When you have the fabrics you need, you are ready to begin.
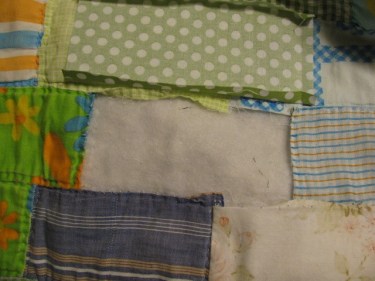
Whatever shape the damaged quilt pieces are, carefully use a seam ripper or very small sewing scissors to gently take out each piece.
Can you see the hole in the pink piece of fabric below? Can you also see the seam allowances and the raw edges?

When you’ve taken the piece out with your seam ripper, use that piece as a pattern to cut a new piece of fabric from.
If the old piece is really torn up and difficult to see what size to cut a new piece, look at the space it came from and that should give you some clues. If you need to, make a piece much larger than you think it needs to be and cut it down to size a little at a time.
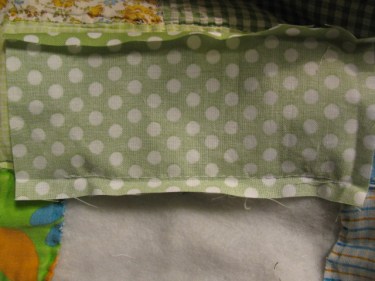
In the photo below, the new piece I’ve chosen for this spot on the quilt, is the green fabric with the white polka dots. I cut this piece larger than I needed to and I also pressed a 1/4″ seam allowance on three sides of the rectangle. This makes it easier than turning the edge over and trying to hold it in place with my fingers while I sew it in. I will adjust the fourth side as needed before I stitch it in place.

On most quilt repairs, you will probably have to hand sew the new piece in place. On this quilt, I figured I could at least machine stitch one side of the new piece to one side of the old piece next to it.
If there is no way you can machine stitch any of the repair, don’t try! I don’t want to stitch through to the backing of the quilt because it will show and it won’t match the stitching that my grandma did, and that’s important to me. If it’s not important to you or to your customer, you can do all the repairs by machine, but most quilters cringe when repairs are made that don’t match the original stitching of the quilt as close as possible!
Why am I even bothering with machine stitching? It’s because it will last longer and be a little more durable than hand stitching. So, if you use the quilt alot, you’ll want to machine stitch wherever you can. I do use this quilt, but I am very careful with it and this is only the second time in a few decades that I’ve had to repair it.
If you’re not going to machine stitch, or it can’t be done on your quilt, skip ahead in the instructions below to the 4th photo that explains pinning and hand stitching for further directions.
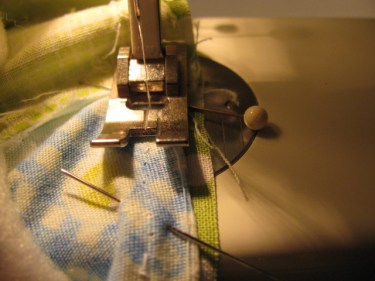
Meanwhile, in the photo below, I flip the new piece face down so that it is right sides together with the piece directly above it on the quilt. I match the folded edge of the new piece to the seam allowance of the piece underneath it, as shown below:
Next, I stitch along the fold, but I stay away from the edges of the rectangle, above, because I will need to hand stitch that in.
Also, do not catch the batting or the backing fabric in this seam you are stitching. This seam is not attached to the quilt, only the two pieces of fabric are being attached to each other.
You can see below that I did not stitch all the way to the ends on the stitching line:
Once you have the one side of the piece stitched in, flip it over so you see the right side of the fabric:

Now, turn under the remaining edges of the new rectangle and pin it to the pieces around it. You shouldn’t be able to see any batting underneath the new piece, or any frayed edges from other pieces around it:

Next, using a running stitch, hand stitch the edges of the piece down. Again, do not stitch all the way through the quilt at this point, but you can stitch into the batting if you like.
I start at one open edge and work my way around the rectangle until the whole thing is stitched down:

Here is another look at that running stitch. Use as many pins as you need to anchor the new piece in place as you sew. To make it easier to stitch, I turn the quilt around as I sew around each edge of the rectangle:

Here is what the new piece looks like all stitched on. Later on when all the pieces are replaced, I will hand quilt around all the pieces like my grandma did.

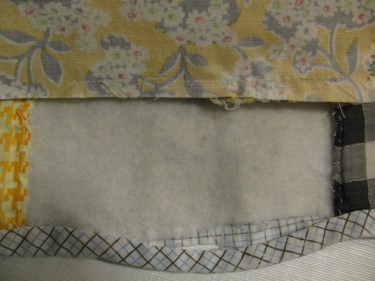
Next, lets tackle what to do if your torn piece is along the binding edge of the quilt. In the photo below, I took out the torn piece just like I did in the middle parts of the quilt. You can now see that the binding is loose. The binding is the thin strip of the checked fabric in the photo below. The binding is made of a cotton/polyester blend and it is getting flimsy, but I won’t replace it now as it has some more years of wear left in it. You can see the white batting in the photo as well:

Cut a piece the size of the piece that you took out plus a little longer on the binding side of the piece:

This time, I didn’t press the 1/4″ under along the edges of the rectangle, but I did lay the piece face down, right sides together to the rectangle above it, as I did on the first repair. Then, I stitched the piece to the one above it as shown below:
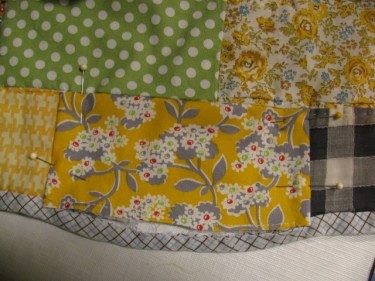
Next, flip the piece over so the right side shows and you can make sure it lines up with the other pieces and isn’t too small for the area:

Once you see that the piece is longer than the quilt edge, trim away the excess fabric from the bottom edge, being careful not to cut the binding. Then, pin it down:
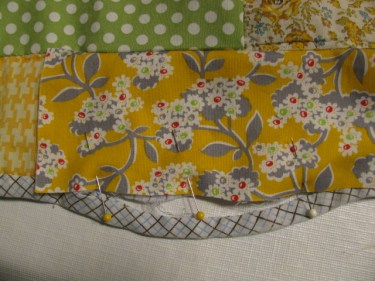
Once the piece is pinned, turn in the side edges and pin them down. Then, stitch across the bottom edge, holding it in place.
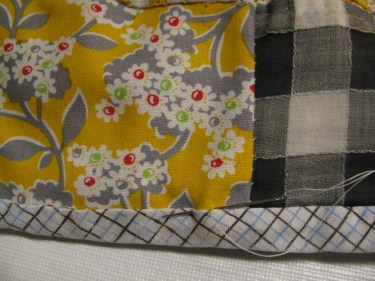
Next, stitch down the rectangle.
Then, stitch the binding edge on both the back and the front of the quilt by hand or machine, whatever kind of stitching the original of the quilt has.
It doesn’t take long to repair a quilt, just a little patience!

Next, hand quilt any areas that need it so that the new pieces are anchored down and so that the stitching matches the rest of the quilt. This shouldn’t take long.
Lastly, let’s talk about washing your quilt.
If you need to wash the quilt, take good care to be gentle with it. I tend to wash mine in a bathtub with a little Vintage Textile Soak or another mild cleaner and cool water. Try not to agitate it when you are rinsing it out. Just rinse with cool water and gently press the excess water out until it is almost dry. This may take awhile. Then, roll it up and roll it out onto some bath towels to dry.
Don’t hang to dry and don’t dry it outdoors as the sun will damage and fade it, even in the shade!
If you keep your old quilts folded up in a cupboard or closet, be sure to take them out every few months and refold them a different way. That way, they don’t develop a permanent foldline on them.
I’d love for you to email me with photos of quilts you have mended. If you’d like, I can add the photos to this post along with your story (and I’ll only post your name if you agree to that).
It would be so sweet to see all your old quilts and share them with our readers!
My email address is TheSewingGarden@gmail.com or leave me a comment or question in the comment section at the bottom of this page.
Have fun and enjoy that beautiful quilt!
———————————————————-
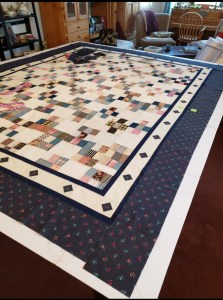
Vanessa, a reader, sent in these photos (below) of her grandmother’s quilt and I am so excited to see them and share them with you!
As you can read in the comment section below, her grandmother made this quilt top from shirts her grandfather wore, along with aprons that her grandmother wore. It is just beautiful!
Then, Vanessa, added the borders and is in the process of finishing the quilt. I just love the fabrics and the borders that Vanessa has made. They just take the quilt to the next level! I hope you can see the small fussy cut squares turned on point against the white inner border. Vanessa, you’re doing a great job and your grandmother would be so honored and proud that you finished this for her. Thanks so much for sharing this with us!

Thank you for this post. I’m currently finishing a quilt top my grandmother made. She too used my grand dad’s shirts and fabrics from old aprons she used to wear. She hand stitched the whole thing. At the time she had alzheimers so it’s a little wonky but to me it’s wonderful. I replaced a few squares and repaired a hole here and there but overall it was thin and didn’t seem to have much structure so I put a very lightweight fusible on the backside. Have you ever done anything like that? Any thoughts on that would be appreciated.
Thanks for all you do!
Hi Vanessa, What a wonderful project for you to finish! I love that your grandmother made it and that you have those special memories of the shirts your grandpa wore and the aprons she wore! Wow, what a gift in your hands. And that she hand stitched the whole thing…that is incredible. I’d love you to send me a photo of it whenever you get a chance. I’ll add it to the post if you are ok with that. I haven’t tried fusible interfacing on the back of a quilt top. A few questions pop into my head as I think of your question. 1). Is this a quilt you want to hand down to others in your family someday? 2). Would the stickiness from the fusible material be a problem down the road if you had to make repairs in the future?
I like the idea of adding some more weight to the quilt because I think you’re right, it needs it. But what if you took some cotton bleached (or unbleached) muslin the size of the quilt top and basted it to the quilt top and treated the two layers as one? That way, when you go to quilt it, you’ve got that extra layer that will stay in tact through the quilting process and once you’re finished quilting, you can take out the basting threads. Just an idea. Keep me posted and thanks so much for sharing such a wonderful keepsake with us!
I can’t figure out how to put a picture in this post so I’ll email them to you. You’re welcome to use them. I think my concern about the interfacing is that it might be too stiff. I used the lightest weight there is but it still feels odd. I’m probably overthinking it. I guess I wanted a second opinion. I’m going try your idea.
My sisters and I inherited about a dozen of her quilt tops. This is the only one that needs a little tlc.
I have a multitude of feedsack pieces that are from the 1940’s. Fortunately the original owner of these pieces had one block done so I know how to sew them together. I have three questions. One, she used muslin and there is not enough of that. Do I decrease the value of the quilt by using muslin from today’s fabric? Second, what do I use to back the quilt? and third, how much quilting do I do, or should I just tie it?
Hi Jackie, Those are great questions! Would you mind emailing me a photo of the quilt so I can give you the best answers possible? Thanks so much! My email address is: TheSewingGarden@gmail.com
Your page contains exactly the info I’m looking for . I bought an old scrap Irish chain quilt today at a steal of a price but 5 of the little squares have disintegrated; otherwise the quilt is in good shape. I have a good match of fabric in my stash so your info will be my friend! Thank you! Sue
Yay! I’m so glad you found my page and you also have a good match of fabric in your stash. I love Irish chain quilts and I’d love to see a picture of it when you’re finished! Thanks for your comment, Sue, and let me know if you have any questions during the process.