
Do you have a tank top or sleeveless dress that doesn’t fit well on top?
Is there extra fabric hanging loose between the shoulder and armpit?
Alot of loose fitting tops and dresses are made without alot of tight fit to them in that area.
And they just feel baggy that way, don’t they?
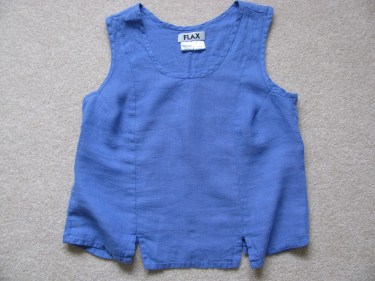
A customer recently brought this tank top to me with this dilemma. You can do a simple alteration to make it fit better by putting in darts in a tank top or dress.

Darts are made by stitching pie shaped wedges of the fabric of a garment that take excess fabric out and help the garment fit better around the natural curves of the body.
Most darts are put in during the construction of the garment, but we are going to take some liberty here and stitch them in afterward!
Some darts lay somewhat horizontally on a top or dress and they run from the side seam to the fullest part of the bust. Some darts are vertical. But the vertical ones usually run parallel to the center front of the garment. There are also vertical darts in the backs of some blouses and dresses.
If you were sewing this garment from scratch, you would probably have a nice fitting horizontal dart that starts at the side seam and is stitched toward the fullest point on the bust. If you tried to do that on this top, the edges along the armhole would not line up evenly. Try pinching it up horizontally and you’ll see what I mean.
The other problem with putting darts into the side seams is that the front of the tank top would be shorter than the back. In other words, imagine, taking up 2″ of the side seam to make the dart. That means you’ve left the back of the tank top alone and it would now be 2″ longer than the front. And it would look silly to put a dart in the back of the tank top to correspond to the front!
Since we can’t make that alteration at the side seam and we aren’t constructing a garment from scratch, we need to have an alternate plan.
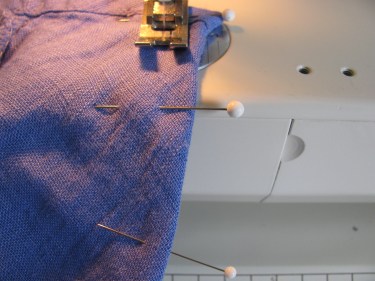
Pinch up the excess fabric with your fingers and place a pin at the outer edge of the tank top about where you see my “outer edge” pins are in the photo below:
When you are pinning your darts, pin them so the outer edges of the armhole of the garment are even.
Then, just pinch and pin the excess fabric all the way to the full part of the bust, sticking in as many pins as you need until it fits well. You don’t want it too tight so that the fabric pulls in any direction.
Now, keeping the pins in place, press the folded edge of the new dart with the tip of an iron or a mini iron.
Be careful not to press the heads of the pins as they might melt.

Now, before you take out the pins, measure the distance down from the outer edge of the shirt (the armhole) and write down how far the pin is placed from the fold of the fabric.

So, for this dart, you can see that at the outer edge (where the gold part of the measuring tape is), we are going to take in 5/8″. You don’t see it in this photo, but I measure from the gold part of the measuring tape to the top pin and that measurement is 5/8″. (If this is confusing, keep reading as I have a photo of this process a few steps down from here.) At 1 3/4″ down from the top armhole edge, we’ll take in 3/8″. At 3 inches down from the edge, is where the dart ends. This means, you’ll be finished sewing the dart at this point.
You’ll understand it better in the next few steps.
Now, take the pins out and turn the shirt or dress inside out. You’ll notice the pressed line you made with the iron.

With the right sides of the fabric facing each other, you’re going to pinch the shirt along that fold line you made with the iron. It will seem weird at first since you are pinching the fold line in the opposite direction that you pressed it in:

Referring to the measurements you took earlier, pin the dart from the inside of the shirt. (The fabric should be right sides together at this point.)
For the first pin, start at the outer edge of the shirt and put a pin in 5/8″ away from the folded edge of the new dart as shown below. Then, move down the shirt 1 3/4″. At that spot, put a pin in 3/8″ from the folded edge. At the 3″ mark, I just put a pin right on the fold. That tells me where to finish the dart.

I like to push my pin in at the exact spot of that marking. It gives me a sewing line to go by. You can also draw that line in with a washable marker, but I don’t like to take the chance of it staying permanently on the fabric. I like to just “eyeball” where I should sew, using the pin placement as my guide..
Normally, you want to take the pins out and not sew over them, but I wanted to show you (by leaving the pins in this time) where my sewing line goes in relation to my pins. As I mentioned before, I stick the pins in in the exact spot where I am going to sew the seam or the dart:

Now, just press the dart down toward the hem of the top or dress
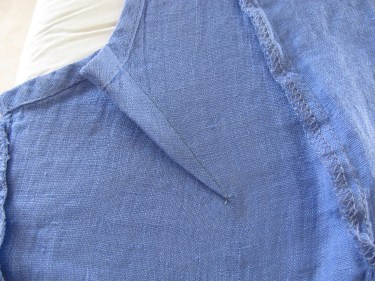
If the dart doesn’t want to lay flat, you can stitch it down with matching thread as in the photo below. (Just stitch the area between the two pins.)

When you are finished, you won’t have that gap like you did before. This time it will fit perfectly!
If this top would have had sleeves, it would have been more difficult to do the alteration.
This way, your top fits so much better in a matter of minutes!

Thanks! I am learning to sew and needed to add darts to a new dress. I followed your guide and it came out great. Thank you!
Very clearly written, thank you!
Sounds good. I always have that problem, will give it a try. Thanks
this is exactly the answer I was looking for! I buy tank tops and they always have the “bra gap” and I dislike that, now I know how to fix that problem. thank you for the step by step instructions!
You’re welcome! Glad it was helpful.
This is just what I have been looking for. I have a stack of new tank tops I can’t wear because of big gaping armholes. Can’t wait to start sewing now that I have read your great instructions. Thank you for posting this.
Yay! So glad it is helpful! Soon you can wear all those tanks, just in time for summer!