
Do you have a bench you’d like to recover?
Do you want to change the color of it? Is it old and worn out? Is it new, but the wrong fabric?
Come along with me and I’ll show you how to reupholster a bench that is ready for a facelift!
It’s fast and easier than you think!
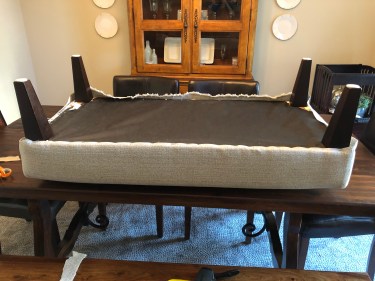
The bench I reupholstered was stained and difficult to clean:

To begin, let’s measure your bench so you know how much fabric to buy.
Your bench may look a little different than mine, but read through the post first so you get an idea of what the process is, so you can adjust it for your bench.
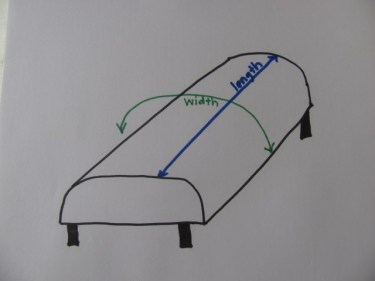
For this bench, I want to take three measurements: the length, the width and the height of the bench.
I have drawn a diagram below to show you what measurements to take.
First, to get the width measurement, take a tape measure and measure the bench from one side of the bench to the other side. See the green ink in the diagram below. Write down that measurement. We will add seam allowances soon.
Second, measure the length of the bench which is shown in blue ink in the diagram below. Write down that measurement as well.
We are going to staple the undersides of the fabric to the frame of the bench, so we will need to add some allowances to each of the measurements. (I will talk about the stapler later in this post.)
The width of this bench was 32″ and the length was 60″.
Because the width of the fabric will be stapled underneath, I added 6″ to the width measurement. That gave me 3″ extra to staple underneath the bench on each side.
Because the length of the fabric will be sewn to the end pieces, I added 1″ to each edge of the length pieces.
So, I cut my main section of fabric 38″ x 62″. (32″ + 6″ = 38″) and (60″ + 2″ = 62″)
Next, we need to measure the ends of the bench. To do that, measure the height and the width as shown in the diagram below. Record those measurements.
In this case, the width was 24″ and the height was 10″. As you can see, it is not a rectangle, but I’m just trying to get the approximate measurement here so I can buy enough fabric.
I need to add seam allowances on these pieces too. I took the 24″ and added 6″ for stapling under. Then, I added 1″ to the top since that will be a sewn edge and I added 3 ” to the bottom since that will be stapled under. So, I need 2 pieces that are about 30″ x 14″. (24″ + 6″ = 30″) (10″ + 1″ + 3″= 14″)

Below, I have drawn the measurements of what I need so I can calculate the amount of fabric I need to purchase:

Most fabric sold in America for upholstery purposes is around 56″ inches wide, so that number is what I used on the diagram above. I then drew the shapes of the other pieces. To get the length of fabric I need, I will add:
68″ + 14″ + 14″ = 96″ length of fabric.
So, for this project, I will divide 96″ by 36″ (which is how long a yard is)
96 divided by 36 = 2.6666. This equates to 2 2/3 yards of fabric.
I like to buy upholstery type fabric for these kinds of projects, but it is not necessary. There are all sorts of fabrics you can choose from. This is a thicker type blend of polyester and rayon. Take a walk through your local fabric store and ask a clerk (or a sewist you know) for their recommendations if you need them.
Once you buy your fabric, cut out the rectangles.
The end pieces are shaped more like ovals, so I like to lay the rectangles over the original pieces (you don’t have to cut apart the old bench, just lay the pieces over the top of the old pieces and pin them down if you need to.)
I lay the fabric pieces with the right sides of the fabric towards the current cover (in other words, right sides facing down.)
Make sure you have left enough room for the fabric to be stapled underneath the bench where it needs to be stapled. You will know by looking at the bench and noting where it is stapled.
Then, pinch the fabric up and pin the pieces so that they fit snugly on the bench. You are trying to mimic the exact sewing line of the original bench cover, so if you need to draw on the fabric, do so on the wrong side of the fabric so your marks won’t show.
Once you have enough pins in, take the pieces to the sewing machine and stitch those seams. Lay the cover on top of the bench to make sure your sewing is correct. Once you like how you’ve sewn it, trim off the excess fabric leaving about a half inch of seam allowance (or an inch if that gives you more peace of mind.)
On this bench, the only seams I have are on the ends where you see them in the photo below. I have flipped up the edges so you can see how I lined up the new fabric pieces against the original bench.
Stitch the seam on both ends of your cover.

Turn the cover right side out and lay the new fabric over the end and if there is any place where the fabric doesn’t fit snugly, sew with a bigger seam allowance until it fits snuggly.

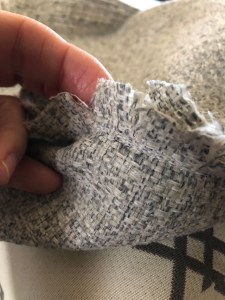
Once you like how it fits, trim the curved edges so that the fabric lies smoother. You can see I clipped the fabric perpendicular to the edge. Clip close to the stitching line, but not through it. You can see my finger behind the clipping.
Next, adjust the cover so that it lays right where you want it to:
Here is what the end of the bench looks like:

If your curve looks a little bumpy (like in the photo below, it is because part of your seam allowance is facing the end of the bench and part of it is facing the main section of the bench. Push the seam allowance so that it lies against the main section of the bench. In other words, push it away from the short end of the bench so that it is all facing the same direction.)

Once you get it smoothed all one direction, it will look like this:

See how much better that looks?
At this point, you are ready to pin the fabric to the underside.
I like to pull the fabric a little tight so it lays even better:
Once you have it tight enough (but not too tight), use pins to secure the fabric to the underside. If the underside is all wood or plastic, try using tape to secure it snugly.
Next, I turn the bench over and set it on a flat surface (either a table or the floor):
As you can see, it is much easier to work on when it is upside down.
This is the stapler I used for this project. It is a Stanley brand stapler. You don’t need this brand. Any stapler like this will do the job well. It doesn’t require an air compressor and it was very easy to use:

I took this heavy duty stapler and stapled the fabric at the midpoint of each side of the bench and worked my way to the outer edges.
I folded over the edge of the fabric before I stapled it, so that it looked neater:

See how closely I added a staple to the edge of the folded fabric in the photo above? I know that most people won’t see the underside, but I think it looks more professional and you won’t have a raw edge showing if someone does turn it over.
When you get to the corners where a leg is, trim the fabric being careful not to cut it too close the the leg. Then, clip the fabric like we did on the curved edge towards the leg (but not all the way to it) until it lays flat against the leg. Staple it down around the edges of the leg with as many staples as you need to hold it down well. It should only need a few staples.
Your leg area may look different than my leg area, so do what you need to to make it work for your bench.
And that is all you need to do!
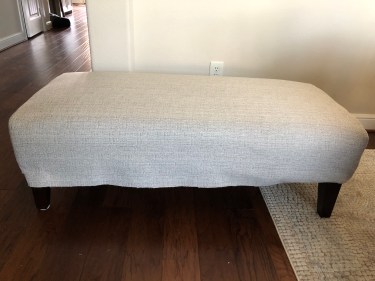
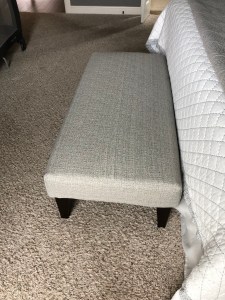
This is what my bench looked like when I was finished:
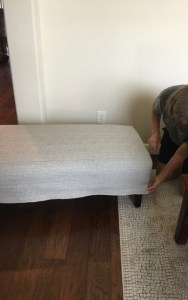
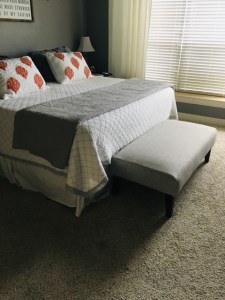
Here is how it looks in the room:
See how easy it is to recover a bench?
Congratulations! You’ll be so happy with the updated look!
Write and let me know how yours turns out and be sure and send me photos so I can include them in this post! You can reach me at TheSewingGarden@gmail.com
If you have any questions or comments, please leave them in the comment section at the very bottom of this page.

Linda, this is not about this post but I saw earlier posts of your help with sewing initiatives in Zambia. I am working on something similar in neighboring Zimbabwe right now. I wondered if you could give me information about where you purchased your treadle sewing machines in Zambia. Thanks so much.
Hi Joanne! It’s been a long time since those were purchased, so I don’t remember the name of the shop and wouldn’t be able to tell you if it is still open. But, it was a sewing machine store in the capital city of Lusaka. And actually, the machines were terrible, unfortunately. And the store would not give us a refund, so it was not a great experience. What did help was that I was able to hand carry a machine over there for the mamas who had electricity and that was helpful. So, if you are able to do that, I would suggest that because then you know what you are donating. I hope that helps!
Thanks for your quick and helpful response, Linda.
You’re welcome, Joanne. I hope you can find a good source for the treadle machines you are looking for. Have a Merry Christmas!