Can you save the planet by mending one bed sheet? Probably not, but it will save you alot of money to do it yourself and repurpose it.
I have a large hole in one of my bedsheets. Typically, my washing machine eats these on a regular basis if I don’t have a full load. I could just zig zag over the hole, but that would not leave it flat and chances are, it would tear again very soon because it would be weak where I stitched it. It is already weak because of the hole. This is what happened the last time I tried to fix it. (See photo below).
I did put a plush piece of theramalam** under the previous hole and tightly zig zagged over the rip, but it wasn’t stable enough with all the washings.

So, now let’s talk about fixing this hole.
First, get out a scrap piece of cloth that closely matches your bed sheet. Wait a minute, who is going to see this thing anyway? No one. So, get out any scrap piece of fabric, the crazier the better! What I’m saying is that unless someone can see it or unless you care what the fabric looks like, you can use any scrap you have. The only recommendation I have is that you find a soft piece in case your little toes, fingers or nose rub up against it in the night.
Mine has to match because my mom was a neat freak and I inherited the gene, and even though she’ll never see it because she’s been gone 15 years, this is how it has to be for me.
Hey, you never forget what your mom taught you, right?
Now, once you have that fabric, cut it a little larger than the area you are mending. Now, if you have a serger, you can serge around the edges of the scrap to keep it from fraying. Another way to keep the edges from raveling is to use your regular sewing machine and zig zag around all the edges. A third idea is to use Fray Block around the edges. Let it dry before continuing on.
Now, pin the patch over the hole. Your pins should be perpendicular to the line that you will sew. This is so that when you get close to the pin, a) you can pull the pin out easily before you run over it and b) if you do happen to run over the pin, chances are better that you won’t break your needle.
Actually, don’t run over your pins! It’s a bad habit.

Plus, if you sew over pins, I recommend wearing eye protection: glasses or goggles of some sort.
I’ve had a few pins and needles break and one got awfully close to my left eyeball. That was enough to convince me that eye protection is so important.
The next step is to sew around the perimeter of the patch close to the edge. If you feel the need to secure it more, sew around the patch a second time.

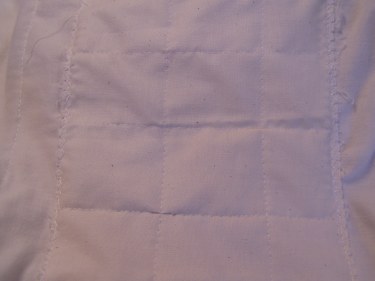
To secure the patch down well so that it stays in place during future washings, stitch some rows up and down and across the patch, as shown in the photo below:
Now, if you want it to be super durable (and I should think you do. After all, it’s alot easier to make it more durable now than down the road. And you already have it under the machine!)
Repeat the process entirely by putting a second patch directly on the same spot on the other side of the sheet, covering all the work you just did and sew it down again. If you’re particular, do the backside first and then the front. If you do it that way, you’ll see this (photo above) on the top side. The under side will show twice the stitching.
Now, get out there and do some arm bending sheet mending!
And here’s a post if you want to learn How to permanently fix a mattress pad.
***P.S. Just so you know, Thermalam is like a thick piece of felt. It is great for making tote bags and other crafts and that is why I had it on hand. You can buy it where you find interfacing at your local fabric shop. I found some Thermalam at JoAnn Fabrics. You don’t need much unless you are going to use it for other projects.

Hi, cool post. I have been wondering about this issue,so thanks for writing. I’ll certainly be coming back to your site. Keep up the good work
Thanks for the post- you present it in a very friendly and approachable fashion.
Today our toddler decided to take the scissors to the bed sheet instead of his construction paper, and managed to get pretty far before we looked up. We’re debating between fabric glue, iron-on patches, and the sewing, but we need to figure it out by bed-time tonight!
Great! I’m glad the help came just in time for you!!!
Thank you for this post. I’m going to give it a try! I’ve looked at other tutorials, and this has the best looking, sturdiest outcome. Thanks for posting this.
Thank you for your kind comments!
Sent from my iPad
Hey! Would you mind if I share your blog with my myspace group?
There’s a lot of folks that I think would really enjoy your content. Please let me know. Thank you
I’m glad you have enjoyed the content on my blog and I’d love you to spread the word! You are welcome to send a link to the blog or if you mention some information you got from my blog on your myspace page, please give me the credit…thanks so much!
This is great. My 93 year old grandma just asked me to repair her threadbare sheet and I was pretty sure I would stump google for the first time ever. But no, I found this post instead. Thanks and I love the bit about safety glasses.
Lindsay
Thanks for the info on repairing the sheet. Had a general idea of how to do it but thought there might be a new product out there. Guess there’s no easier way other than old fashion sewing which I CAN do. Again, thanks for the blog.
Love your great sense of humor! Thanks for the help!
You have convinced me that I can do this! Thanks!
Yay! That’s because you can!!!
Thank you! I knew it couldn’t be that complicated to sew a sheet up but for some reason I was stumped.
Glad it helped you!
Thanks for this, I will give this a try!!
Thanks much for this. I have fixed sheets before by zigzagging as you have done, but it always rips again in short time, as you mentioned. Right now I have four fitted sheets that are ripped/frayed, so I was thinking of “sacrificing” one of the sheets to fix the others but wasn’t sure if I wanted to do a combination of fusible webbing/fabric or just fabric (I don’t like the feel of the fusible webbing). I hadn’t thought of sewing material to BOTH sides and creating a grid to keep the fabric in place, so thanks for the tip! And thanks for mentioning safety glasses–good point!
Thanks for writing in, Terri. Hope this method works well for you!
I don’t have a sewing machine, can it be sown on by hand?
Yes, just be sure and sew your stitches close together so they will last through many washings.
Thank you! We don’t have the extra money right now to buy a new good-quality sheet set, so I will definitely be doing this. It really looks sturdy!
Why is it always the man who sticks his foot through a sheet & tears it? (They should do the repairing!!)
your pretty funny and did a great job with your tutorial. I will probably sit here the better part of my day just reading how you do things!!