I want to teach you how to alter a garment that has French Seams in it.
But, first, I’d like to talk about what they are and show you how they are made.
The French Seam is a seam that is encased within itself so that no raw edges can be seen.
You’ve probably seen French Seams on many types of garments including lingerie, bridal, haute couture, and even on fancy pillow cases.
They are beautiful!
And they are not difficult to master.
I use them most often when making a “wrap” for a bride or a girl going to prom.
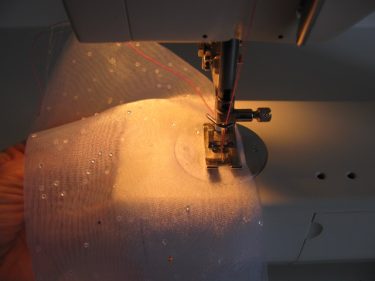
French Seams are often found on fabrics that are sheer like this blouse:

The photo above is taken of the right side of a blouse and the photo below is taken on the inside of the blouse:

French Seams are also found on garments where the fabric frays easily.
They are generally sewn on seams that are straight.
But you can find them in the curve of a sleeve as well.
I will be showing you how to do them on a straight seam (which will remind you of side seams and shoulder seams), but just use the technique on your curved seams and they should work very well.
Let’s take a look at how they are made.
I found a scrap of sheer fabric:

The main point I want to emphasize here, is that the construction of a French Seam is different than that of a regular seam.
When you stitch a regular seam, you generally stitch two fabrics together, with the right sides of the fabric facing each other. You will often see RST as an abbreviation for the term.
In this case, however, to sew the French seam, you will put the two pieces of fabric wrong sides together!
The goal of a French seam is to stitch the first seam with a very small seam allowance and then the second seam will have the first seam enclosed inside and to make that happen, you will stitch a wider seam allowance.
In this example, I stitched the seam with a 3/8″ seam allowance.
I used a contrasting bright pink thread so that you can see it better:
Once you stitch the seam, trim the seam allowance to just less than 1″4″. It could be 1/8″ if you want, but it doesn’t need to be that thin.
Your cutting doesn’t have to be precise, but if you are making anything with a sheer fabric, you want to be sure you cut it down very evenly because the seam allowance might show through the sheer fabric.
You might feel more comfortable trimming your seam allowance with scissors.
Here, I used a rotary cutter and mat to do the job.

Next, press the seam open.
Be careful not to scorch the fabric.
Some fabrics are not to come in contact with an iron.
They might melt.
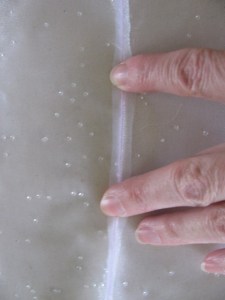
My scrap piece is like that. It has some metallic threads in it and some beads, so I’ve got a option other than an iron to use for it…
In this case, you can just “finger press” the seam by pushing it down with your fingers and running your fingernail on the seam to help it lay flat.
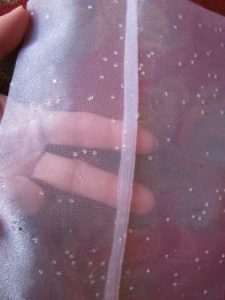
Next, fold the fabric right sides together, so that the seam allowance is on the inside now. This will enclose the seam allowance you just made. Press close to that edge. Again, you can finger press if you can’t use an iron.
The reason I finger press (or press) the seam is because it helps the seam lay down flatter than if I didn’t.
Here, I used an iron for 2 reasons: 1.) because this is a test scrap and not a real garment and 2.) I’ve set the iron on a rather cool setting so there isn’t a chance of it melting.
You want the stitches of the original seam to be on the very edge of the fold as you press it, not not showing on one side of the fold or the other:

Make sure you trim off any frayed edges along the seam allowance.
This is a very important step. If you don’t trim them, you’ll risk having lots of wispy “whiskers” sticking out after you sew the French seam and turn the garment right side out.
Now, stitch the entire seam using a 1/4″ seam allowance (or a bigger seam allowance if you want to and can afford to.

Press the seam to one side or the other. If you are making a blouse or dress, press the French seam to the back of the garment.
Ok, now let’s alter a garment that has French Seams.
Whatever amount you need to take in, is the amount you’ll need to trim off the raw edge of the fabric.
For example, let’s say you need to take in 1/2″ all the way down the side seam of a blouse.
First, use a seam ripper to take out the current French seam.
Next, open up the French Seam all the way (from armpit through the hem) and press the fabric flat. You want to get rid of all the folds and creases that were created by the original French seam.
Then, trim off the 1/2″ off the raw edge of the fabric.
Then, referring to the instructions above, put the seam back together wrong sides together first.
Follow the rest of the instructions above, stitching a 1″4″ seam at first. Then, when you make the French seam, trim that first seam down to 1/8″ and then after pressing, stitch the French seam with a 1/4″ seam. If you do the math, you’ll see that you are taking in a total of 1/2″!
What if you need to take in more at the top of a seam than at the bottom?
Let’s say you need to take in 1/2″ under the arm and then taper it to nothing, seven inches below the underarm.
Then, just rip out about 9 inches (or whatever you need to have room to work) of the seam, press it flat and trim off the amount you need to take in.
Then put the seam back together again, just like we did in the example above.
It’s the same procedure for any French Seam.
Before you begin, just be careful to do the math and check it twice before you begin cutting!
It’s easier than it looks and sounds. Try it on a scrap piece of fabric first and let me know if you have any questions!

I am in a dilemma with a bride’s maid dress with french seams on the over skirt. The gal ordered a size 10 and needs a size 14. I have enough fabric, from the tail of the skirt that had to be shortened, to sew a piece (1 & 7/8″) into the side seams. I am going to use a long triangular piece but I cannot figure how to incorporate that triangular piece using a french seam. Here you cover how to take in a garment. I need help! If you can provide it, I would greatly appreciate it.
You are right, this is a dilemma! But, I’m so glad you have enough fabric to add a gusset. In this case, doing a French seam would most likely be impossible. So, go ahead and do the alteration. I know it means that you’ll have to take out more of the seam than you would normally, but it should be doable. Also, don’t worry about how it looks when you transition from the French seam to the regular seam. It shouldn’t show, but you may need to clip the seam allowance at that spot to make it lay flat. Depends. See if it lays flat first and then clip if necessary. If you have a serger, I’d use that to finish the seams when you are done with the alteration. I hope that helps and encourages you!
Ugh, I have the exact same problem, enough flat seam on the lining, but a French seam on the chiffon over skirt! Not a very good design to begin with! But, I will follow your direction, although I don’t need to let out this dress but 1″ on each side which = 1/2″, so I should be good. Although, the French seam on the over skirt will be narrow, have no choice! I think it will look o.k. UGH!