Recently, a reader inquired about how to hand sew a hem. So, let’s walk that through together.
There are many techniques and stitches that can be used, so I just want to say up front that this is not the final word in hemming, but I hope it will help.
First, if you would like to look at the entire process of hemming from the time you pin a pair of pants to the finished hem, you may want to look at these posts first:
Hem Your Jeans The Professional Way
How To Hem Without Puckers: Tapered and Flared Pants
Even though the above posts deal with stitching hems with your sewing machine or overlocker, this post will tackle the actual hand stitching of the hem.
Now, depending on the type of fabric you have, you’ll want to choose an appropriate needle. If you are hemming through a thick fabric like a wool coat or denim, you’ll want a heavier weight needle. Sometimes, I even choose an upholstery needle for this job. Some of them are straight and some are curved. As a side note, when I am actually hand stitching upholstery or any tight area where its difficult to get a needle in and out, I use the curved needle. If you are hand stitching through leather, you can find a leather needle at most fabric stores locally or online.
If you’re hemming thick fabrics, I do like to use a double thread to stich with. It will be more secure and strong on heavier fabrics. For the purpose of this post, I will use a single thread through a medium weight cotton fabric. A single thread is also perfect for sewing with lightweight fabrics.
When I’m hand sewing light to medium weight fabrics, I like to use what are called “sharps” needles. They are a good middle sized needle.

If you can’t find a package of sharps, you can look for a package that has similar sized needles or packages that have multiple sizes of needles in them. Most fabric stores sell a pack of multiple sized needles and you can choose the one that fits you the best. Just be sure to not use an upholstery needle on a lightweight fabric. It will make large holes in your fabric and that won’t look good and may compromise the integrity of your hem.
To begin, thread a hand sewing needle by threading the end of the thread that comes off of the spool through your needle. I learned this trick many years ago. The reasoning behind it is that the thread won’t get tangled as easily if you thread the end that comes off the spool. Knot the end of the thread.
By the way, another reason I use a single thread is because a double thread tends to get tangled up alot easier on me.
Some people use beeswax or a product called “Thread Heaven”. (Update on March 24, 2021: I just found out that Thread Heaven has been replaced by a product called Thread Magic. I haven’t used Thread Magic, but I’m sure it is the same concept and works just as well. If you’ve used it, let me know in the comments what your experience with it has been.)

Thread Heaven is a very small box that contains a substance that coats the thread and keeps it from tangling. Beeswax has the same effect, I am told.
Here is Thread Magic if you’re interested in checking it out:

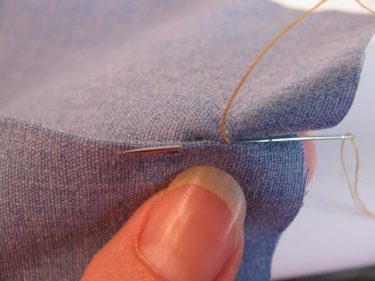
Once you thread the needle, put your finger over the thread (see photo above) and pull the thread through the thread magic substance, keeping your finger there, so that the thread gets covered with the coating. Do the same if you are using beeswax.
If you are ready to sew your hem, let’s begin. I like to serge or overlock the hem edge of the pants or skirt or dress. I like the finished edge that serging produces. (For this demonstration, I am using some scrap fabric so that you can see the stitches better).
If you don’t have a serger, you can finish the edge with a zig zag stitch, or trim the hem edge with a pair of pinking shears (if you have them), or add on seam binding or stretch lace that you purchase at your local sewing store. Walmart carries the latter two as well.
Let’s say you don’t have any of those options. You can always turn down the top 1/4″ of the edge and press it with an iron. Then, you can stitch on that folded edge. We’ll look at that in a moment.
First, let’s look at how to hem a serged edge.
I fold the serged edge towards me and hold it down with my fingers as I sew. You can also pin it if you’d like. (See photo below)
Bring your needle up through the fold (where the white thread is coming out below) and take a tiny stitch into the leg fabric of the pants. I try to only take up one thread in the pants, if possible, so that the stitch doesn’t show through on the right side of the garment.

Then, take your needle behind the fold and take a tiny stitch into the fold. (See below)
 (As you can tell, you are working from right to left across the hem. If you are left handed, just do the opposite and take stitches from left to right). Take another stitch into the pants and then a stitch onto the folded edge. Repeat this process until you are finished sewing the entire hem.
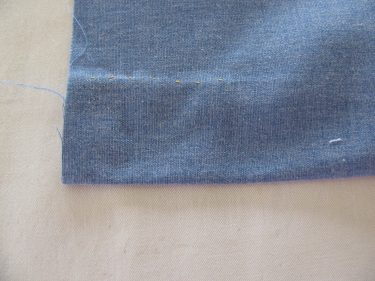
This is what the underside of the hem looks like when you’re finished:
 This is what the pants will look like on the right side of the garment:

I like this type of stitch because it is almost invisible from the right side of the garment. That is because it is not sewn right on the hem edge. When a hem is sewn right on the edge, it tends to make a ridgeline where the edge of the hem is.
Here’s another common stitch. For this one I come up through the hem section and take a small stitch on the garment. Notice I am working from left to right this time.

I continue by taking a small stitch in the hem and then a small stitch in the garment. Keep your stitches a little on the loose side. Don’t pull too tight.
After a few stitches, it should look like this below. It should look like a series of “x’s”

A third way to hand stitch a hem is by turning the edge under 1/4″ as previously mentioned. Once you turn it under, you can stitch it down similarly to how we did in the first example:
Take a small stitch into the garment and then one into the “tunnel” that is made by the fold.
It looks really nice on the inside of the garment

Just be careful not to iron over the fold like this

If you do, it will leave a bump on the right side of the garment like this:
Just iron on the bottom fold only and from the wrong side of the garment. That will ensure your hand stitched hem doesn’t show from the right side and looks professional.
There are other techniques to hand sewing a hem, but these are the three I use most often. If you have one that you love, comment below.
Happy stitching!

I am a self taught sewer, so this is very helpful, thank you
Thanks. This web
This website was the most helpful on hand sewing seams. I have been searching for days on this topic. I am learing to make clothes and i got the measuring down but sewing seams had me stuck. You truely helped.
Oh, I am so happy to hear that! Thanks for letting me know. 🙂
Linda
Your explanation is great. So clear. Thank you.