Are you looking for a fast, easy, and practical gift for you or someone you love?
This caddy can be made custom for any hobby you (or the gift recipient) likes to do while sitting in your favorite chair.
Your caddy can be used to hold remotes, gaming devices, sewing, knitting, or crocheting supplies, card games, little toys, diapers, wipes and ointments, or anything else you can dream of!
You can get really creative with the theme and fabric you choose.
This caddy will fit over any armchair or sofa and all you need to make it is the fabric of your choice and a few basic sewing skills.
If you can sew a straight line, this project is for you!
So, let’s sew an armchair caddy tonight!
All you need is 24 inches (or 2/3 yard) of 45, 54 or 60 inch wide fabric.
Some fabrics that would work well for this caddy are: canvas, duck, denim, corduroy, pant weight fabric, and some upholstery fabric. Actually, most fabric that is medium weight will work well for this project.
You will also need thread to match the fabric.
Read through all the instructions first so you have a good idea of what to expect. This is very simple item to sew, but it always helps to be familiar with the instructions before you begin.
You can prewash and dry the fabric according to the fabric care label on the bolt of your fabric, but you don’t have to wash it.
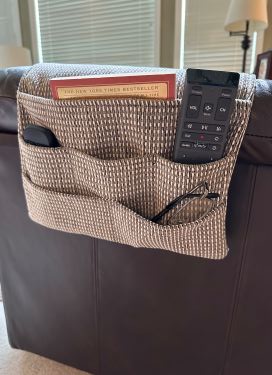
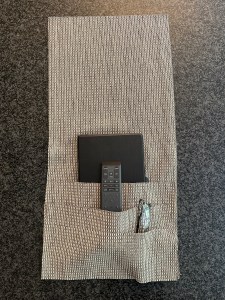
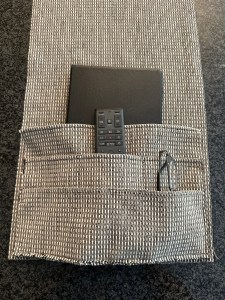
This caddy has 3 layers of pockets on it. The first layer is the deepest pocket and can hold a tablet or a newspaper or a magazine or two.

The second layer pocket has three sections and can hold 3 remotes or anything of that similar size and shape.
The lowest pocket has 2 sections and it can hold reading glasses, gaming devices, earbuds, kleenex packets or anything else that you’d like.
You can measure the items you would like your caddy to hold and make adjustments to one or all the pocket measurements I give you, to make your caddy.
This caddy has a finished measurement of 12 1/2″ wide by 29″ long.
The first time I made this caddy, I made it too short. I started with a piece of fabric 24″ long and after sewing, the finished length was 23″. There was enough of the tail end to tuck into the armchair, but not enough to hold it when the chair reclined. So, I made another one and this one should fit any chair or couch.
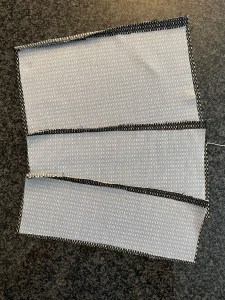
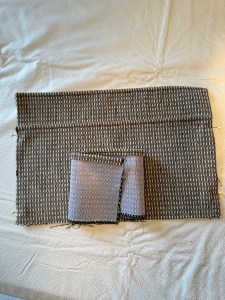
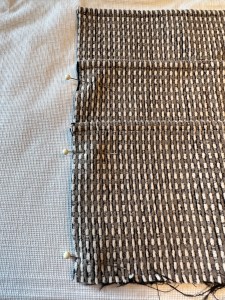
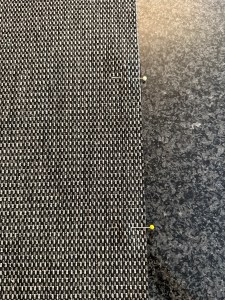
Begin by cutting out the following shapes:
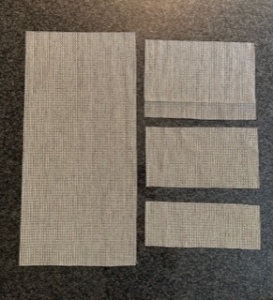
- You’ll need to cut 2 (you can only see one on the left side in the photo above, but you do need two of this size): 13″ wide x 30″ tall rectangles for the main body of the caddy (the front and the back)
- Cut one rectangle that is 13″ wide x 8″ tall (this is the rectangle in the upper right of the photo above)
- Cut one rectangle that is 13″ wide and 6″ tall (this is the rectangle in the middle right of the photo above)
- Cut one rectangle that is 13″ wide and 4″ tall (this is the rectangle in the lower left of the photo above)
You might be wondering how I decided on the measurements I chose. I am making this caddy for my husband, so I first measured the arm of the armchair. That told me how long and how wide I could make it, which gave me the measurements for the main body of the caddy.
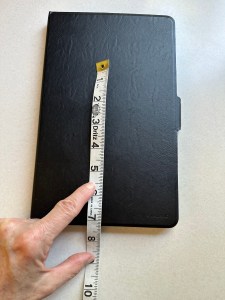
To figure out what size pockets I needed, I first measured my husband’s tablet. I knew that would fit into the biggest pocket. But, I didn’t want the tablet to sink so far down that we couldn’t see it and grab it easily, so I just measured part way up the tablet. This pocket has enough room to also hold a book, if he wants it to. So, this is why I chose to make this pocket 8″ tall.
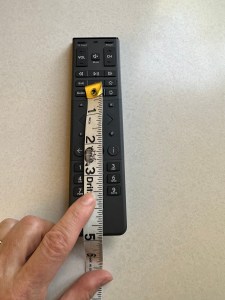
Next, I measured our largest remote across the middle and added about a half inch. I figured 4″ would be just about right. Since my finished caddy will be around 12″ wide, I knew I could get 3 equal size pockets on the middle layer of pockets.

I measured the height of it too, and felt like 6″ high would be a good size for the middle pocket layer:
Lastly, I put his reading glasses in the bottom layer and decided 4″ would work well for those and other smaller objects, like ear buds. If these measurements don’t match yours, just make the adjustments to suit whatever use you have for this caddy.
Below, I show what they will eventually look like inside the caddy, once you have the caddy sewn.
If you feel your fabric is too flimsy, you can iron on some interfacing to the back of the fabric, like I did here. But what I found out is that I didn’t really need to make it stiffer. When I remade this caddy, it was just fine without the interfacing. But, I wanted to show you what you could add if you want to:
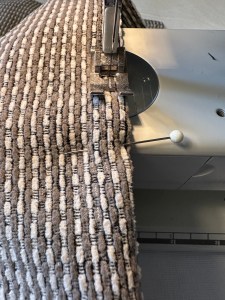
Next, press under 1/4″ on one long edge of each pocket piece.
In the photo below, it is the the top edge of each of those pocket pieces:
Once you press that edge under 1/4″, then press under an additional 1/4″ so that you hide the raw edge.
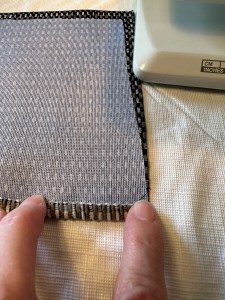
After you press it under twice, pin the edge, if you need to, because you are going to sew it in place.
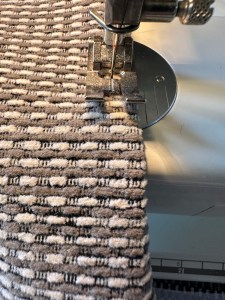
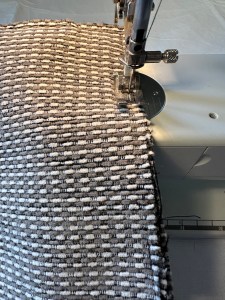
I like to use the right edge of the presser foot as a guide while I sew to keep my stitching straight.
All right, next, we will do two things.
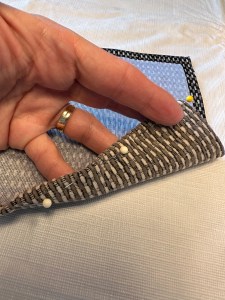
First, pin the middle pocket to the lower pocket on the side edges only.
To find the middle of both the pockets, fold them in half and put a pin in the fold as shown in the photo below. If that photo isn’t easy to see, just draw a line up the middle of the lower pocket with a non-permanent marking device, if you have one.
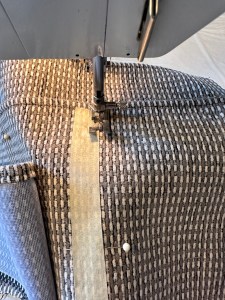
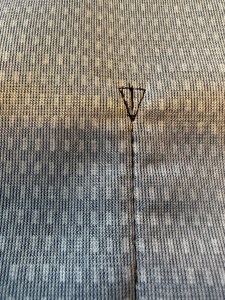
Next, you are going to stitch right up the middle of the lower pocket, which will hold the two pockets together.
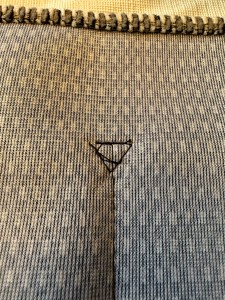
Now, you can just backstitch to hold that seam in place, or you can anchor it down a little more by stitching a few stiches to the left of the middle line, leave your needle down in the fabric, lift the presser foot, turn the fabric, take a few more stitches back to the center line, put the needle down, lift the presser foot, turn the fabric again and finish the stitching so it looks like a triangle like in the photo below. (I am showing the backside of my pocket because it’s easier to see)
Next, lay the lower two pockets that you’ve been working on, on top of the largest pocket. Now, you are going to do something unusual in the sewing world. Fold the sides of the lowest pocket to the middle like this and just leave them there:
Using your seam gauge or small ruler, check to make sure the middle pocket is the same distance to the top pocket all along the section. You can see I have a 2″ gap between the top pocket and the middle pocket. (Yours may not be 2″ if you are making a custom caddy. Whatever your measurement is, keep it the same all across the pocket sections.)
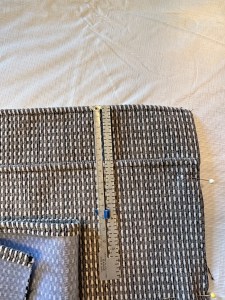
Next, take your seam gauge and measure in 4″ (if you are using my pattern of 12″ across). If your measurements are different, divide the pocket measurement by three and place a piece of masking tape along that measurement vertically as shown below:

Use that tape as a seam guide and stitch the middle pocket section to the top pocket, making sure you don’t catch the rolled lower pocket section in your stitching.
If you want to secure your seam, it will help the pocket be more durable. If not, just backstitch several times to lock the seam in place.
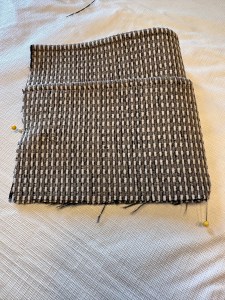
Unroll the lower pocket section and lay it down flat on top of the other two sections and pin the sides like this:
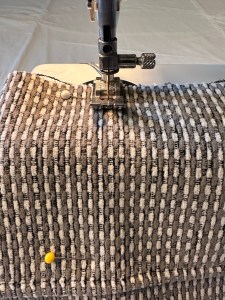
Next, using a long basting stitch, sew around the three raw edges of the pocket sections to hold them all together.
Now, lay the pocket sections on top of the main caddy fabric as shown below, making sure all the right sides of the pockets are facing towards you. (I put the accessories in the pockets so you could see the pockets better.)
Next, lay the second main piece of the caddy fabric face down on top of the pocket section, Right Sides Together. This piece will be the back of the caddy when we are finished.
I like to leave an opening about 6″ long on one of the side edges. You will turn the fabric through this opening later. Stitch all the way around the edges of the rectangle, leaving this 6″ section unstitched and open.
Next, stitch again, but this time, stitch using a 1/4” seam (using the right edge of the presser foot as my guide). This will reinforce the caddy by having the double stitching.
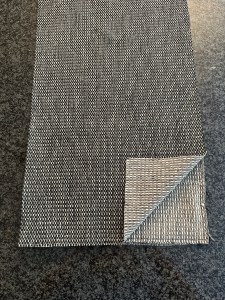
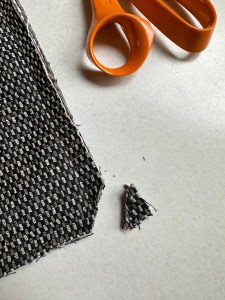
Once you are finished stitching all the way around the rectangle, trim off the excess fabric at the corners being careful not to cut any stitches you just made.
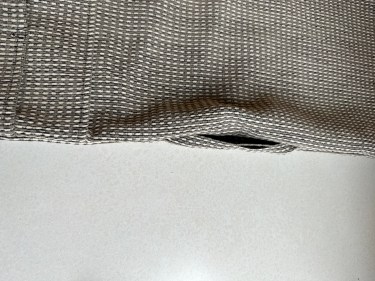
Turn the caddy right side out and notice where the hole is. Pin the opening closed.
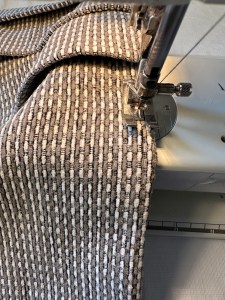
You’re going to topstitch the sides and top edges of the caddy, but you won’t topstitch the pocket area. Start stitching just above the pocket on one side and stitch all around the top of the caddy and over to the other side, stopping at the other side above the pocket area. It will be like a giant U shape.
When you topstitch over the hole, the machine does all the work and you don’t need to hand stitch the opening closed.
You’re finished sewing! That’s all there is to it!!
Give it as a gift or keep it for yourself and enjoy!
All you need to do to use it, is lay the non-pocket end of the caddy over the inside of the arm of a chair or sofa.
Tuck the non pocket end into the inner crease of the chair or sofa like this:
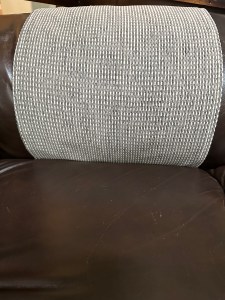
Lay the pocket edge over the outside arm and fill the caddy with remotes, books, magazines, a tablet or anything that you want to keep organized and off of the table.

Wasn’t that easy and quick?
Now, put your feet up and grab your favorite book or use the remote to watch a tv program and enjoy your new caddy!
And send me pictures to post on Instagram and on this post for future sewists to see and be inspired!

My companion has moved into a support home. She asked me to make her an organizer for her phone, TV Remote, Kindle, IPad etc. I dragged out the old machine and spent a very long time reading and cross referencing the instructions for this Armchair Caddy. I had help from the ladies at the fabric store too. The result is that the sewing machine is now cleaned and tuned up and my companion now has a new Caddy! Thanks for this marvellous set of instructions and pictures.
Gerry.
So glad to hear this was so helpful! Isn’t it fun to create and give where there’s a need. Hopefully, this will spark your sewing creativity! Thanks for this encouraging comment!
I don’t understand where you say to put the pocket unit onto the base piece with wrong sides together. If you’re going to then put the backing piece on right sides together, wouldn’t that cover the raw edges and give you the seam you need so that everything is facing the right direction when you’re done? I’m usually pretty good spatially, but I can’t understand why your directions say to do that…Thanks for any guidance. I love your design. I’m looking to make one for a friend who has lung cancer and can no longer sleep flat in bed and instead uses her recliner to sleep in. I just made her a double layered fleece blanket because she said that she’s always freezing.
Oh good catch! It should read the the wrong side of the pocket lays on top of the right side of the layer below it. I’ll fix that in the main section as soon as possible. Thank you! And thank you for your kind comments. You are such a sweet friend to make one of these caddies for her. I just prayed for her and I hope she has a full recovery.