Update: October 19, 2020
If you read my last post on How Much To Charge To Replace a Zipper, I promised I’d be back to show you how to put in a new zipper.
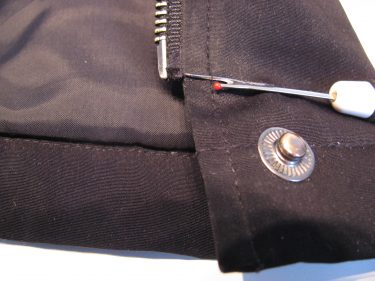
Here’s the jacket with the broken zipper:

On this jacket, the zipper teeth didn’t hold together when the jacket was zipped. Your jacket or coat zipper may have other problems. So, let’s replace the zipper.

Before you begin, be sure and choose a zipper that is long enough for the jacket opening.
Try to buy a zipper that is the same length as the current zipper.
If that is not possible, get one that is longer.
You can always shorten the top of the zipper, if you need to and I’ll talk about how to do that later in this post.
Here are two different types of jacket zippers:

The zipper on the left is a heavy duty silver metal zipper.
The one on the right is made of durable nylon.
For this jacket, the metal zipper was chosen.
Before you buy the zipper, zip it up and down several times to make sure it doesn’t stick and that it actually works.
You’d hate to sew it in and find out it was defective!
If your zipper tape is wrinkled, you could iron it, but be careful that you don’t hit the teeth on the nylon zippers with the hot iron.
I don’t usually have a wrinkle problem with jacket zippers.
But occasionally, a dress or pant zipper is wrinkled.
Let’s begin.
I start by grabbing my seam ripper and beginning just below the zipper, start taking out the stitches:
Pull out all of the stitches on both sides of the jacket.
As you can see, in this jacket, there is another row of stitching right next to the zipper tape.
It needs to come out too:

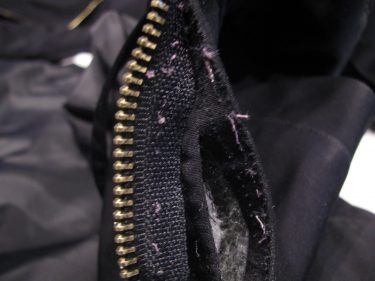
Here is what this jacket looks like as the zipper is being taken out.
I think it’s funny that the manufacturer used pink thread:
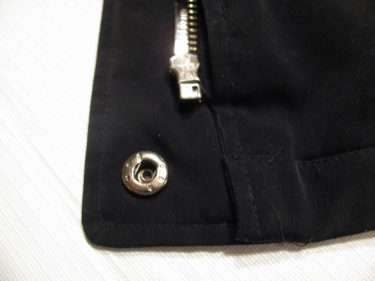
Here’s another look… near a snap:
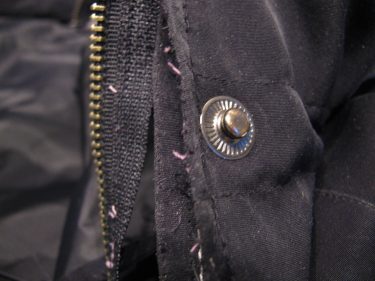
I’ll show you how to deal with the snap in a moment.
Before I take the zipper out of the top edge of the jacket, I pay attention to any detail I need to, so that I can put the new zipper back in the same way, if possible.
The zipper tape at the top is usually folded back inside the jacket so it doesn’t show from the outside. (So, if your new zipper is too long, just fold it back and tuck it inside the jacket top before sewing it in. Don’t cut off the bottom of the zipper!)
You can’t see it very well on this jacket, but just take mental notes of your jacket as you disassemble the area:

Once you take out the entire zipper, be sure to take out all the loose little threads.
Sometimes, a lint roller is very helpful with this:

I insert the new zipper making sure the correct side of the zipper is on the corresponding correct side of the jacket and pin it every couple of inches:

I like to pin because it anchors the zipper down enough so it doesn’t move as I sew.
If you are uncomfortable doing this, you can always hand baste the zipper in place.
Be sure to pin or baste the zipper so that the zipper slide won’t get caught in the fabric edge when you zip it.
I don’t measure this. I just eyeball it and give it about an eighth of an inch clearance.
Make sure that the lining of the jacket is lined up correctly to before you pin or baste.
You don’t want that bunched up on the back side at all.
Now, let’s talk about the snaps, if you have them.
When you come to a snap, you may notice that the zipper tape doesn’t fit down into the opening too well.
The snap is in the way.
Do you see how the zipper rises too high because of the snap?
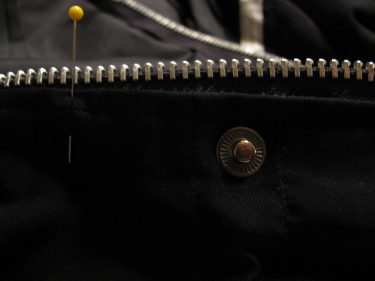
I place a pin right next to the snap on the zipper tape (see photo below).
It doesn’t have to be perfect placement as you’ll see in a moment.
You just want a visual marker:

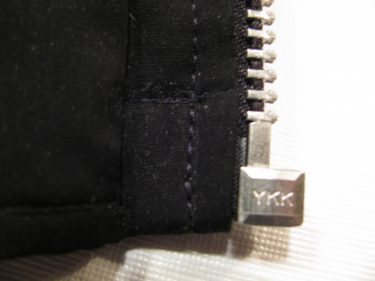
Next, with a pair of scissors, notch out a little semi circle on the zipper tape just below your pin, like this:

That semi circle is going to fit around the snap.
Now, remove that “marker” pin.
It has done its job.
Place the zipper tape back in the “hole” and continue pinning:
See how great that looks?

Your zipper will not pull out because you have that notch. Your stitches will hold it in place.
Once the entire zipper is pinned in, put your zipper foot onto your sewing machine.
I also use a denim weight needle.
They are better suited for a jacket, than an all purpose needle.
Begin stitching and be sure to back stitch so your stitches don’t come out later.
Stitch on the stitching line where the original zipper was, being careful not to run over your pins.
Take them out just before you get to them:

When you get to a snap, just stay on course.
You shouldn’t have any trouble staying on the original stitching line.

You might think from the photo above that there would be a small pucker.
To avoid that, I just make sure to hold the jacket tightly in front of and behind the zipper foot as I sew.
Let’s look at how that stitching line looks near the snap:

When you reach the bottom of the zipper, you’ll notice that the zipper tape has a thick, stiff area about one inch long.
I go slowly over this area.

Sometimes, I may even “walk” my needle over the stiff area so that I don’t break my needle. To “walk” your needle, use your hand wheel (and keep your foot off of the foot pedal) and turn it towards yourself several times as your needle “walks” over the thick area and then continue stitching as usual.
You may have noticed that the original zipper ended a few inches above the bottom edge of the jacket:
The new zipper was longer and it fit perfectly into the bottom of the jacket:
Remember that second line of stitching that was next to the zipper tape? You don’t need to worry about that.
This one row will hold your zipper in tightly.
Here is the finished zipper:

It’s easy to replace a zipper. It just takes a little time to learn how, but the effort is so worth it!
In addition, if you own your own sewing business and you’d like to know how much to charge for your work, I’ve written a comprehensive E-Book on Pricing that will answer all those pricing questions for you!

Yes! I love it when I do it the way you do it! Almost makes me feel like I know what I’m doing. 😉 Except I’m absolutely in love with the way you got around the snap instead of taking it out. SO much faster and easier!
Oh and yes – definitely check the zippers! After needing 12 zippers for Christmas costumes and not checking any, we ended up having to take costumes up and over heads because they stuck so bad. *Check the zippers before you buy them!*
Thank you!
Of course you know what you’re doing! You’re a great seamstress! Glad you liked the “getting around the snap” trick. No one knows you’ve done it and it’s the original sewing line, so it looks like it was never replaced!
I’m sorry about those zippers on your costumes, but you had a good idea to make them work. In those situations, you just gotta do what you gotta do!
Thanks Theresa! Linda
Thanks for being so completely understandable in your explanation! I’ve done this a few times..praying all the way…and had good success. It is not my most favorite repair to do, but in the end, it always looks great and functions well. And thanks for the tip about checking the zippers before buying/installing! I’ve never had a problem before so I will be sure to put that on my checklist as a preparatory step! I can’t imagine going through everything to find an installed zipper that doesn’t work! Again, keep up the good work and keep the tips coming!
Thnaks for the tutorial. Do you have any hints on how to avoid ripple effect on fleece type jackets. It seems no matter how careful I am at removing the old one when I finish putting the new in, it doesn’t lay flat, I have assumed its because it was stretched when taking out the old one. Thanks, Darcy
Like Darcy, I too struggle with unpicking zips from fleece – the fleece seems to expand having been unpicked and looks awful and misshapen! I no longer unpick the zips from fleece jackets I just cut them out REALLY carefully and close to the fabric. The end result doesn’t conceal the new zip in between the fabric, so is not as neat as I would like, but it is perfectly functional and you can’t tell from the outside!
Thank you! I’ve been looking forward to this tutorial. I’m off to tackle my husband’s ancient windbreaker & it’s broken zipper. He’ll be thrilled to be able to wear it for another 30 years!
I found your site this morning and can’t wait to have time to go through it entirely. I do a lot of zipper repair. I always prefer repair to replacement if possible. In the case of this example zipper a new tab/pull/slide would have solved the problem. Any time a zipper comes apart behind the tab it indicates that the tab has been stressed to the point that at least one side of the front and back of the tab are no longer perfectly parallel. You can buy metal top stops that just squeeze on to replace the top stop you remove in order to get the damaged slide off. They come in corresponding sizes to the size of the zipper you are working on. They are much quicker than creating a top stop with a needle and thread.
Thanks Nikki. (Now you tell me!!! Ha.) This is good to know. I appreciate it.
I have also found it is a good idea to replace the slider if the zipper teeth will not come together. Another trick I discovered is to very gently, (and I mean gently) with a pair of pliers, squeeze on the parallel side of the slider. You can’t even tell you have pinched it. It only takes a very tiny squeeze and sometimes the zipper teeth will close. You are right when you say the slider gets stressed. If the squeeze method doesn’t solve the problem then I replace the slider.
I have run into jackets where the snap is positioned directly over the zipper tape and am unable to remove the zipper because the snap is fitting so tightly. What would you do in that situation? Cut out the zipper around the snap? It then would be very bulky trying to fit a new zipper around the snap using the semi circle cut out on the new zipper tape.
I want to thank you very much for your clear, correctly spelled tutorial on how to replace zippers. What a help it has been to me! And seriously, not having to interpret misspellings has enabled me to understand your directions that much faster. You are very appreciated.
I haven’t had that kind of a compliment before, but I’m thrilled to get it. Thanks! I try to prrofread each post before I publish it, so I’m glad you liked it. I hope you like the other tutorials I’ve written and find them helpful as well.
It’s great to find simple tricks for zippers. My problem; however, is the side that goes into the zipper slide. The fabric has started to give way making it hard to close the zipper. The little metal piece is partly detached and no longer slides into zipper pull. Is there an easy trick for repairing oppos3d to replacing zipper? Thanks for any advise you can share.
That is such a good question. I have not found anything that works that also looks good. I usually replace the zipper in this case.
After reading your instructions I felt confident enough to replace the zipper in my husband’s 15 year old goose down parka. Keep in mind we live in Arkansas and he probably wore it 2 weeks a year, but during those two weeks it’s a life saver. It is hard to justify spending money on a new one. I learned-
-If it is a down filled coat, sew a seam along the zipper to contain the feathers as you rip out the zipper.
-You CAN use a seam ripper “up side down”, putting the little ball end inside the seam so you don’t poke holes or rip the fabric by mistake.
-If the snaps are too close to the zipper, don’t rip out the old zipper. Just cut off the teeth, seal the cut edge with Fray Check or the like, and sew the new zipper to the old tape. (I define “To Close” as less than the width of your zipper foot’s ability to pass between the teeth and the nub of the snap. I have a new machine with the snap on type foot and is almost 3/4″ wide! The old machine who’s zipper foot would have fit, needs repair.)
-Since I had ripped out the zipper when I found the zipper foot problem I sewed a 3-sided box around the snap, not catching the zipper at all, and then used Amazing E-6000 to adhere the snap to the tape since there was a little pocket created by the box.
Well it is 29*, ice on the roads, and my husband HAD to work today. I fixed it last night so I asked him to be gentle on the snaps today until the glue fully set up.
Your instructions were very clear. I just ran into some educational situations!
Great the post helped you Susie. Congrats on a job well done!
Thank you so much for these post:)
I’m confused about the zipper. Can we just use any type of zipper or there are special zipper for jackets? Since we have to split it half?
Thanks.
Good question. Yes, you need what’s called a separating zipper.” Some people call them a jacket zipper. It is found in the same place that regular zippers are found at your local fabric store. A regular zipper is used on a dress or a pair of pants, for example, and when you unzip it, the garment stays as one unit. A jacket needs to separate so that you can put it on. I hope that makes sense.
Hi, Anonymous. I just replaced three jacket zippers in the last two weeks and I can speak only from my experience. I had three jackets- two were fleece jackets without a lining (one adult and one toddler sized) and the other one was a fully lined adult sized down jacket. Each jacket already had a full length broken zipper in them to start with. I chose to measure each jacket and purchase for the adult ones something called a “parka” zipper that has dual separating sliders. For the toddler’s jacket I chose a “parka” zipper that had one single slier on it. I purchased all of them at three separate times, but was able to use a coupon for “40% off one regularly priced item” at Joann Fabrics. Just my experience.
This is awesome! I am gonna try this and will let you know how it goes. Thank you!
so many times after I’ve sewn in both sides I find one side of the jacket is longer than the other, like about a half a inch. I always leave the zipper zipped up when sewing it on to each side, but don’t understand why one side of the jacket ends up longer. HELP.
Good question. Try basting the zipper with stitches that are not too long or far apart. It may be that your fabric is moving too much as you sew the zipper in. Also, try to sew in the same direction. If you put one side of the zipper in from top to bottom, do the other side in the same direction: top to bottom (or vice versa).
Thanks for the suggestions. I’ll try them and see if it helps.
I usually start with the slider side when installing a new zipper as it seems to be easier for me to do it that way. I don’t know why, but that side seems to be a little more difficult when it comes to lining it up. Once you have the one side installed then add the other half and zip it up. Very carefully make a tiny snip about 1/6th of an inch in the tape of the unsewn side of the zipper where there are horizontal stitching lines. Also do this at the top and bottom of the zipper. Then unzip the zipper and line up all those snips to the horizontal lines of the side you are sewing. I then baste everything in place including the liner. Zip the zipper again to make sure the horizontal and top and bottom are in alignment. If satisfied with the placement then sew it in. It works perfectly every time just make sure the snips are right on the horizontal lines.
Zip up the zipper after having sewn in the one side of the zipper. I usually start with the slider side of the zipper. Once the side is installed then zip up the zipper and if there are any horizontal stitching on the garment where you need to line up the eaist or something then take your scissors and make a small snip on the zipper tape to line up with the horizontal lines of the jacket. When you pin or baste make sure the snip is lined up exactly with the horizontal stitching. If it gets off a hair then it will show when finished. Be very exact about this and sew the other half of the zipper to the garment. It should come out perfect every time.
Hello I just finished repairing my brothers jacket zipper. I replaced a nylon zipper with a metal one. I was so frustrated because after I sewed the zipper tape in, the zipper kind of curled or puckered and now the zipper won’t zip smoothly. I started another jacket which is a thin fleece and the same thing. Why is this happening?
Sometimes this happens when your machine pushes the zipper as you sew and if you sew the opposite direction on the other tape, it will do what you’re talking about. The fix is to take it out again and baste it down good with hand stitches (not just pinning) before you machine stitch. Fleece is a fabric that will move on you a lot, so it’s really important for fleece to baste it. Hope that helps!
I have found that using a glue stick to temporarily hold zipper in place in combination with Clover clips for added hold worked wonderfully for stretchy fabric jackets.
You are a Godsend! Once upon a time, I sewed. A lot. Costumes, couture, curtains, and a whole lot of other fun projects. However, I went back to college and became a teacher. While I love my job, I really haven’t had much time to sew. I’m now getting back into it. Of course my first project was hemming a bridesmaid’s dress. Hemming turned into “Oh, I can’t zip up my dress, none of us can! Enter your amazing blog! I read your instructions through, and just did it! You can’t tell the dress was altered that much unless you really look at it! THANK YOU! THANK YOU! THANK YOU!
Susan, I am sooo happy to hear about your success! Thank you for letting me know. I’m glad the blog has helped you as you transition back into sewing.
in purchasing a coat or jacket zipper I learned you need to buy
open face or the coat zipper that cost more but it’s better than a new coat or jacket
I am taking all of the advice in as I have been designated to sew zippers into coats at work though I am not experienced at this. I really need all the help I can get ie hints and tips. Thank-you very much for your information.
I am going to put a separating zipper in fleece rather than buttons and buttonholes. Where do I line up the zipper? Which pattern markings do I use? Thank you. This is for a doll jacket.
Hi Rhonda,
First you’ll need to consider that you don’t need the facings in your jacket and you don’t need the jacket to overlap as you do when putting in buttons and buttonholes. Since I can’t see your pattern and am not familiar with the style of it, just move the zipper around until you have it in a spot where it looks good. usually, that is at the end of the collar or neckline area. Look at full size jackets for your guide. Hope that helps!
Success!!! Thanks so much for these very detailed and exceptional instructions. I put a new metal heavy duty zipper on my ski jacket and got around the snap just as you outlined. Also, thanks to my sister for teaching me how to sew when I was a kid; did lots of knee and elbow patches. Some guys can sew!!!
Yesssss! I love it when men sew! Congratulations on putting in your zipper and letting me know that you had success!
If you have too long of a zipper you should pull the teeth out at the top so you don’t have so much extra at the top. You can remove the zipper stop at the top and remove some teeth and then put stopper back on. Use a pliers to remove the teeth and stopper.
But u never said how much u charge… u only said a flat rate … I need to know what that flat rate is please n than u kindly…
Please read my post about pricing!
https://sewfordough.wordpress.com/2009/06/05/pricing-strategies-for-alterations/
Thank you!
Wow! You are so thorough & methodical. You have given me the confidence I need to put a new zipper in my husband’s jacket! Wish me luck!
Haha, thank you! The Lord must have wired me that way. I’m glad it helped. I know you’ll do a great job!
Thank you. Very informative.
You’re welcome! Glad to hear it helped!
Thanks so much wonderful tutorial, so cool.