Have you ever tried to hem a pair of pants and by the time you were nearly finished sewing it, you realized that you were going to get puckers?
It happens to the best of us.
But, how do you avoid it?
I couldn’t find the answer anywhere in books or on the internet, so I devised my own method many years ago and it works like a charm.
I should probably try to patent it or something, but I’ll put it out there for the world to see today. Just remember you heard it here first! Ha!
To begin with, follow the post on How to Hem Pants and Skirts. Do everything it says to do up to and including the 7th photo. That means, you’ll be marking the new hemline, pressing it, and trimming off the excess.
After picture #7, the next paragraph shows how to tell if your pants are straight legged or not.
That post, How To Hem Pants and Skirts, covers how to hem straight legs.
This post that you are reading, is for how to hem your tapered and flared pants.
If they are tapered (they get increasingly narrow as they approach the hem), then follow these next steps.
If they are flared (Wider at the ankle than at the knee), we’ll cover that farther below.
For a tapered (narrow at the ankle) pant:
If you fold up the pants at the new hemline, you’ll see that the new cut edge does not lay flat against the pant leg. There is excess pant leg material as shown in this mock pair:

So, this means we either have to narrow the pant leg above the fold line or increase the diameter of the hem below the fold line to get them to lay flat.
Do you see how that makes sense? Think about it for a moment until you understand, because it is the key to this hem’s success.
To know how much to increase the hem amount, or decrease the leg circumference, (most times, you need only do one or the other, but I have worked on pants where I have had to adjust both), pinch the excess amount of fabric above the cut edge and that will tell you how much you need.
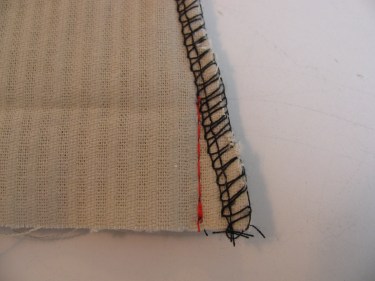
It’s usually enough to increase the amount below the fold line. As you can see by the red stitching line, I have stitched from the fold line out diagonally to the serged area:

This amount from the original black seam to the new red seam is the increase. Now, take out the original stitches of the black seam from the original fold line at the hem straight down to the cut edge. In the above photo, it’s the black seam line to the left of the red one.
In the photo below, I’m using a real pair of pants to demonstrate this. Can you see where I stitched in a new beige seamline that is at a diagonal to the original seam?

Many times, the manufacturer will use a chain stitch for this seam and you can rip out a stitch and pull it and the whole thing comes out quickly in one long thread.
Flip the pants over so you can see the expanded area:

Next, press that area flat.
Do that alteration to both the inseam and the out seam (side seam) of the first leg this way.
Now, fold the hem up on the fold line and check to see if it lies flat.

If it does lay flat, do the same alteration to the inseam and out seam of the other leg. Then follow the instructions just after the 8th photo in How To Hem Pants and Skirts.
If there is still too much excess in the pant leg, you’ll need to take some out of the area above the foldline (since you’ve increased all you can below the foldline.) It’s never usually very much, maybe another 1/4″ amount.
To do this, stitch a seam (as represented in red below) stitching gradually out from about 6 inches above the fold line (Actually, you could start stitching as far up the pant leg as the knee if you need to), keeping that 1/4″ distance until just before you reach the fold line. If you don’t, the cut edge will still not lay flat. Stop stitching right at the fold line.

You can trim the seam a little if you want, but it’s not necessary.
If you have a flared leg pant, you’ll want to do the opposite:
Stitch straight down from the fold line to the cut edge (red stitching line).
Then, make sure your hem lies flat.
Fold up the hemline and follow the directions after the 8th photo in “How To Hem Your Pants and Skirts”. Or, if you are hemming jeans, go to the post on “How To Hem Your Jeans the Professional Way”.
If you need to hand stitch the hem, here’s a post on How To Hand Stitch a Hem.
Any questions? Just email me at The SewingGarden@gmail.com and I’ll get back to you as soon as possible!
Now go sew a hem without puckers!

Thank you!!!!!!!! I can now hem without puckering. I tried this today and it worked perfectly.
Hey, that’s great! I’m so glad it helped. Thanks for letting me know. 🙂
Thank you so much for this site and for all of your tips. They are easy to understand and I have looked all over for how tos since I am new to sewing! Thank you for the patch tips also. I just got a new machine and folks are lining up and I havent even learned how to sew yet, lol! oh me! well, together with you, Im sure I can do this!
I’m so glad to hear that this site has helped you. Wow, you already have customers lined up! That’s great! I am sure you’ll do a great job. I f you ever have any questions, just e-mail me at thesewinggarden@gmail.com and I’ll see if I can help. You might also want to look at the posts on pricing strategies and the “Alterations” and “Sewfordough” tabs at the top of this page. Have fun!
You are the bomb. How could I not have thought of such a simple solution to hemming pants without puckers. I have a pair of my husband’s expensive dress pants in the closet dreading to have to deal with PUCKERS. Now I am sure I can hem these pants without the puckers, which means the pants I did hem with puckers I will have to redo.
Thank you “sew” much for sharing your knowledge.
So glad it helped. It won’t take you very long to redo the ones with puckers now that you have the technique! Have fun and let me know how they turn out.
You are a genius – thank you, thank you!!
I am hemming about 20 pairs of tuxedo pants for a high school men’s choir; some of the pants are REALLY long, but we can’t cut them off because they will need to be hemmed to fit other students – taller or shorter – later on.
The extra-long, tapered legs were giving me fits – but I think your solution is going to work! I didn’t even re-stitch the seam – I just opened it up so it would expand and not pucker the hem. We can always re-do the seams later if we need to.
Thanks again!
So glad to hear this helped. And, actually, you thought of an additional solution (not stitching the seams back up!). In your case, that is a perfect solution since those pants will be re-hemmed every year. By the way, how did you tame all the extra fabric at the hems?
I just tried your technique and turned my pegged leg pants into cuffed capris. This method worked great! Thanks for sharing.
Wow, congratulations! You did alot of work on those pants! Glad it worked so well.
Thanks so much! I think you just saved me about $100 and weeks of waiting for the tailor to return my so-so alterations! I’m not a great sewer but this was easy and it looks great.
Dawn
So glad it helped! You don’t need to be good at sewing, you just have to know the techniques involved and you’ll have success. 🙂
thank you SO much for this tutorial! my friend asked me to hem 2 pairs of pants for her…expensive linen pants! eek! i was doing great until i started to pin and realized, duh! these are flare legged! i was just going to keep on going and let it pucker and tell her “it’s the best i can do” but since these pants are so nice i couldn’t bear to do it! thanks so much!
I think that’s how I finally decided I had to figure it out…I was thinking that “it’s the best I can do”, but I thought there had to be a way to get those puckers out to where the fabric would lie flat.
Thanks for the sweet comment!
A reader e-mailed me this morning with this question:
Hi there,
I’m planning on taking a pair of flared jeans I have and turning them into cuffed capris and decided it would be wise to hem them first. In your “Hem without Puckers” article, you briefly mentioned how to deal with the flare and I’m wondering if I’m supposed to do steps 3 and 4 (respective to the order of the pictures) before I delve into stitching straight from the fold line to the cut edge. I’m also wondering if after that I continue with steps 9 and on (also respective to pictures) on the “Hem Pants and Skirts” article.
Both, by the way, are extremely helpful!
To answer her, I wrote:
As you probably noticed, the first 6 photos on the “Hem Without Puckers” article refer to tapered pants. My guess is, that after you cut off the jeans to make them a capri length, that you will have cut off all of the flare. Is that correct? If so, what you may have left is basically a tapered pant leg. If that is the case, only do the directions for the tapered leg (not the flared.)
However, the tricky part comes in that you want a cuff, so I wouldn’t use the “Hem Pants and Skirts” article unless you want a wide hem. My guess is that you’d want a regular jeans hem in which case you might want to refer to this post:
http://sewfordough.wordpress.com/2009/05/06/hem-your-jeans-the-professional-way/
Let me know if your situation is different than what I described or if you want to do soemthing other than I suggested.
Thanks,
Linda
thanks so much for the puckering info!!!!! you saved me on a hemming job! great info for future use!!!!
Thank you for this information. I have been working on hemming my hubbie’s suit pants for the morning, blind stitching on my machine. I have sewn, ripped, sewn, ripped and at 2:00am, tried to google, “hemming tapered pants”. Will follow your steps, then off to bed!!
Hi Louise,
I hope you had success with these instructions. Let me know if you ran into any problems.
Thanks!
Linda
Thanks again! The pants look beautiful! After hours of sewing and ripping, I was praying for wisdom and guidance, and found your website!! The hard part was ripping out the old stitches. If you can’t find the leading thread, it’s impossible to remove them quickly and easily! Practice, practice – there’s another pair of pants awaiting the same treatment.
Oh, good. I am so glad to hear it! Yes, ripping out seams is a painstaking adventure. Click on the post below and read the comment section if you haven’t already. There may be a good tip in there for you!
http://sewfordough.wordpress.com/2011/05/24/a-question-for-you/
Thank you for the information. I have already used both of these methods. I am currently trying to hem up a pair of tapered pants that has a straight stitch inseam and a flat felled side seam. I need to oepn up the leg below the hem to accomodate the width, but I am a novice and don’t know what to do with the flat felled seam side. Can I let out the straight seam side below the hem and somehow decrease the width in pant leg above the hem by taking in only the straight seam side? Would taking in only one side cause a visible uneveness in the legs when wearing the garment? Thanking you, in advance, for your help.
Pam
Finally the answer I needed. Thank you so much.
Connie
I paid someone to make my 4 year old a pair of elastic waist, lined pique shorts and the hem looks horrible (puckered). Do you think I should ask her to fix them or take them to someone else? These are dress shorts and I can not bring myself to let him wear them puckered. I’m a beginner at sewing and I have never lined anything. Therefore, I had someone else make these shorts. I appreciate any suggestions. Thanks, Lisa
I would take them back to her. No one wants to fix someone else’s mistakes and it’s good to keep the original seamstress accountable. You already paid her, so it shouldn’t cost you any more to get them right.
Happy Easter! Linda
Sent from my iPad
What happens when you CAN’T reduce the leg width? Sometimes there’s not enough seam allowance to work with below the fold, especially if the fabric is delicate or ravelly or the taper is too extreme (one good reason to turn the pants into shorts). Sometimes the seam above the fold must remain intact, say, because a cargo pocket is over it. And sometimes the pants lack an outside seam altogether, like the linen ones I’m looking at now. In some situations, adding a notch to the leg on the outside seam buys just enough room for your method to work. But it can be tricky, and often requires improvisation. The only other approach I can think of involves using the cut-off fabric to create a facing and doing it that way. But unless the pants are flared, THAT piece of fabric wouldn’t be wide enough either. If enough cloth is available, do you think the piece for the facing could be turned 90 degrees? Or on the bias? Obviously piecing would be a real hassle here, no matter how you did it. Of course, in some cases this approach wouldn’t work anyway; instead of a nice flat fold at the edge, you end up with a bulky seam (which would be fine if you’re going for cuffs). I’m interested to hear what you think about all this.
I believe you can always reduce the leg width. Did you mean…what happens when you can’t increase the leg width? That problem was addressed in the post above. You need to take more out of the leg width above the hem fold and make the pants narrower before you continue the process.
I am not sure I’ve ever seen a cargo pocket at the hemline.
If the pants lack a side seam, just do the process on the one seam or make a facing out of other fabric to match the hemline.
By “making the pants narrower” you mean reduce the leg width above the fold (the new hemline), right? That is, if you can’t increase the leg width below. While I’m sure leg width can be reduced in most cases, for some reason I always run into the exceptions.
Say the pants have a patch pocket centered on the seam. Sure, I COULD remove it, alter the seam, and replace it. But that adds a LOT of work. Same if the pants have a piped seam or an inset panel.
Or maybe the fabric has a very loose weave. In this case, ripping out the original seam (which alone can be tedious with some fabric) leaves the edges vulnerable to unravelling. If this is below the fold where I’m trying to gain fabric, the material can end up compromised, leaving me two flimsy little flaps to serve as a seam allowance. If it’s above the fold where I’ve made the legs narrower, I may still have a puny seam allowance for a ways, or at least puny to me because I don’t have a serger to secure the edges.
Yes, this seam allowance gets a little bigger the higher I go, but I usually have to veer back to the original seamline pretty quickly. For one thing, I like a generous fit and can’t always spare much fabric. For another, I’m short, so I don’t have as much room to merge – especially if I’m hemming shorts as opposed to pants (which, BTW, is when the cargo/patch pocket issue comes up, either that or on fatigue style pants, some of which have pockets all the way down – not at the hem, but almost . . . especially if the pants were way too long to being with).
If I’m doing pants that are seriously tapered, they end up MORE tapered. If I’m doing pants with a tailored fit, I can’t always manage a smooth transition between old and new. It’s not always something specific; the pants just don’t have the clean, sharp lines they originally did.
Leaving the original seam instead of ripping it out [shudder], means I can’t manage to get the new seam pressed flat, so I end up with a clumsy seam – and a lumpy hem.
No doubt you’ve had success with this method, which I’m sure works great most of the time. And I think it’s wonderful that you’ve detailed it so completely here, and with very well thought out illustrations.
While I’ve never sewn professionally, I have sewn for a long time. Maybe it’s just that what stands out over the last 50 years are the “ones that got away”, not the ones I hooked.
Now, if I haven’t insulted you, I’d love to hear your thoughts on substituting a facing for a standard hem – in situations where this is appropriate, I mean. I don’t mean to imply this is anything but a last resort option. Do you think using the cut-off fabric – a bias cut – would work, or better to use a different fabric? Any stitchery tips, maybe something I wouldn’t think to ask (having never been industrious enough to try this)?
Yes, as I’ve mentioned in other posts, there are always garments that give you trouble. Each of you has to make the choice of whether or not it is worth your time and your customers money to do the hard work required in some alterations. Sometimes, it’s not worth it. Often, I go the long route because I want the finished garment to look as close to the original as possible, but only if the customer agrees. If they want the cheapest route, that’s what I do.
Yes, you can always put in a facing, but I rarely use what I’ve cut off for that facing because it is either too small in circumference or there are other issues involved (depending on the garment). I like to face with a fabric that is as close to the original in color, weight and fibers as possible. I have not done a post on that because it’s not the norm, but if you’ve made facings before, you know how easy it is. Just be sure you add for seam allowance and angle of the pant leg. Once you put the facing on, press that new seam line open and then press it up and under so that it doesn’t show. This means you may lose about an eighth of an inch in length, but that generally is not a problem.
Hope that helps!
On Thu, Apr 11, 2013 at 7:15 PM, Sew for dough
Thank you so much for the tutorial with pictures. You saved my sanity, I was trying shorten old bermudas and that hem was soooooo puckered… thank you very much.
You have no (NO) idea, how long I’ve searched the internet – how many videos and blog pages I’ve read through just trying to find the information you provide here on this page. YOU are a Godsend. An angel. Bless you ❤ My friend asked me to hem her dad's pants and I don't want to let her down. When I saw they were slightly tapered I figured I'd have to do some seam ripping but didn't want to "learn" or "self-teach" on his pants 😉 Thanks very much for the info and the pictures!
Hi Christine. Thank you for the feedback. I am so glad this helped. I knew I had to get it out to the world once I figured it out for myself. I am sorry you had to search so long to find it. I am hoping to get my blog to the top of the search engines but don’t know how to without spending a lot of money.
I went and turned the pants inside out and they are actually the khaki – side pocket work type pants? So, being tapered at the bottom slightly, the front fabric panel is wider than the back panel and it is intimidating to cut into someone else’s clothing. (I’m calling my mother-in-law for assistant management on this one – along with using your super tutorial =)
Christine
They came out great and I didn’t need back up help after all.
I used the same color threading and you’d never even know they were hemmed – no puckering.
Thanks very much once again =)
I am so lost by this tutorial! Are you trying to give instructions on how to remove the flare from pants? I want to know how to shorten bell bottom pants without ruining the shape of the bell.
Whenever you take off some length from flared pants, you will lose some of the flare. But this tutorial is designed to show you how to hem flared pants so that they lay flat without puckers. You might try re reading it slowly or ask a seamstress to do the alteration for you. Hope that helps you.
Thanks so much! Your tutorial was a big help!
Yay! Glad to hear it helped you! Thank you for letting me know.
I wish I would have found this sooner. I made a pair of pants and have been struggling with the hem all day! One leg came out fine, but the other kept puckering and I couldn’t figure out why. Sewed and ripped it out more times than I care to admit. Finally gave up, popped open a beer, and decided to google a solution. Thanks for the tutorial!
I, for one, am grateful for Google! Yes, I remember ripping out hems many times until I just sat there and figured out the solotion. Thanks for letting me know how my blog helped you.
Bless your heart, thank you!
Thanks!