I realized after posting yesterday on How To Hem a Pair of Pants that are Flared that I hadn’t shown you how to hem a pair of straight leg pants (or skirts. The application here can be applied to both.)
So, let’s look at how to hem pants and skirts.
In this post, I will focus on the pants, but the technique is the same for skirts.
Grab a pair of straight leg pants that need to be hemmed. This is a pair belonging to one of my customers. I happen to know that she likes her dress slacks with a 30 1/4″ inseam. If you don’t know the inseam measurement, refer to the post on hemming your jeans the professional way and see how I marked the hem.
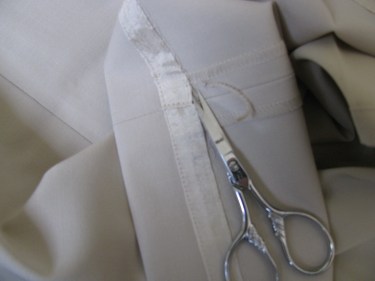
Now, I begin by taking out the old hem. On this particular pair, the hem was sewn with a blind hem stitch machine by the manufacturer. In this case the brand was Ann Taylor.
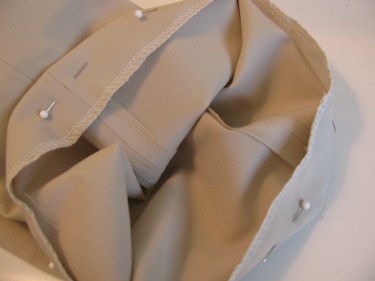
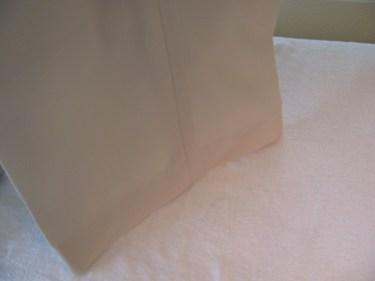
Notice the thick cording in the photo below. It is the one to two inch cord that attaches the lining to the pants at the side seam. It keeps pants from twisting as you wear them. Just cut it.
Now, carefully, remove the stitches that held the hem in place.
Next, spread the slacks out so that one leg lays flat. Measure from the intersection of the crotch seams down the one leg (as shown in the photo below).

Measure down and put a pin in the side seam, perpendicular to the seam as shown below. For these pants, I am measuring to the 30 1/4″ mark.

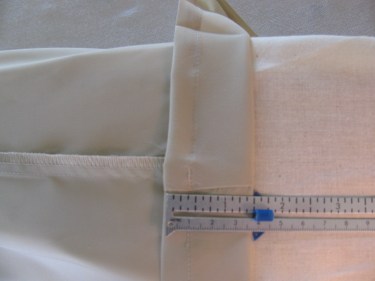
Measure the distance of the original hem. This hem is 1 1/2″ deep.
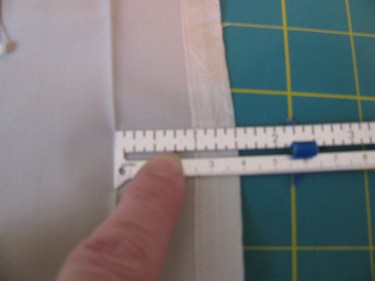
That will be how deep your new hem will be also. Write down that measurement if you need to.
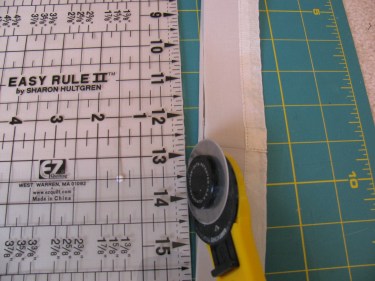
Now, if you have a rotary cutter and mat, slip the mat under the slacks as shown. Make sure the slacks edges are lined upon one of the yellow vertical lines. Also, make sure the fold of the hem on the underneath layer matches the fold line of the hem on the top layer.
Use a clear ruler and line up the side seam along one of the horizontal lines on the ruler. (In this case, you can see the side seam of the pants coming out from the 12 1/2″ mark on the ruler.)

Measure the hem 1 1/2″ away from the pin and trim off the excess fabric. (Do you see the pinhead on the fabric under the ruler? Make sure you cut 1 1/2″ away from that.)
If you don’t have a rotary cutter and mat, just mark the cutting line on your fabric and use your scissors to cut off the excess fabric.
Now, go to your iron, set the correct temperature for the fabric as found on the garment label and fold up 1 1/2″ and press on that line all around the hem.

It’s time to check and see if your pants are really straight legged or not. Turn up the edge along the new hemline fold and put both hands inside the leg and see if they lay flat against each other.
If there is any puckering in the pant leg, you have a flared leg. If you have puckering in the hem, you have tapered pants.
So, if you have flared or tapered pants, see this post on How to Hem Without Puckers on Tapered or Flared Pants.
These are straight leg pants. Do you see how the hem lays flat against the pant leg. That’s your clue.

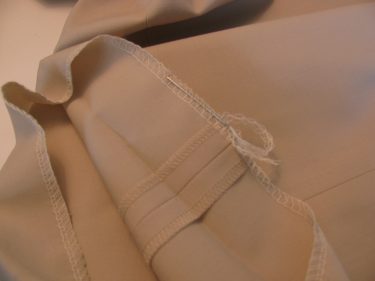
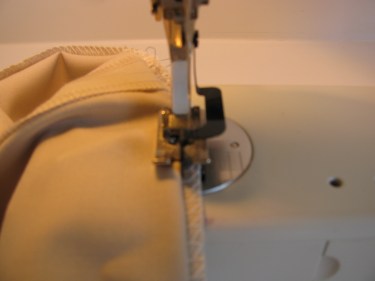
Now, the first step is that you are going to want to finish the edge of the hem so that the fabric doesn’t ravel. If you have a serger, this is the time to use it. If you do not, I recommend zig zagging the edge. I don’t like to use hem tape or hem lace as they end up puckering, and then your edge doesn’t lay flat against the pants.
After you serge the edge, leave a thread tail. Thread the tail onto a big eyed needle and weave the tail back into the serged area and then cut it off (as you see in the photo below). If you just cut off the thread tail, without weaving it back through, it will unravel and you’ll have an ugly sight and a weakened serged edge. You can also zig zag it back onto the serged edged using a regular sewing machine.
Now, fold up the pants along the fold line and put pins in parallel to the fold line, halfway between the fold and the finished edge.
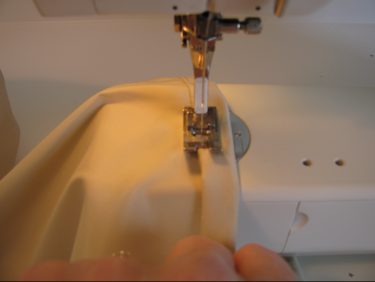
Set up your machine for a blind stitch using the blind stitch hem foot, if your machine has one. Check your machine’s manual for details on how to attach the hem foot and where the dials should be set on your machine so that the machine can sew the blind stitch. If your machine does not have this type of a foot, you should be able to buy one at your local sewing machine dealer, online from the manufacturer, or a website like ebay or Amazon. If that is not feasible, you can hand stitch the hem with a needle and thread.
Stitch all the way around the hem. The machine will take two or three stitches on the flat (or the fabric to the right of the needle) side of the fabric and then take one tiny stitch into the fold, so that it is barely noticeable from the right side. If it takes too big of a stitch onto the folded edge of the hem, then turn your dial to make a more narrow stitch.
If you have lining, you are now ready to shorten the lining fabric. You’ll need to shorten the lining the same amount that you shortened the pants themselves. In this case, we took up 1 1/2″, so press the lining up 1 1/2″ as well.
Instead of taking out the stitches of the hem on the lining, I trimmed off the old hem as close to the old stitching as possible. This saves valuable time.
Then, I folded the cut edge up to the fold line and pressed a second fold line into the lining as shown below:

Next, fold up the lining twice on the fold lines and stitch around the edge as shown, using a regular presser foot and a regular stitch:
Chances are the lining doesn’t need pressing, but the pants do. Always press on the inside of the pants on the wrong side of the fabric.
If you press on the right side of the pants, always cover the pants with a lightweight piece of cotton fabric (sometimes called a press cloth) so that the iron won’t leave a “shine” on the fabric. Never, never, press over the stitched area if you are pressing from the right side because it will leave unsightly lumps and bumps that you can rarely get out.
It’s perfectly fine to press over the stitches if you iron the wrong side (inside) of the pants:

In the photo above, you can see that I used a darker bobbin thread so that the blind hem stitch would show up.
This is what your pants should look like when you are finished…nice and professional looking!
Use this same technique to hem your straight skirts!

A reader e-mailed me this morning with this question:
Hi there,
I’m planning on taking a pair of flared jeans I have and turning them into cuffed capris and decided it would be wise to hem them first. In your “Hem without Puckers” article, you briefly mentioned how to deal with the flare and I’m wondering if I’m supposed to do steps 3 and 4 (respective to the order of the pictures) before I delve into stitching straight from the fold line to the cut edge. I’m also wondering if after that I continue with steps 9 and on (also respective to pictures) on the “Hem Pants and Skirts” article.
Both, by the way, are extremely helpful!
To answer her, I wrote:
As you probably noticed, the first 6 photos on the “Hem Without Puckers” article refer to tapered pants. My guess is, that after you cut off the jeans to make them a capri length, that you will have cut off all of the flare. Is that correct? If so, what you may have left is basically a tapered pant leg. If that is the case, only do the directions for the tapered leg (not the flared.)
However, the tricky part comes in that you want a cuff, so I wouldn’t use the “Hem Pants and Skirts” article unless you want a wide hem. My guess is that you’d want a regular jeans hem in which case you might want to refer to this post:
http://sewfordough.wordpress.com/2009/05/06/hem-your-jeans-the-professional-way/
Let me know if your situation is different than what I described or if you want to do soemthing other than I suggested.
Thanks,
Linda
Learned a lot on hemming cloths. Will return late
r for more information on other situations. Thanks again
I am shortening a sleeve on a jacket. The material keeps puckering as I hand sew the hem. What do I do to prevent this from happening? Do I open the seam ?
That happens because you are taking a smaller circumference and stitching it to a larger circumference. I have written a post on how to remedy this problem on a hem and the same principle applies to a sleeve. I’m having difficulty pasting the link here. So, type in the search box, “How to Hem Without Puckers” and click on “search” and it will bring up the post. That should help you with your sleeve.
Thank you! I’m a half-a$$ sewer… anything square – I can do. LOL I recently purchased several pairs of pants at a thrift store because they are beautiful but, of course, they need hemming. Now I’m not afraid to try it on my own. I appreciate your detailed explanation in layman’s terms
Thanks for letting me know. I’m so glad you’re gaining confidence in your sewing ability!