Do you have trouble hemming stretchy knits? They can be tricky. Let’s look at the various ways to hem knits so that they don’t stretch out.
Then, we’ll look at some alternatives and see if they work as well.
This dress is a customer’s. Her dog chewed the hemline and she brought it to me to see if it can be salvaged.
 So, I had her try it on with the shoes she will wear with it. I pinned it at the length she wanted it to be. To get that length all around the dress, I used a yard stick and noted that she wanted it 24″ off the ground. So, I put several pins all around the circumference so that I’d have the new hemline even all around.
Then, I folded under the hem along the pin line and put additional pins to hold the excess hem fabric. It might not look even when you hang the dress on a hanger like this:
 Take out any pins that are directly on the new foldline. Turn the garment wrong side out and press along that fold with the iron set at the correct temperature for the fabric. I always press the hems on the wrong side so that I don’t get a “shine” on the fabric from the iron.

Turn it right side out again and lay it flat. I put the dress on my ironing board and make sure the under layer isn’t getting caught underneath it.
I measured the original hemline amount and it is 5/8″ wide. This will be the measurement we use on the new hem.
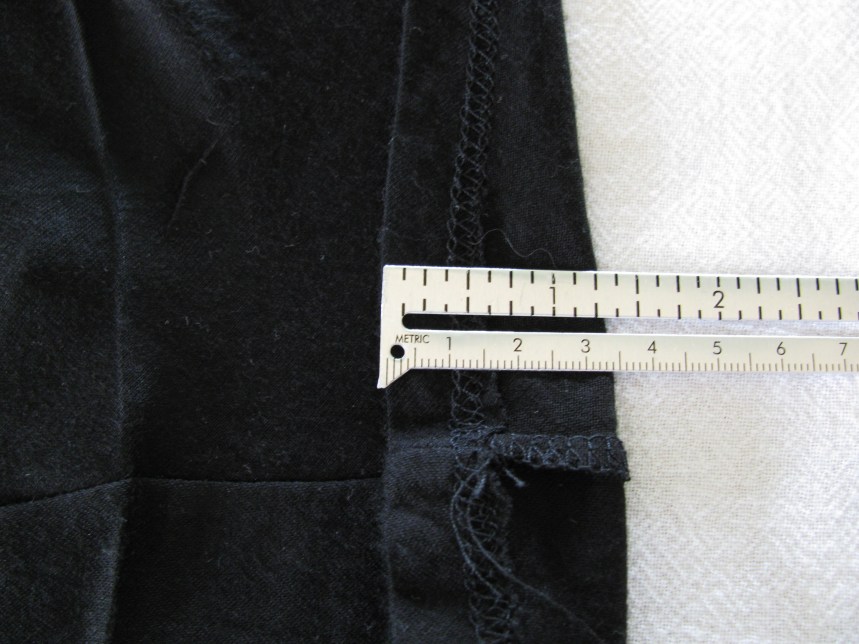
Now, we’ll cut 5/8″ away from our new fold line (towards the original cut edge).

***If you are hemming a T-shirt, do not finish the raw edge by serging it. The reason is that you want the T-shirt hem to stretch so it can fit over your head. If you serge it, you have lost the stretchiness of the fabric. (Technically, you don’t have to finish the edge on a knit fabric as they don’t fray). If you have a cover stitch option on your serger, use that because that will keep the stretchiness in.
Again, since this is a dress and doesn’t need to stretch at the hem, I have used a serger to finish the edge.
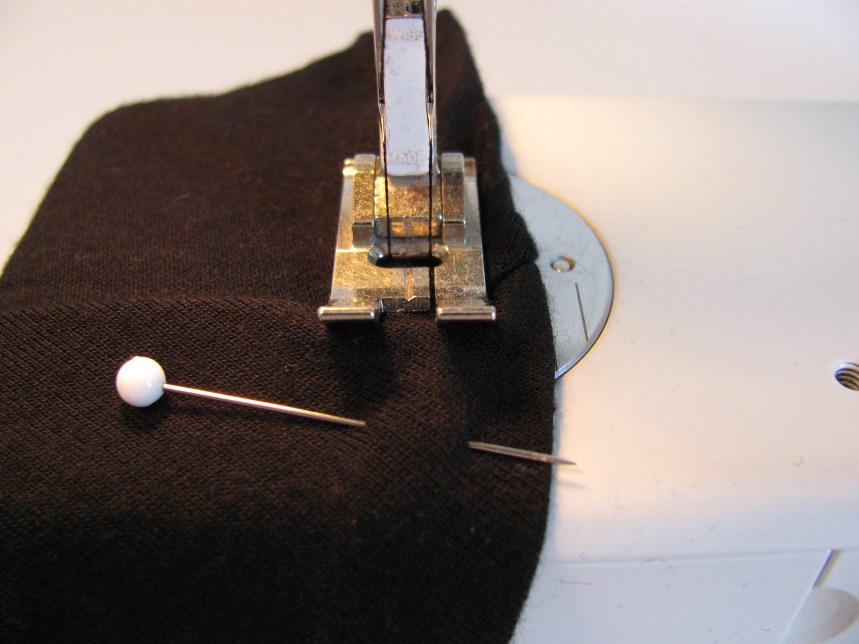
 Now, you’ll want to pin the hem all the way around. I use a pin about every half inch to every one inch depending on how stretchy the fabric is. The more stretchy the knit, the closer the pins should be.

See how I pinned the skirt from the right side? (I turned it to the wrong side so you can see it from that angle as well.)
If you are putting in a double hemline (two rows of stitching running parallel to each other), use a double needle. Schmetz makes these and you’ll find them at your local sewing store or online. I prefer the Stretch double needle, but my store doesn’t carry them anymore, so I have been using the regular double needle. There are varying widths between the 2 needles. This one is 4.0:

Replace your regular needle with this one. You’ll need to add another spool of thread to the second spindle on your machine. Thread both threads together as though you are threading with one. When you get to the double needles, of course, you’ll thread one through one needle and the other thread through the other needle.
You can see it better here:

If you are using a single needle, use a “Stretch” needle. These are also available at your local sewing store or online.
Stitch around the hem with the double needle (or the single). Be sure not to stitch over your pins. Take them out just before you stitch over that area or you may break the needle and cause it to get jammed underneath, which is a big mess to fix.
Notice, I am stitching at the 1/2″ mark. Since our hem was to be 5/8″ wide, we want to make sure we catch all the fabric in the hem we are putting in. This assures that we won’t miss any of the hem when we stitch.
 So that you can see the stitching lines better, I stitched this same seam on a white knit fabric with black thread. I did not serge this raw edge so that you can see what the seam alone looks like. As you can see on the backside, the double needle creates a seam that allows the garment to keep its stretch.
 You may be wondering if there is another way to put a hem in knit fabrics.
Let’s look:
1. Don’t use fusible web like Stitch Witchery to hold your hem. First, it looks baked on and it doesn’t stretch so that it looks like a piece of masking tape was stuck to the underside. By the way, don’t use masking tape or duct tape either! The gooey film is so difficult to take off.
2. If you want the double row of stitching, be sure to get the double needle. It doesn’t look near as professional to sew two single lines of stitching. The double needle makes it look uniform and professional.
3. Be sure to pin the hemline all the way around the garment. Or, you can sew a basting stitch in instead. If you don’t pin or sew a basting stitch, the fabric will bunch up and gather and then you’ll be forced to take out the stitches and start again. Sometimes using a walking foot helps, and sometimes not. Experiment on a scrap of fabric if you have a walking foot .
4. You can sew the hem by hand. You will want to use this technique when you don’t want the stitches to show at all from the right side.
Ok, I think that about covers it. I hope this has helped you understand the steps involved in sewing on stretchy fabrics.

This is a wonderful post. I just started using twin needles to hem some knit tops that were too long. I noticed for some of the tops that were stretchier the thread was popping when I stretched it over my hips. What am I doing wrong? Please help and thanks again for the great info.
Hi Mary,
Glad you liked the post!
It could be several things. I always test many things until I find the thing that works best. Every fabric acts differently. What works on one garment or fabric, may not work on another.
Try these:
1. Try to stretch the fabric a little as you sew. If that doesn’t work, try not stretching the fabric! Try holding tight behind the presser foot. Try holding it tightly in front of the presser foot.
2. Move your upper tension a little tighter. Then, try it looser, moving the dial a little at a time each time you take a few stitches.
3. Make sure you use the same thread in the in the spool holder as you use in the bobbin. Don’t use two different threads.
4. Lengthen the stitches.
5. Put a piece of paper between the fabric and the feed dogs. I use this alot when quilting and it works great!
I hope one of these does the trick. If not, e-mail me again and I’ll give it some more thought.
Linda
thanks for the tips and instructions, with the new maxi dresses now they ae way too long, I got one yesterday that needs about 4 inches off it, this double needle you talk about would that only work on a newer machine, I have a very old sewing machine. thanks in advance. Phil.
Thanks for this great thread. My question is, when you show what the stitch looks like from the backside on the white fabric, how does it get that zig zag look, while on the right side it shows the twin needle seam? I must be missing something but I’m not sure what. 🙂 Any info is greatly appreciated!!
Hi Lisa,
My machine just does that. On the top, it’s using two needles and of course, two threads, but on the bottom, the bobbin only has one thread. So, the one thread has to weave the two from the top together and that’s how it ends up looking. I don’t know if that is true for all machines. Does that help?
Linda
I’m just learning how to sew and took apart an old top and attempted to replicate it. Used super-stretchy, fine fabric. Got all the way to hemming, but had a hard time with it looking all wavy, but this did the trick! Thanks!
Thanks for letting me know. That was a huge project you undertook. Not many experienced sew-ers would have taken that on. Great job! Linda
I see you are using a Bernina. What foot works best with jerseys other than the walking foot? Thanks
This is a wonderful post. Thank you! My question is a bit basic, but a stumper for me. My machine only has one spindle. Can I piggy back two spools of thread on the same spindle???
I’ve never tried it. Try it and see. If it doesn’t work, thread your second spool through a “sippy cup” that has the lid on or something similar where it sits down inside and will hold the thread in there while you sew.
If you don’t have a sippy cup, let me know what you find that works!
Linda
For the lady who has only one spindle…try putting your thread onto two bobbins, then stacking them on your spindle.
Hi Linda, what a great post. I have been doing lots of T shirts so many that I finally bought a cover stitch machine , the only drawback to my machine is that I cannot back stitch. So I undo one side, stitch the hem, then sew up the open side on my regular machine. I was also wondering what price you get in your area for this alteration.
thanks,
Judy H
Hi Judy,
As you’ve probably read my post on pricing : http://sewfordough.wordpress.com/2009/06/05/pricing-strategies-for-alterations/ As you can see, I charge by the time it takes me. What I charge in my area is probably alot different than where you live. On average, I would say that you should probably be charging $15-$30 an hour based on your skill level (if you’re super slow, you need to adjust your pricing to match what other shops charge) and where you live. Hope that helps!
Linda
thank you Linda, I always appreciate your input.
judy
Oh, hi Judy! I didn’t recognize your email! Glad it helped!
Thank you so much for info I’m just learning to sew this was very educational.
I am practicing on my husbands old t shirts. Never got the hem to lay flat. Now I know why. I never used a double needle, worked on the tension. I tried to sew without stretching, I thought that would make the hem curl. I need to practice more. Great web site. I have read it three times, trying to put it on pininterest so I can go back to this web and review it over , and probably over again.