Have you found the perfect dress, but it won’t zip up in back? It looks and fits great everywhere else, but you just can’t zip it up?
Well, here’s an alteration you can do to fix that problem.
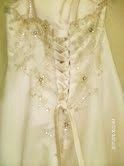
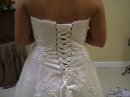
I’ll show you how to add a corset back to your wedding dress (or any dress) and it looks like this when you are finished:

There are also three other options for altering the back of a wedding dress and the links are at the bottom of this post!
I do not do this corset back alteration very often, but my friend Christy, who owns 2 alteration shops in North Carolina does them all the time!
She is the one who has given us the instructions and photos for this alteration.
Thanks, Christy!
Here are some before and after photos.
Before:

After:
She says, “It looks a lot harder than it is and girls are so amazed they think you are a miracle worker. It always fits, too, because it is self adjusting.”
She tells me that your dress must fit well between the two bust points in front in order for this to work.
So, if your dress fits well there, let’s proceed.
First thing you need to do is remove the zipper starting at the top, using a seam ripper. You are going to remove the zipper just down to the point where you couldn’t zip it up any further. When you remove the zipper, be sure and back stitch so that the part of the zipper you want to remain in the dress stays secure.
As you take out the zipper and cut off the excess zipper tape, leave enough zipper tape to fold down just like you do when you put in a new zipper. It will be covered by the lining later. (Don’t have lining in the dress? We’ll cover that situation later in this post.)
You are going to be making three items for this alteration: a modesty panel, ties and loops for the ties. None of them are difficult, so don’t be intimidated.
First, look at the back of the dress when it is on.
There will be the gap where the dress didn’t zip up. If that gap is only about 2 inches wide and only needs a few loops, make the loops smaller and the tie narrow so you can see that it does Criss-cross. You just have to decide what will look the best and what will be in proportion to how much gap you need to fill. If the dress has three or four inches in the gap, make the tie a little wider because it has more of the back to cover.
To make the tie, you can follow my post on How To Make Spaghetti Straps.
Christy makes the finished tie about 1/2 inch wide and about three yards long. That means you need to make sure you cut the strap double the width plus the seam allowance before you cut and sew it.
Once it is made, set it aside for now.
Next, we’ll make the loops.
Christy uses spaghetti straps to make the loops. “All the dresses come with them and most of the girls don’t want them, so I keep them to use for this purpose.”
If you don’t have the pre-made spaghetti straps, you will just make them like you would make spaghetti straps. “I just cut bias strips about one inch wide and join them together. I make one long tube and sew at about the 1/4 inch mark, trim the seam and turn.
Christy suggests making one long spaghetti strap about 1/4 inch wide and then cut it in 1 and 1/4 inch long segments. (My suggestion is that you may want to make these segments longer. Up to two inches long may help! You can always trim the excess amount later.)
Christy says, “I cut the loops about one and a quarter inch long. That is longer than you really need, but it has to be covered by the lining and I like the ends to be close to the seam allowance. You will be pulling the tie through them and you don’t want them to break because of the stress. They need to be strong!
I draw a pattern on paper, using a corset that I took out of a dress I found at Goodwill.

You want your loops to be exactly the same width and distance apart for both sides so they match up. If you don’t use a pattern, you may get some loops too fat and it won’t look good. I sew the loops on the paper straight down the middle and then peel it away from the paper.


Starting at the top, pin the first loop in. Don’t leave a large opening. You don’t want the loops to pull. Just leave enough opening for the tie to fit through and fit snug. When you insert the next one it should overlap the first one and make an X on the underside. They look like they are one beside the other, but they are really overlapping.

Pin them all in leaving the lining free. Sew close to the edge with tight stitches just like you do when you put in a zipper. If the dress has beading, I walk the needle over them. Do the same to the other side and make sure the loops match up. They must be identical! If the dress has lining, sew it back down just like you would when putting in a zipper.
If the dress doesn’t have lining, I use satin ribbon to cover the raw edges of the loops:

Here’s a view from the right side:

(You can make the loops and stitch them in, in one continuous step without cutting them, but I think it looks better when they cross over each other. I don’t like the loops to stick out away from the dress that much. I don’t even want to notice the loops.)
Here are some pictures I found on the internet. Some of them look good and some look bad. If the loops are too far from the fabric and the tie is pulling it looks bad. You will see what I mean.
Here is a good one:
Here is one that isn’t good. See how far out the loops are pulled out when it is tied?:

Next, you’ll make a modesty panel.
Here are a few photos of a modesty panel:


To make the modesty panel, I just make a wide wedge V-shape from the main fabric. Fold fabric right sides together with the top of the wedge on the fold line and then cut in a wide V shape wider and a little longer than the width and length of the dress opening. It is just like a gusset but the top and bottom is straight across, not pointed. The top is wide and it gets narrower as it gets to the bottom.
The basic shape that you would cut out of your fabric looks like this:

When you fold it along the foldline, your modesty panel will be a double thickness and that foldline will be at the top and the narrower end at the bottom.
Before I sew the sides and bottom closed, and before I turn it, I add covered boning to one side (the lining side of the panel) or I add a heavy interfacing for stability. As you can see, the boning is straight across starting at the top and added about every two inches. You don’t have to go down too far. It’s just for stability.
The red modesty panel (first of the two red ones above) photo is easier to see how the boning is on the lining side, but not on the outside. I sew it on the wrong side of the lining before I sew the fabric and lining together. When you turn it right side out, the boning is encased. Some do have the boning on the side facing out, as you can see from the picture of the ivory one:

I attach the modesty panel on the left side of the dress (just tack it on) and leave the right side loose. (The left side I’m referring to is when the back of the dress is facing you.)
I usually hand sew the lining down after I put the loops on because I only want to sew down the dress one time so it is really neat. I find it hard to sew the loops, the modesty panel and catch the lining all at the same time.
Some modesty panels snap on so the bride can take it out if they don’t want it. So, you could sew on snaps if you prefer.
Another additional point: “I have taken some dresses in at the sides, even if it fits, so that I could make a corset back and it would show off the laces. This works well if the dress fits in the waist but won’t zip all the way up.”
Well, there you go. Now you have the step by step instructions to go and make your dress fit perfectly.
I have written another post on How To Put In A Corset Back, Option #2. I think it will be helpful to see more instruction on the process.
Another option, if you don’t want to put in a corset back, is to put in gussets on each side of the dress under the arm.
To learn how to do this option, click on How To Put Gussets in a Dress or Top.
And still another option is to Shorten the Zipper at the Top of the Dress to add more room.

Thankyou for this tutorial! I have put in several corset backs, and never thought of using the paper for a guide on the loops!! How clever! That will make it so much easier and quicker. I usually use purchased satin cording for my loops – saves time on making them!
Glad it helped! That’s a good tip about the purchased satin cording. That would save alot of time. Thank you!
Would you please tell me where to buy satin cording for the loops?
Thanks a lot
Hi,
You should be able to find it at a fabric store like JoAnn Fabrics. Do you have one of those nearby? If not, a Hobby Lobby may have it or try to Google it and I’m sure you can get it online. You can always make your own if you have a few strips of satin. I have a post about making spaghetti straps and that will show you how to make them.
http://sewfordough.wordpress.com/2009/05/30/straps-lets-make-some/
I hope that helps!
Let me know if you have any trouble,
Linda
Thank you this was very helpful.
Satin cording works well like you said! You can’t make the loops so ‘flat’ though, I found.
Your tutorial is very informative, however do you know of anywhere that the corset back, loops and ties can be purchased instead of making?
The corset back is not something you could purchase, partly because each corset needs to be a size to fit the dress and partly because each fabric is different. I believe the post mentions that you can buy cording by the yard that might do the trick, but again, it would have to match the dress. Hope that helps!
look downthread for posts about a product called Laceeis (approx. $35) by Perfectfit Patterns. It is a kit that allows you to sew pre-made loops over the zipper in the back. Check it out on Youtube or go to http://www.laceeis.com.
Sharon,
You can find the kits on Amazon.
Thanks so much for your kind words. When I first responded to this question, I couldn’t find companies that were selling these items online. But, yes, I’ve seen the panel and the loops and ties on Amazon in recent years and lately. I can’t recommend any certain company because I’ve never bought them before, but just check the reviews on each one and hopefully, you can find a good quality, good color matched kit. I usually have a hard time matching my fabrics to ones I see online, but if you find a good one, please write back here and let us know! Thanks and hope you find just what you’re looking for.
Very handy, this post was very useful, thanks a lot!
Keep up the good work, and don’t give up!
Emily ~ Corset seller
Thanks so much!
Thank you so much for posting this 🙂
I need to add corsets to the back of some my daughters bridesmaids dresses. I got a great deal on the dresses from ebay but unfortunately they ran very small & the are no refunds or exchanges accepted. The size 4 fits like a tight 2. My only concern is that the dresses zip up the side so I need to cut down the back.
Any suggestions, tips or tricks would be welcomed.
Hi Roxy,
Can you send me a photo of the back of one of the dresses? That would be really helpful.
Thanks,
Linda
Here are 2 pics (hope they work)
[IMG]http://i45.tinypic.com/2qxowvm.jpg[/IMG]
[IMG]http://i49.tinypic.com/20h3lhv.jpg[/IMG]
Thanks Again
My pic links won’t work 😦
I’m trying again
http://tinypic.com/r/20h3lhv/6
Wow 🙂
Thanks so much for the quick reply. I will go take a pic and post it soon
omg i love this tutorial! i bought by dress on craigslist and i bought a very plain dress for the purpose of customizing it. i tried on dresses and found what i wanted in my dress so im putting a corset in it as well as adding beading. thank goodness i have a year before i need the dress done!
So glad you liked it. You should have it done in no time!
I am SO glad I found this tutorial! I just got my dress in I ordered off the internet & it is far from the stated size! This is the perfect idea! Much appreciated!
I haven’t bought a dress off the internet before, but I hear that’s a common problem. Glad this will help you fix it!
hi can u help . is there a way just to have a panel put in with zips either side and the corset bit is already made please help im desparate thanks
After e-mailing Lindsey back and forth, I let her know that the corset back is probably her best option. You can put gussets into the sides, but those are more difficult to make and soemtimes you don’t have matching fabric to work with which many times doesn’t look that professional.
I bought my dress last august and then i found out I was pregnant, do you think a corset back would make my dress fit my baby bump? I am 23 weeks now and the wedding is in 6 weeks!
I’m changing a zip to corset back for a pregnant bridesmaid – they had bought the dress before she was pregnant, she is now 30 odd weeks!! I have had to put a gathered panel in the front for her – she is lucky the dress is chiffon with lining, and the chiffon had gathered front but not lining, so it makes no difference to the outside look of the dress! I am in the process of doing the back so it can tie now, thanks to this site!! the other thing I had to change was it had a satin bit under the bust – i had to shrink this to fit the expansion at the top of her belly too! All in all it looks great so far!
Thank you so much for this – I had to alter a dress for a bridesmaid with just 3 days to go before my wedding this week and managed to do it in under 3 hours with this tutorial! It looks fantastic now and so relieved I got it done – I’ve never altered a dress before and did it all by hand so very proud of myself too! Thanks a whole lot 🙂
Wow, Kirsty, are you kidding me? You did this alteration the week of your own wedding? I am totally impressed!!! Incredible! And the fact that you’ve never altered a dress before? I am speechless! I’m so glad this post helped you. You are an inspiration to us all. Thanks for writing in. Congratulations to you too. 🙂
Linda
Hiii need an alteration done to my dress, converting to corset and in NC! Could I please have your friends info?!
Yes, Christy’s Alterations in Monroe, NC!
I am thinking of putting a corset back in my wedding dress right now it fits at the hips and a little into the waist but there is about a 6-8 inch gap around the bust line, do you think it will work?
Thanks,
Courtney
Awesome Directions. We purchased a prom dress in August. SIx months later it is a little snug. Thirteen dollars and three hours later it fits perfect. Thank you so much!!! The directions and photos were easy to follow. God Bless!
So glad this helped. Enjoy your prom!
My soon to be daughter in law asked me to put a corset in a lovely gown she found in aconsignment shop. My question is because of her build, I am concerned that a corset that stops at or just below the waist won’t quite do it. Could I insert a modesty panel all the way down the back? And then lace it just to her waistt with the result being a mini train? Make sense?
The wedding was a success! I put the corset back in and had to alter it once but it was lovely! We did make a chiffon shawl to cover the bunching at the hips that couldn’t be helped but no one but the bride and I were aware of this. Thank you! What a great alternative.
Louise
That is such a great success story. Thank you so much for sharing it. I don’t always hear how dresses turn out afterwards, so thank you for taking the time to check in and let us know how it went. So glad to hear the wedding was a success too!
Linda
Hi! Great article. I have a wedding dress that is a size too small, in the ribcage area. Unfortunately, it is a side-zip. I only need a very small, inconspicuous corset (like an inch wide, maybe 1.5) in the side of the gown. Do you think this is a totally idiotic idea? The gown is already very assymetrical and”romantic” looking in appearance, so I think it would work with the overall design and not be very noticeable at all. Please advise!
Thanks,
Red Fox
Thanks so much for this! I’m trying to add a corset back to my prom dress and this helped TREMEDOUSLY! Thank you so much! This was perfect!
I have to give an estimate for creating a corset back from a zippered wedding gown. How much time should it take or what do you charge for this alteration? Thanks so much
This tutorial is a God send! The bridal shop totally butchered the alterations and here I am less than a month from my wedding with a dress that barely zips the last few inches. Last night I realized a corset back would be a good solution but had no idea how to make one. Thank you so much for the directions, and an extra thanks to whoever posted about the cord for the loops. HobbyLobby, here I come!
I hope you can help me. I added a corset to my daughter’s strapless prom gown. When I tie up the corset,the two edges with the loops came together too close. There was no space between them and the gown would nor stay up.I would still like to make the dress into a corset and have about a week left before prom. Any suggestions would be appreciated,or I will just have to insert a regular zipper. Thanks
I’m sorry to be replying so late, but I was out of town for the weekend.
I’ve had that happen at the bottom of the corset. Is that where you’re having trouble? If so, just take out the bottom 2 or 4 loops and retie it. It should be just fine if you have the modesty panel behind the lacing, so that no skin shows. If that is not where the problem is, please write me back.
Thanks,
Linda
Oh my gosh! Thank you so much for posting this! It is genius! My best friend just said she’s letting me borrow a gown of hers for a military ball next spring, and we wanted to fix it into a corset-laced back so that both of us could use it in the near future. This is GREAT! I love this! I cannot thank you enough! 😀
Oh, good. I am so glad it helped. Have a great time at the military ball and be sure to thank those servicemen for us for all they do. We are extremely grateful.
Linda
Thank you so much for posting this! I am wearing my prom dress to a costume party and I am not the same size I was when I was in high school. I was wondering if it would be possible to post the guide you use for the corset loops? I have been looking for a corset dress to use for the pattern, but have been out of luck.
Hi Laura,
The reason I didn’t post a guide is that each dress is different. The size of the loops isn’t as important as the spacing of them and how many you need.
Does that make sense?
First, thank you so much for this site. I just did this alteration for a friend’s bridesmaid dress. (The shop insisted she order a smaller size than she wanted, leaving her stuck with a dress that’s a good 4 inches too small in the bust and waist!)
Putting in the loops using the optional straps that came with the dress took about 1 hour including time to remove the zipper and create a guide. Since I had no corset source to work from, I measured the opening, i.e. the length of the zipper. In this case, it was 13.” Since a loop every inch seemed a good spacing, I drew 2 lines in pencil on a sheet of paper, the first 1/4″ away from the edge, the second line 1/4″ below the first and marked every inch on both lines. Next, on the lower line, I put a dot at the 1/2″ intervals between the inch-marks. Resulting in something like this:
___________EDGE_________
_____l_____l_____l_____l____l…….
__.__l__.__ l__.__ l__.__ l__.__l……..
Then I found a round object roughly 1″ in diameter; a quarter worked. I centered it on the lower line with its edge just inside the paper’s edge, and drew the arc above the lines. Repeat for every loop you want, and you have your guide. This process can easily be adapted for larger or smaller loops by changing the spacing on the lines and the size of the round object.
I hope this helps make a great technique / tutorial even more useable.
Thanks, Lori! This is one of those techniques that needs to be adapted to each particular dress and its measurements. I’m glad you found a quarter worked for yours. Thanks for sharing your helpful tips with us!
Linda
love the directions and will be using them with my version mixed in, Thanks.
Good Job.
Glad you liked the directions. I hope you have great success!
great job.
Thank you!
How many inches at max do you think this could add to a dress?
It really depends on how wide you need it to be. It could cover your whole back if you need it to. It also depends on what that will look like and if you like that size that you need. Try putting in some white fabric to fill the open area and step back and see if you like it.
Linda
VERY VERY handy. This SAVED my friend’s costume! And now it will even adjust to weight gain and loss, and even bloating 🙂 Plus, we didn’t even need to be super exact with our measurements either. 🙂
Oh, I’m so glad it helped. Your great comments made me think that this would work for a pregnant gal as well. As she gets bigger in the tummy, this can be adjusted accordingly. Thank you!
Linda
I have a braidmaid dress that is too big for me and i want a corset back instead of the zipper, how could i make the dress smaller and adding a corset back
Thanks for this! I’m going to buy a gown for my junior prom in the spring, and I love the idea of a corseted back. Dresses with the corset already in them are hard to find in plus sizes at a good price, so I’m lucky enough to have a seamstress as a grandma! She’s making a corseted back for a lady’s wedding gown right now, actually. I have a question, though. Suppose the dress does zip all the way up. Would putting the corset in still be possible? Would it look the same? Thanks again!
Yes, it is possible. Since I’ve had so many requests for this, I hope to write a post on it after my daughter’s wedding. Thanks!
Can you add a corset back to a dress that isn’t a strapless dress? Like the one I need to fix has a satin bodice with spaghetti straps and the whole bodice has lace overlay and it used to have a high neck that I took off because she doesn’t want it – what would I do with the lace overlay above the satin bodice? Any ideas?
Hi Kathy, My I initial thought is to have sone sort of a lace that has a nice border edge to it and sew that along the vertical edges of the opening where the corset back goes. Let me think about it some more and see what I come up with. When do you need to have it finished?
Linda
Hi again Linda,
Sorry to insert here but there was no “reply” below your comment. The wedding isn’t until August 3rd. I have purchased some pretty lace and think that might work. Have you thought of any other ideas? I am now struggling with the neckline – what do you think of a boatnect type?
I had a question: the dress I am thinking about doing this in is a trumpet style and the zipper goes all the way down to lower back- do I sew the dress closed partway and then make the corset back or do a long corset all the way down my back. Would that look to dramatic?
I’m not sure how far down you are describing, but I wouldn’t go past the lower back. Look at those photos again to see if you can tell where the bottom of it should go. It is your call though. You can make it be wherever you want. If the zipper is too long, then, yes. I would take out the zipper and stitch it up a ways. But without seeing it first, I’m not sure exactly where you are referring to. Does that make sense? Does it help?
Linda
This post has helped me so much but I do have a question – in fact two. I am making a sheath wedding dress from scratch and my daughter wants a corset back. I am making the muslin now and decided to add the corset loops to the muslin so we can see how the dress fits. (We will probably have to take in some at the sides.) The dress calls for a 14 inch zipper so I decided to make a 14 inch corset back. Using your directions, I estimated each loop would take up 1/2 inch of that 14 inches. I made the loops and installed them in the muslin. I have 28 loops on each side!! I’ve counted the loops on various photos of corset backs that look like they are inserted in a length the same as my opening and they have only 14 or 15 loops. So my question is, How many loops per inch will look and work best. Second question: I made the spaghetti straps by your directions and they came out fine, but when I pinned and then sewed them in, the seams on the spaghetti straps (cording) were in all different places. On some you can see the seams and on others you can’t. Would pressing the cording first have helped that? Or do you have any suggestion to avoid the problem? Sorry to be so long-winded!
Hi,
Since you left a message as anonymous, it didn’t come into my email and that’s why the delay. Sorry about that. I would space your loops farther apart. 28 on each side is alot and you’ll find it won’t work to have any at the lower portion anyway. Yes, always press your spaghetti straps first! Hope that helps!
Linda
I live in nc and need this done on my dress! Who is the seamstress!
What a blessing to find someone who shares their talents with others! I struggled through re-doing 2 wedding dresses that had to have corset backs. One dress was found at a thrift store but 2 sizes too small. The other was found free in a neighbor’s garage, unfortunately it needed to go from a size 10 to a size 16-18. What a challange not to mention both brides wanted their dresses strapless so I had to cut the tops off. Starting wtih a prayer (which always helps) and adding all the things my grandma and my aunt taught me the dresses were transformed. I had such a struggle and no clue how to put in a corset back and ended up making the loops like you did because we had no money. Oh had I only seen your directions I am sure with your directions it would have helped me add a cleaner, more professional touch and confidence that I needed. You are saved to favorites and I will certainly refer to you the next time first! Blessings to you.
Oh, thank you Lisa! You made my day! It sounds like you did just great without my instructions, though. Great job! I also start each garment with prayer each day. What a difference it makes to put our minds on Christ first. I think the confidence comes from Him and also from doing the same alteration over and over. I’m sure the next time you put in a corset back, you’ll be a pro at it!
Have a blessed day!
Linda
hello, I just wanted to say a massive thankyou for this information i had no idea at all what to do with my beautiful wedding dress, I bought it from the internet and although it is labelled as a size 20 it is exactly the same size as a 16 bridesmaid dress I have here, I am a bigger lady and I have been desperatley dieting to fit into this dress but my bust is still too big for it,so i decided to give the corset back a go and to my amazement after following your instructions i have done it and I now have a beautiful dress which fits lovely and also if i can manage to lose more weight it wont matter as I can just pull it in tighter and it will look amazing on the day….I cant thankyou enough…..thankyou thankyou thankyou….
regards
paula ….(uk) ..
Hi Paula,
You just made my whole week! I’m so proud of you for trying this alteration and having such great success! Yes, wedding gown sizes are all over the map. It is a shame that so many dresses are not really the size that the label says they are. You are correct…..if you lose more weight, it won’t matter, because you can cinch in the dress without having to make more alterations down the road. When is your wedding?
Thank you so much for sharing your success story with us! I wish you and your future husband the very best!
Linda
Hi Linda, sorry ive taken so long to reply but ive been really busy with the wedding plans,alterations,and working fulltime also…My wedding is may 2012 so my dress is now all ready and waiting for my big day,and now thanks to you i will be wearing it with pride and feeling amazing on my big day…once again many thanks for your help…
Regards
Paula….(uk) ..
Thank you for your sweet comments. I’m glad you have some time before your big day to get it all done. So glad the blog has helped you! Congratulations!
Thank you so much for the tutorial. Someone wants me to add a corset on their wedding dress and though I sew, I was a bit nervous about taking on the task. But now, I am ready to take on the task. Looks simple enough, I think I will try and find the satin cording for the loops thank you for sharing your talents
Hi,
Thank you so much for stopping by and leaving a comment. I’m so glad you found this post helpful.
why is it so hard to find a seamstress in charleston sc that is willing to do the work? i’m about 6 weeks from my wedding and just need a corset back and a bustle put in so the dress fits perfectly. i’m afraid to do the corset back myself because it is hard for me to sit at my sewing machine to work on anything right now. i had a friend come over and we got the dress zipped up i think half way and it would fit perfectly with a corset back. what do i do and why are people so against putting in a corset back if you are willing to pay for them to do the work?
I sent you an email in response, but thought to leave a note on here to help others in the same situation. Many times, alteration shops don’t do this type of alteration because they don’t know how, or don’t know of its existence. So, it may not have anything to do with whether or not you’ll pay them a high price to do it. Keep calling around until you find someone who does.
Hope that helps!
Thanks for your site. I volunteer at Adorned in Grace a shop that sells new and used wedding dresses. All of the proceeds go to stopping human trafficking. Because we only have one of each dress customers often ask about putting in corset backs. Now we can help them.
What a great ministry you are doing there with a wonderful cause. Glad you like the blog!
Thank you so much for this information. I just have one question. Will this work for a bridesmaid who is pregnant. I have a bridesmaid who when we ordered the dress she was not pregnant and she just found out that she will be about 4.5months come the time of the wedding. She is a very slender fit girl so I don’t expect she will gain too much so we were wondering if this would be an option. Thanks!!
Absolutely!
This helped me out soooooo much on a wedding dress I’m working on. I referred back to it a few times and the dress was perfect! I’ve done corset backs before, but with the tutorial about overlapping the loops and the pics made it look so much better. Thanks for the blog and post!
Hi Rosalyn,
Thank you so much for your feedback on this. So glad it helped. I love the name of your boutique….very fun!
Linda
I need someone to add corset backing to my dress. Where does your friend in NC work at? I am near fort bragg.
Thank you.
Maha
She is in Monroe. Her website is http://www.AlterationsbyChristy.com. Check it out and see if she is close to you.
I found a very nice pre-made corset lace up kit. The installation only took 15 minutes. I found it on youtube
Hey, that’s awesome! It looks like it has alot of loops. Did you like that feature?
Wow! I was looking for something like this back 5years ago! I went ahead and made my loops with satin cording as the wedding fabric shop had never seen pre made loops or even bias satin tubing!
Hi, yes each loops is about an inch and a matching lace up came with the kit along with a modesty panel. The ivory satin fabric matched my dress very closely. They have white and I think they have colors also.
Thank you. This is great information!
hello
Would you tell me where I can purchase this kind of kit. Thanks best wishes.
Agnieszka
Hi, try their website http://www.perfectfitpatterns.com they have a page about their corset kit there. I emailed them and they were very helpful, you can find their email address on the website. Have a nice day, Leslie
Hey, that’s great! THank you for the link. I hope everyone sees this comment. 🙂
Halleuiah!!! this will save me doing my nieces Homecoming dress… I need to finish in three days so please someone HELLLLPP!!! only question is when you rip out
the zipper ( in my case down to the waist) can you explain how to finish & resew it in so its a finished product. I’m afraid it won’t stay & I’ve
only ever put zippers in that were fit to size. I’m not exactly sure how it will stay w/o that finished
end on a typical zipper! HELPPPP !!! Thanks!! Any responses would be appreciated!!!
Hi there,
I’m not sure what you were asking because I don’t know what “&” means in your comments, but if it is what I think it is:
I actually just hand sew (whipstitch) just above the zipper to make it stay. It won’t show because you’ll use thread that matches the fabric. (It looks like one of those silver stoppers, but you make it out of thread.) Does that make sense?
Let me know.
Thanks,
Linda
Not sure what the “&” was bz if you look at website the comment I wrote doesn’t show that…, I’m assuming that was for “ampersand” the & symbol “&” translated via email default ??? anywho I just meant how to finish & resew zipper
in! Thanks you answered my
question:) I hope I don’t mess up the dress… Lol but it all sounds pretty
easy!!
One last question.., I think… 🙂 … Once you sew the loops to modesty panel/dress is the panel only attached to left side of dress? … I know it said leaving panel on right side loose but was wondering how panel stays in place w/o bunching up? just want to make sure I don’t miss a step… This is my first attempt & I’m a little nervous about making a mistake! Thanks so much! This is an awesome site!
I have a red satin strapless ball gown that a friend gave to me to where to my husbands Marine Corps ball. I absolutely adore it and it looks great but is pretty hard to zipper and once zippered I can’t take a full breath! Could the zippered back be replaced with a corset back? If so, how much would this cost me if I were to get it done professionally (as I am TERRIBLE with alterations)?
It really depends on your area and who knows how to do it. Not all seamstresses know how. Around here, that alteration could cost $80-$100 because of the time commitment. If you ask an alteration shop, be sure to see some before and after pictures. A bridal shop should know how. You might be better off to just go out and buy a new dress. Usually, it costs about the same as a new dress.
Are there any other seams that are wide enough to let out the seams to make the dress a little bigger so that you don’t have to mess with the zipper area?
Linda
well this sure helped alot considering that when i bought the dress of my dreams, http://www.morilee.com/bridals/bridal/1667 , the sales lady said it is not possible to put a corset in. she said it would “ruin the dress” but i remember my friend adding a corset to her promdress herself! now im getting married and if i dont fit in this thing, its not 100-200 down the drain,were talking 1000! and when the dress came in, it BARELY zipped up, it was VERY snug im a petite girl but lately have been gaining weight and im worried my dress wont fit. hopefully i can find a seimstress who will do this like u said(:
Thank you so much for posting this. I’m going to do this on my daughter’s too tight ballgown. A couple of quck questions
You said: “First thing you need to do is remove the zipper starting at the top, using a seam ripper. Just remove it as far as you need to, maybe down to the waist, maybe farther, if you need to.
As you take out the zipper and cut off the excess zipper tape, leave enough zipper tape to fold down just like you do when you put in a zipper”
So I unpick as much as the zip as I need to (say to the waist) and then cut that off –leaving enough to fold down the edge ? I just cut through the zip teeth too?
Will what remains of the zip be used as a zip from now on or will it be kept closed like a seam? (Then I’d need to sew across the top to stop it pulling open?
I’m in the Uk and the Satin cording I’ve found in the shops is 2mm wide Is that too narrow for lacing?( to lace 3 or 4 inch gap) I could buy satin ribbon, but would that be strong enough? (trying to avoid making the lacing if I can, as 3 yards seems a lot to make)
Thank you
As far as I can see, you have this spot on. When I did this on my friend’s bridesmaid dress, the zipper still functioned as a zip to the waist. The lacing above took any strain, holding the dress closed enough that the zipper stayed put when shut.
She also had a 3 to 4 inch gap, so we used 3/8 inch (c. 9.5 mm) grosgrain ribbon as lacing. It’s sturdy, doesn’t stretch, and was cheap; we purchased it on a spool, 6 yards for $1.99. I fray checked the ends after we decided on the right length. For her this worked great, achieved the look she wanted, and kept her comfortable throughout the wedding and reception. She’s even wearing the dress again at a formal dinner this month!
Oh, thank you for your sweet comments and your advice on the grosgrain ribbon. I hadn’t thought to use that….brilliant! Thanks for sharing.
I had this exact question, glad I found your post. I was wondering if a modesty panel is a must if the corset section is relatively small, or the lacing covers enough?
That’s definitely your call. If you like it without, just don’t add the modesty panel!
Thank you so much for the replies.
I haven’t heard of grosgrain ribbon. How it it different from normal ribbon?
Could this work on a bias gown? This one is high in back with wide semi-racerback straps and a long back zipper. The back hem is a slight fishtail train. It’s not a wedding dress, but a deep purple velvet evening gown with copper stenciled details below the knee and accenting the fishtail. I’m short-waisted with a belly-dancer’s tummy (below a well-defined waist); the dress is too loose at the waist (hip line falls too low. Maybe remove the zipper altogether and replace with the corset back (copper cording)?
That’s your call. I’m not sure how low your zipper goes, but take a look at the photos again and see if that helps!
Linda
I have a prom dress that is too loose and zips up the back. It is a size 4 and I am a size two. I was wondering if I could cut it and add a corset back? Or would the extra fabric around the waist get in the way?
This application is usually done on dresses that are too small, not too big. I think you’d have to do alot of altering of the entire bodice and probably even the skirt to get the look you want. If you’re not familiar with how to do all that altering, personally, I wouldn’t try it.
I’m looking at making an alteration to my bridesmaids’ dresses. The bridal store charges $95 per dress and can only do the loops in white or ivory, plus I don’t trust them (they’ve got a bad reputation in alterations).
My question is, is there a way to add loops without removing the zipper? We’d be making the alterations so the style matches more closely with my dress, as well as to add a touch of our accent color, not to actually adjust the size. My dress zips all the way up the back and then has a corset back that overlays the zipper just for decoration. I’d want to do the same with theirs.
Hi,
I am sorry I have been slow in responding. Many things going on.
I’m trying to picture this question. Can you send me a photo of your dress that has this application? I can’t picture it only because I haven’t seen something like this before. And actually, I bet you can figure it out if you dissect your dress a little and see how the manufacturer did it.
Hi Linda,
There is a lot of great conversation about this. Anyway, I just got a prom dress in that needs the loops for a corset back. I should have suggested she get another dress since it does not fit but she really lucked out and paid only …$10!!! How long, approximately, should it take me to do this?
Thanks,
Linda M.
Where I can get a back lacing corset already made for a wedding dress,and how much the price is?
Adding a corset takes a little bit of time so the alteration typically will cost you from $95 to $150 for a professional seamtress to do it. I recently found this product called Laceeis (approx. $35) by Perfectfit Patterns. I have read some great reviews from those who used it. I will try it for the next time I need to replace a zipper with a corset. request. It is a kit that allows you to sew pre-made loops over the zipper in the back. Check it out on Youtube or go to http://www.laceeis.com.
Linda M.
http://www.CustomFitAlterations.com
k.
I just recently bought a Vera Wang dress new off someone for a good price. My problem now is it won’t close its about 4 1/2 inches too small do you think a corrset will work….please help!
Definitely! This is the exact problem a corset back would solve!
I purchased the laceeis kit and it was very easy to install. The loop panel was made with boning so it remained supportive and didn’t pucker when it was laced. The lace-up and a modesty panel in matching satin were included. You can see their video on youtube http://www.youtube.com/watch?v=w30w65cTd_c
Awesome. Thanks!
Thank you, I need to make a dress for my coursework in art and I couldn’t find how to make a corset anywhere else, and hopefully this will make my dress look better than the other person who decided to do a dress, x]
And also I’m like 14 so i haven’t made a dress before but my dress is fishtail and Im like not sure how far down to do the corset, x]
I bought a dress a few months ago for my daughters wedding in August, based on a sample size I tried on at a bridal shop. Unfortunately,I didnt try on the dress when the dress I ordered was delivered, until this week. I ordered the same size as I tried on (and have before picture of the sample, and have since lost 10 lbs, but there is no way the dress I ordered is the same size as the sample I tried on, although the size does say 16. It is too tight in the back, upperbody only. It is a vneck back, with the zipper very low in the back. I am meating with a very good seamstress next weekend, so I assume a corset will work? Maximum, it would only be one size too small, because I have a bigger bust. I assume a corset will work?
It depends. Your seamstress should be able to answer that questin because she will see it on you. The other option would be for her to put in gussets on the sides.
I hope that answers your question!
Linda
THANK YOU!! A friend’s sister is getting married on Saturday and called me because she got the dress back and the modesty panel and loops weren’t right at all. I’ve never done this kind of alteration, but your instructions made it so easy! The modesty panel looks great and the bride is soooo happy! Thank you again!
Oh, Amber, this is the reason I started the blog. I’m so happy it helped you and you didn’t have much time to spare! Good job!
Thank you so much for sharing this tutorial!! I just did this in about 4 hours.
Thank you so much for this idea, I am going to try it for my granddaughters dress. I appreciate the great details in the instructions.
My Daughter already bought the Wedding dress, and decided she wanted the corset back put in (by me). Now she’s pregnant – will be 7 months at Wedding date -. Dress was 2″ big, so at least I don’t have to take it in, but how wide is too wide before it looks tacky? 10″ – 15″ ?? Or any other sugestions?? She’s 5′ 2″, 110 lbs. now
Hi, Are you asking about the width of the corset back or the length? If you’re not sure, go to a bridal store and look at one for reference. I think that would be your best bet. Linda
Thanks so much for this tutorial. I’m not “adding” a corset closure to a tight dress, I’m making wedding dress with this type of closure from the get go. So far it is going very well.Your tips have been amazingly helpful in getting a beautiful finish first time.
Wow, Jade, that is so impressive that you’re making this dress from scratch. I would love to see a picture when you are finished. Thank you for your kind comments. I am glad this tutorial helped! Linda
Thank you for a wonderful tutorial – made me believe in my abilities to make my wedding dress alterations myself. Corset is fully boned, so no problem there, but I only need about 2cm extra space – can I make the loops in the form of a satin cord, sewn on in points, hidden inside the dress? And do you have any tips on removing zipper without opening the lining? One side is hidden behind the flap so that can be cut off, but the other is at the edge. The lace up itself probably won’t show, as the panels will very nearly meet.
Hi Anna, I’m glad the tutorial helped. You’re a better one to answer the first question than I am since I can’t see the dress. It sounds doable to me. I’m not exactly sure what you mean by sewing the loops in points, but you should give it a try. I don’t have any tips on removing the zipper without affecting the lining except for cutting it out. If that will show, don’t do it. At least you can cut out one side! I don’t cut zippers out because I want the finished product to look as professional as possible for my customers. If it is for yourself, you surely can do it. I charge for taking it out, so you should too.
I hope that helps. Let me know if you have more questions! Linda
Thank you for answering so quickly! The dress is for me, and fits if I don’t breathe (!), so we’re talking a tiny alteration. Sewing on it points… English is not my first language, so I’m a bit unsure about the technical terms, but I’m thinking of simply sewing on a ribbon on either side of the inside corset, and just skip every other centimeter of seam, so as to create holes for the lacing. The other alternative is putting in grommets (eyelets?), which might work better when it only needs a tiny bit and even help cover up the cuting out of the zipper – if I knew how to make them that is…
Hi Anna, That is a gorgeous dress! Oh my! Just beautiful! I think your idea might work, but do you need to make the lacing so close (every other centimeter?) it sounds very close together, but you know better than I do what you need.
The other idea I have would be to sew in gussets at the side seams. Have you seen my post on that alteration? I’d send you the link, but I’m not sure how to on this computer. You could type in “gussets” into the search box on my blog if you want to see them. They may be more work than this alteration, but you may want to look at it and see.
Let me know what you decide to do. When is your wedding? Linda
Thank you! You can see why I blew my budget on it… 🙂 I see what you mean with it being so close together – a little more spacing might be good. Gussets might be a good idea, but the bottom line is I need some kind of lacing so the fit will be a little flexible, if only for my peace of mind. And I love the laced look! My wedding is next august, so there’s plenty of time. What do you think of grommets? Do you think it could be done my an amateur?
Hi Anna, Since you love lacing, go with lacing. I think it will fit the look of your dress well. Sine you asked my opinion, I think grommets look good on very casual things, but I don’t think they are classy enough for this dress. This dress is over the top gorgeous and I think it really wouldn’t fit the elegant look of the dress.
That said, if you decide to do grommets anyway, you would want to practice on fabric scraps first. Yes, it can be done by an amateur. I have dine them before, but i would be chicken to do it on a wedding dress. If you made a mistake with where you put the hole, or holes, you couldn’t fix it. You’d be stuck.
I’m so glad you have so much time to do this. Many brides are working on their dress the week of the wedding and I don’t k ow how they do it without having loads of stress.
I sure hope you send me a photo of your dress when you get it done. Congratulations and keep in touch! Linda
Thank you for this tutorial. I have done tailoring and all forms of sewing for 40 years and this was the first time I was asked to do this. This was requested one week before the wedding. It worked wonderfully. I used satin cord, made a template, scanned it, made copies, taped them together and sewed on the paper. I found it easier to leave the cord intact and do every other loop. I cut after each one. Then I went back and made the rest. You saved me so much time!
Awesome, Deb! Thanks for sharing your experience. Hard to believe how many brides wait until a week before the wedding for an alteration, isn’t it? Linda
This specific blog post Adding a Corset Back to Your Wedding Dress � Sew for dough, has got extremely very good information and I learned exactly what I was
basically browsing for. Thank you.
So glad to hear that. It’s the most viewed post on the blog!!!!
I personally have a tendency to go along with almost everything that was in fact composed throughout “Adding a Corset Back to
Your Wedding Dress � Sew for dough”. I am grateful for all the
advice.Thanks for your time-Clarence
Thank you so much for this information. My son’s fiancee has her heart set on a home made wedding dress with a lace-up back. I have found several patterns she likes, but they all have a zipper back. To modify the pattern, I’m wondering if I would just turn under the edges (where the pattern calls for a zipper closure) an extra 2 inches on each side? She likes the look of the wider opening.
You’re definitely on the right track. I would have her go they on dresses that have a corset back because I think that would give you a better idea of how much to turn back. I don’t k ow what size she is, but I’m guessing you may have to turn back more than that, but since I can’t see it, I’m not sure. If she tries on dresses, you’ll have a much better picture of that.
Have fun in the process! Linda
I have heard that when converting a zipper dress to a lace up dress you need to add boning to the dress itself. Is this true?
I’ve never had to, but I suppose you could if you felt you needed it.
Wow I am so happy to see these postings. And that others are in need of the same help as me. I have a couple questions. Have you ever put in the lace up corset in a different color? My bridesmaid dress is purple and I can’t find a perfect match for the chiffon overlay fabric. I found a match for the satin underlay. Do you think using the color from the satin underlay would be ok for the loops and lacing? The satin underlay is more lavender and the chiffon fabric is more pink/purple; its listed as lilac when I ordered it. OR should I go with a silver to match the silver brooch on the front of the dress and my shoes? Any profession advice would be most welcomed.
The top of the dress is ‘ruched horizontal’ with the chiffon. I hope that is the proper term. the waist down is tiered chiffon layers
Also may I clarify that you do not take out the zipper when doing a conversion, and that you sew over top of the zipper? I need to know this when discussing with the seamstress.
I can’t really comment on colors without seeing the dress and the actual colors but I do know that most of my clients are going for contrast rather than matching and I think it all looks great. In the past, we always made sure everything matched but that appears to be old fashion. Again, as Linda would say, it’s your call.
When doing a conversion, you typically sew on top of the zipper. In rare instances, the zipper may come out depending on the design of the dress.
Hi Kimberly, I wish I could give you a definite answer on the color choices, but that is totally your preference. What I might think looks good, you might nit like. I would suggest using crayons or colored paper in those tones you are talking and make up some miniature samples. Mix and match them until you come up with what you like.
As far as the zipper is concerned, it depends on where the zipper ends. If your zipper goes down below the bum, you’ll need to keep so e of that zipper there, so just shorten the zipper. If the zipper is short, you need to remove it. Your seamstress should know. If not, try it on and make the call for her.
Hope that helps! Linda
Hy, i have a beautiful lavender dress thats just a litlle bit big at the bust and waist. I’d like to add to it a corset back, so ill probably have to cut at the sides, but the problem is i don’t now how much to cut. Should cut it to fit my waist or make it a bit smaller so that we can actually see the ribbon?
Thanks a lot for this tutorial and sorry for my bad english.
I was searching to purchase those loops and didn’t think I can make my own. Also tutorial too!! You save my day!
Glad to hear it, Coco. Thanks for letting me know how it helped you!
Great work, pleased to have discovered this blog on blogs list.
This is the sort of resources that should be distributed around
the web. You should seriously look at publishing more things like this on web 2.
0 list. Shame on the search engines for not setting this
blog higher. If you’re interested, please come and pay a visit to my web site. Kudos
Hi Denny, Thank you for your kind words. I will be looking into how to do just that…get some greater visibility on the web. Not exactly sure who to hire, but I will start the search soon. I plan to visit your website this afternoon!
Thanks again and I wish you the best, Linda
I am so happy I found this blog. My daughter found a vintage dress for prom and it is too small in the bust. It has a side zipper. Any tips on cutting the fabric in back to make the corset?
I haven’t read that post in awhile, so I’m sorry if it didn’t say either in the post or the comments, but because each dress is different and what you want as an outcome is an individual decision, it’s hard to give you an exact answer. Play around with the dress until you get the look you want. When you cut, be sure to add enough for seam allowances before you cut the fabric. Maybe look at other dresses for a clue. Does that help? Linda
I really love your blog.. Pleasant colors & theme. Did you create this website yourself?
Please reply back as I’m trying to create my own personal website and would love to find out where you got this from or what the theme is named.
Thanks!
Go to WordPress.com and look at the different themes they offer and see which one fits your needs the best. They can answer all your questions in setting up a blog!
how much do you charge
Please read my posts on pricing as well as the “Alterations” tab at the top of any page. Hopefully, that will help!
Hi there! Would you mind if I share your blog with my facebook group?
There’s a lot of folks that I think would really enjoy your content. Please let me know. Many thanks
Thanks for asking. If you just post the link to my website, that would be fine. Were you thinking of something other than that?
You have saved my life!!!!!!!! 8 weeks until my wedding, bought a second hand dress months ago and didn’t get to try it on until yesterday due to some family losses and the zipper wouldn’t go up!! I’ve cried for 24 hours with no money to afford a new dress and just found this! … And I have a mother in law (to be) who used to be a seamstress many moons ago. This has refreshed her memory and she’s said we can sort it!!
You have saved me so much stress, tears and anxiety! Thank you so much
Oh, I am so happy to hear this, Jenny. How sweet of your mother-in-law (to be) to take on this project for you! A nice way to start your married life. It will be a fun story to tell your children someday. Have a wonderful wedding!
Just curious….how did you find my blog?
Yes, it will be a fantastic story to tell them. And it will certainly help build a bond between my mother in law and I.
I was explaining to my friend the problem with the dress over facebook. I typed “my dress is too small and the zip won’t go up” but instead of typing into the message bar it went into the search bar for google. And your blog was the first suggestion, so I clicked it and my partner, looking over my shoulder said “I bet my mum could do that, she used to be a seamstress”, so we showed her the page and told her the dress didn’t fit and she said that she would be happy to do it, had done it before and the page had totally refreshed her memory and offered some great tips!
It’s fate! An accidental message in the wrong box lead me straight here 🙂
Thank you so much. I’m making my niece’s prom dress and although I’m a confident sewer, the fitting issue perplexes me. Not any more though. The added advantage is that her bf has her dress and it is a lace up, but has no modesty panel.
I did this today to a friends dress – I’m not a dress maker but can sew. It took a while and wasnt perfect (my inexperience not the instructions) but good enough and she was happy. Thanks for the tutorial.
Glad to hear that, Jenny. Thanks for letting us know.
I am needing help I am attending the military ball for the 9th year in a row with my husband and I bought a dress off of someone who was selling one and well it’s a side zip up dress and I’m needing to know could this be converted to a lace up corset it has a wrapping effect of fabric that goes around the whole back of the dress so I guess I would have to do a side corset I’m just wondering if this would work since I don’t have much time to fin another dress now
I’m not sure how much time you have left and what your sewing ability is. I’m not exactly sure what you mean by the wrapping effect of the back of the dress. If you could email me a photo of the back, that would be great. I don’t think a side corset is an option, though.
Thanks,
Linda
Yes I would be willing to email you a picture of the dress it is a side zip up and the wrapping ruffle fabric effect is the same on both the front and back of the dress it wraps around it let me know where I am able to email it
email to: thesewinggarden@gmail.com
Hi I found this very helpful but I have a different problem. I have a long satin gown that will not close just like the dress in your demo. I bought it because I love the train. It has a lining but it’s not satin the color is similar but not exactly the same. I am taking it to be fixed today what can I do?
You can ask the seamstress to add gussets in the dress. They work well for dresses that don’t need a corset back. She should know how to make those.
You do amazing work! I was wondering what your thougths would be on my issue – I found THE dress but it’s out of my price range. i’ve found some preowned/gently used ones for sale that I can definitely afford but they are too small. So my question is, how many inches is too many to try and add to a dress? the closest one i’ve found is still about 3 inches too small (when I compare the measurement charts) Would a corset back fix or is it too much and would look bad? Thanks for your help!
Hi Raine,
I’m guessing from your comments that you don’t sew. Am I correct? Three inches is not alot for this type of alteration, but this alteration might be more expensive than putting gussets in the side seams.
Read this post on gussets and see if you’d prefer this alteration: http://sewfordough.wordpress.com/2010/10/07/how-to-put-in-gussets/ Once you have your answer, ask a seamstress how much she or he would charge to do each alteration. Hope that helps.
I want to thank you so much for your website and for those who have posted additional information on how to make a lace up back. There is nowhere you can buy a pattern which will tell you how to do it so your resource was invaluable. Last Saturday my daughter walked down the aisle in an ivory silk dupion dress with a lace up back which looked fabulous. I could not have done it without this website and I owe you a great debt of gratitude. I managed to avoid all the potential pitfalls and found it actually very easy in the end,. I even made my own lacing ribbon. Let me know if you’d like a photo of the lacing.
Sue, I am so thrilled to read your comment. This is the reason why I wrote this blog! Not only would I like a photo of the lacing, I’d love to see the whole dress! So glad this was tremendous help to you!
Linda
What is the maximum width of tying ribbon would you suggest? We are redoing a 5 year old 2 piece dress to accomodate a size increase. The top is strapless, some boning and she needs tension at the top for support. We can use tie belt 2″ wide winding through flat (tight ) loops, or we could cut belt in half 3/4″ and increase the number of loops..The alternate is loops and ties done in premade cording. I would probably want to put a wide top strap across the to for bra support. Love your site!
That’s totally up to you. The only thing I’d say is, don’t make your straps wider than the opening in the loops. Glad you like my blog!
Going with plan B – using metal hoops for purses – shiny silver – to “punk ” the outfit a bit! 4 on each side, and use the original belt as the lacing. The loops will definitely take the strain and the D shape will hide the fabric loop under the edge. The belt is a bit wider than the hoop, so it will ruffle a bit and will match the rusched bodice. Elayne is really pleased with the choices I gave her, all from your site. Thanks!
Nothing like a happy customer!
My daughter travels for competitions and some of her gowns need to have the corset back added. However, she is unable to lace the dresses up herself. I am trying to figure out how we could lace up the dress at home and use a zipper on one side of the lacing to get in and out of the dress.
Thanks for the really clear clever tutorial. Am going to try it one day when I’m feeling brave! I bought a £2500 silk designer wedding dress on eBay for less than £10. Knew it was too tight when I bought it but thought lacing it up would solve it. Its a stunning dress so fingers crossed…..
Im grateful for the blog.Thanks Again. Will read on…
My friend purchased a dress online from some company in China – She ordered it with her measurements at the time and when she received it, it was to small… Thank you so much for your tutorial – I was trying to figure out the best way to go about this.
Unfortunately, the sewing quality on the dress isn’t that great from the start as the area they inserted the zipper in has very large flap that is a good 1/2″ from the edge of the lining where the zipper was installed. I removed the zipper, and put in the corset back only to realize that the darn flap was going to be a pain and look horrible… I’m taking it out, sewing the lining up and then going to attach the loops close to the edge as seen in your pictures… Wish me luck!
They also cut crooked and hemmed it crooked… Good times…
Hi Natalie,
So many brides are ordering their gowns from the Far East like this. It’s amazing to me. I know it’s less expensive, but by the time they have alterations done, it turns out to be the same price or more. Some do have a great experience and I guess that’s why they take the risk.
Would it be easy to just do the loops without taking out the zipper? My daughter’s dress doesn’t fit 2 months later and we need it in 2 weeks. I called around a couple of places to add a corset back and they are all busy or need a couple of weeks. I didn’t think it would be hard to just add loops onto the dress. She still may fit it in time as we are excercising and watching what we eat. I wanted to add small loops just in case she needs them, inconspicuous so that if she doesn’t need them, then it still looks good.
Hi Jody, give yourself plenty of time. I adjusted a friends dress using this tutorial. It was a little complicated and Im an average sewer and managed it. I’d never done anything like this. So good luck – follow all instructions and if you’re not happy well you could always add a little bolero jacket. Jenny x
Do you have to use satin fabric for the loops?
No. You can really use any fabric. I just like to use something that matches the dress as much as possible unless you want something completely different. It’s totally up to you!
I would like to know what should be more cost effective. The store i got it from ordered my dress two sizes smaller than needed and I just found out I’m pregnant…should i do corset back or let her put in panels on the side. The top part is off white with lace overlay and lilac stitched flowers…idk if that helps..
I can’t answer questions relating to a specific price as they differ all over the country (and world). The best thing to do would be to ask a couple of seamstresses in your area for their estimate. That will require you to take it to their shop so they can see it on you.
Hey there Meghan – I got married at 16 weeks pregnant and was thankful for a corset back, I think it keeps more of the integrity of the dress depending on how much larger you’ll need it, but that’s ultimately your decision. 🙂
CONGRATULATIONS on both and best of luck 😀
What a godsend of a blog post to stumble across! I am planning to make my wedding dress for May next year, and have started making a practice bodice, but the pattern is a teensy bit too small and has a zip up the back that I don’t want. I’ve been wondering about how to add a lace-up back instead and this looks like perfect instructions. Thank you so much!
This looks like exactly what I need to alter a bridesmaid’s dress that has at least an 8 gap at the top of the zipper. Is there any way to print out the instructions?
Hello,
I need to put a modesty panel in the back of my bridesmaid’s dress. The thing I cannot figure out, is how to do it and still be able to use the zipper to get it on and off! It zips up the back of course. How do you put a panel in above it and still be able to use the zipper? The only thing I can think of is to put another zipper up one side of the panel, or snaps inside, where it attaches to the straps. Can you please help me? Thank you!!
I’m having a little difficulty knowing what you’re asking. Can you send me a photo? Also, what do you mean when you say you want a zipper above the modesty panel? Do you mean on top of the panel? Usually, when you put in a corset back, you want to take out the zipper and just lace up the back, so if you could spell it out for me, that would really help me. Thanks!
It is not a corset back I want to put in, just a piece of material to fill in the deep v in the back of the dress. It exposes a lot of my back, which I do not want. I am doing the same in the front which is a very low v neck, but that is no problem because I don’t have to worry about messing up a zipper. In the back, the dress has a zipper that comes up to the bottom point of the v-back. If I simply sew in a piece of fabric above that, the zipper will no longer be functional. Does that make it clearer? I am sorry I cannot send you a picture; I am unable to load pictures onto my computer right now. Actually, maybe I can send you a link to the website the dress was ordered from. That way you could see it. Yes! Here it is. I hope this link works. They have pictures of the front and back. http://www.davidsbridal.com/Product_Long-Satin-Tank-Ball-Gown-F15741_Bridal-Party-Bridesmaids-Long-Bridesmaid-Dresses
Thank you so much for your time in replying to me!
I would make a triangle shaped piece with some fabric that matches as close as possible to the main fabric (maybe you’ll have some leftover from hemming the dress?) if not, buy a small amount of fabric to make the piece with. Then, stitch one edge of the triangle shaped piece to one side of the back of the “V” and then put snaps (or Velcro or buttons or something) down the other edge. That way, you zipper up the dress and then have a bridesmaid snap the remaining edge. Does this make sense?
Yes! That makes sense perfectly. Thank you so much for your time and advice! It sounds like that would work and be easy to do. And yes, I will have a 6” strip of the fabric from hemming, plus a nice large piece which is a wrap in the same material. So I happily have plenty of the same fabric to work with. I also am making flutter sleeves with the extra material coming off the lining, which is thinner than the satin. Between me and the bride, we are doing 5 of these, so by the time we get done we should have it down pat (I hope!) Thank you again. I am so glad I found your website. It is one of the best I have found regarding sewing alterations.
Awesome! Glad I could help. When you’re all finished, I’d love it if you’d send me a photo of a finished dress. I’d love to see the sleeves you are creating. The dresses will be beautiful!
Soooo glad I found your site. Am using all info to make a custom corset top for my nieces wedding dress. Feel confident about that, but after altering the matching ballroom skirt , and a little added weight, I find I now need to add this corset design to the top of the skirt, which has a zipper. Hope it works the same…using purchaced cording and am attaching to flat boning for stability on corset and skirt. could you address what stich size to sew loops onto boning. loops are so small am afraid my stiches may not get enough stitches across loop to secure them properly, or do you just keep sewing over them time and time again?
I usually just back stitch and forward stitch several times. Sounds like you’re doing an excellent job!
Hi,
How much fabric does it take to do this? Thanks.
Probably a yard would do. You will need to cut the fabric on the bias and you’ll probably need several strips sewn together.
Thanks for the tip. It looks even more beautiful than the original one. Can I ask you what you mean when you say that it must fit “between the two bust points”? I have a dress whose zip fits at the bottom and at the top (there is a small hook), but not in the middle where my breasts are. The problem is that it is not strapless. Would this work anyway? The dress is exactly this one https://s-media-cache-ak0.pinimg.com/originals/e4/47/fa/e447fa1cb619b4880e58f4d30bcef30c.jpg. What would you suggest instead? Thank you
Yes, even though it fits well at the top of the zipper, you can still use this process. Just take out some of the top area so that the opening is like a V shape (narrower at the base than at the top) and put the corset in.
great solution, thank you!
My grand daughter found her perfect dress in a local thrift store and fell in love with it! The only problem is that it won’t zip all the way, so we decided to make it a corset back and I didn’t think it would be too difficult since I had to redo one as an emergency for one of her mother’s bridesmaids at the last minute. Since the current dress is completely lined it turned out to be more difficult, so I’m so grateful to have found this tutorial!
Hi there! I have read every post on this thread and thank you for your kindness in offering such detailed information. I wonder if you could help me please. I have just purchased a second hand wedding dress with a satin, boned zip up back. I can get it zipped up and the overall fit is pretty good. I do have to rearrange my bust to get them in but all is ok. The only issue is that the boning digs into the bottom of my ribcage. I’m a comfort girl and on attempting to sit down in the dress I wonder whether I could actually tolerate the pinch throughout a meal. Would you have an opinion on whether this is a corset issue please? Many thanks Emily – if I could work out how to attach a pic I would lol. Thanks again
Her shop is called Christy’s and it is located in Monroe, NC
What do you use as the ties? Are they wider ribbon, or do you construct them out of fabric?
You can do either one.
Can you do this with a dress that is 8 inch too small thank you
Eight inches is a lot, but it might be doable if it is 8″ too small in the busy. However, if you’re talking about the waist or hip area, it will not work, nor will it look good. Ask a knowledgeable seamstress to look at it and assess the situation!
Where can I get the corset cord
A fabric store (local or online) would be your best bet.
Your tutorial is complete and provides details and pictures to help both the beginner and experienced sewer. This option for the back will allow for my daughter to have the dress of her dreams. Thank You!!!
Thank you so much for this tutorial! I used it to modify a friend’s gown to fit her as well as to make my own custom Cinderella gown. I love the way it looks. Thank you again!
Awesome! You’re welcome!
I’m currently working on a dress for my daughter who is in the Renaissance Fair as a Lady in Waiting. She wants detachable sleeves on her dress. I tried to make the loops with the silken cord but found the application works really really great with flat ribbon!!!!!!! If you don’t need it to be really strong as it’s not holding the dress together at the back try ribbon, it lays flatter and goes through the sewing machine easier!! Thanks for this. All the little tips have helped me out very much! God Bless!
Hey! Where in NC is the shop located? I’m near Topsail and am looking to have this done for my wedding dress and am on the hunt for a good seamstress.
She’s in Monroe, N.C.
Where are her shops located at in North Carolina?
Your tutorial was very informative. However, do you know of anywhere to purchase a pre made back, loop and ties for a wedding gown?
Wow! This saved the day, brilliant step by step photos! Thank you so much 🙂
I have done several of these. When I make a loop so I use a cord in inside like you would for piping. Give them a little more stability. I love to sew and love a good challenge. Enjoyed your info thanks
hi, my daughter purchased a corset kit that has a pretty thick “bone” lining..I am wondering what size/type of needle to use to add this to the dress. thank you 🙂
I’m not sure if I’m understanding what you’re asking. You should just be using a regular sized needle since you should only be going through the lining and maybe some casing, if you have it. Your needle should not be going through the boning. Does that help?
How do you make the straps as they are very long 3 yds long. Can they be turned out without too much trouble.
This is a post I wrote on that subject:
https://sewfordough.wordpress.com/2009/05/30/straps-lets-make-some/
Love this idea! I need to alter the bodice of my daughter’s lace and tulle prom ball gown. It has a full back with a high neck and zips all the way up. Neck fits so I am thinking of adding a hook and eye closer but am not sure how far up the corset would have to go to and still look right. Any suggestions would be appreciated. Thank YOU!
That’s a good question. I’m not sure. If you could send me a photo of the back of the dress including the neck area, that might help. Thanks!
Do you think something like this might work to cover a cut-out back panel of a dress? I found a wedding dress I adore, but it’s backless and I really don’t want a backless dress.
Could you send me a photo of the back of the dress? Thanks.
Thanks for the response! Here’s a link to a photo:
Yes, I think it could work. I think you’ll have to rework the back neck area, perhaps even taking that out completely and reshaping the back of the dress.
Wonderful. Thank you very much for the help.
You’re welcome! Glad it helped.
The biggest problem I have with this new project; turning a huge, stiff, poufy prom dress into an Elizabethan inspired stage dress for a play is that sewing anything on or around the bodice is difficult with all the stiff tulle layered all around this skirt. It is much like i imagine driving a car would be in a blizzard while the airbag was engaged. Fabric everywhere, and I am having a hard time seeing what I’m doing and also controlling the fabric. Oy! But one way or the other the Queen of this fairy tale kingdom will have a gown that fits and looks impressive once I’m done, I hope!
Hi Shana,
Is there a way to take the tulle skirt off while you do the alteration and then put it back on? Or maybe you can take it off and make a skirt out of it by putting a waistband on it? That might add a little extra work, but it might help take away that battle you’re having with all those layers!
Hi Linda, I am so glad I saw your website. My daughter already had her dress altered – they were making the bustle. The wedding dress just fit her – size 16. Fast forward to 3 months later, my daughter is back from out of state for her wedding dress fitting after the alterations. I know she has gained weight, it is obvious. We have her fitting in 3 hours. I was wondering what the options would be to make it fit if it is to small. I do not sew unfortunately, but I am wondering what a reasonable price to pay for this alteration would be referring to adding the corset with the panel in the back.. Can you give me some kind of idea? I would really appreciate it. It is a strapless dress and I can tell she gained weight from the bust to the hips for sure.
Hi Colleen,
I’m sorry I didn’t see this sooner. I hope your appointment went well. I”m not sure what your alteration lady charges for this type of alteration. The more important question is the worth that it is to you. If your daughter loves the dress, it’s worth the price because it’s a great answer to the dilemma.
If not, she could think about buying another dress, which is probably quite alot more money. I’m sure you made the right decision, whatever that is. Have a wonderful wedding!!!
Oh la la this explanation has made my day!!! My 9 year old daughter’s Communion Dress won’t zip up at the back; so I’m going to use this method to transform it into a lace up corset back. I don’t sew at all but I’m sure these detailed instructions along with the tips in the comments will help me to do a good job. Wish me luck and THANKS A MILLION, your a life saver!
Dianna
Thanks so much for your encouraging comment! So glad it helped! This is why I love to write on this blog…to help people who are in a bind.