Is the elastic in your shorts, joggers, or pants all stretched out? Is the waistband too tight or too loose?

Is this a beloved old pair of shorts that you or your customer just can’t live without and can’t find a similar replacement?
Whatever the reason, it’s time to learn how to replace the elastic in your waistband!
I’ve got a solution as well as some tips to make your project go quickly and look professional.
Some waistbands have a single row of stitching holding the elastic to the garment and some have several rows of stitching holding the elastic in. In this example, I’m going to show you what I do for multiple rows of stitching. If you have less rows, or you want to stitch back in less rows, you can certainly do that. If you have a flat waistband, the technique is still the same, but you just stitch one row of stitching to put the new elastic into your waistband.
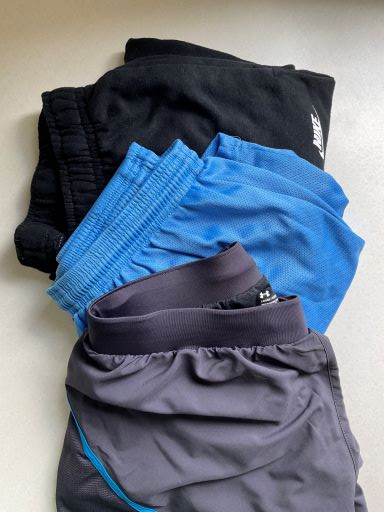
This technique can be used no matter what type of fabric your garment is made of (cotton, denim, polyester, etc.). In this case, we will replace the elastic in a pair of nylon athletic shorts.
Please read through all the instructions first, before you begin, so you understand the process and what you need to buy as far as elastic is concerned.
Before you take out the elastic, you need to figure out what width and length of elastic you’ll need to buy for the replacement elastic.
Measure the amount of waistband fabric that has been turned over to the wrong side of the garment. (At this point, if you want to use wider or narrower elastic, you sure can! Just use the new measurements instead of the old. Some people think they are locked into using the same exact width of elastic, but you can be as flexible as you want. However, if the waist fabric shows signs of wear, you may want to stick to the original width or make your width narrower to hide the wear and tear.)
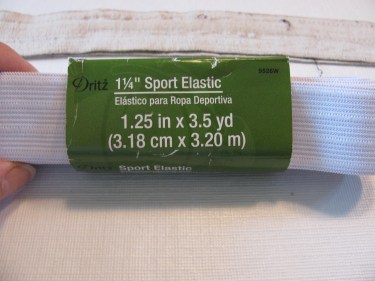
In the case of these shorts, the elastic is about 1 1/2″ wide. But you will see later in this post, that I will use elastic that is 1 1/4″ wide to replace it and I’ll explain why.
You’ll also need to know how long of a piece of elastic you need to buy. If the waist measurement of the person is 30″, buy or cut it to 28″.
You might be wondering why I would cut it shorter than the waist measurement. In most patterns that you buy, the pattern manufacturer says to add a few inches.
Many seamstresses advise that too.
But, think about that. If I add to an elastic measurement, it means that elastic is bigger than the waist itself and it would sag in the garment and be too loose on you. You want the elastic to stretch just a little in order to give a comfortable fit. If this makes you nervous, cut a piece according to the pattern suggestion and see if you or the customer likes that. What I’ve found over the years, is that people say that is too loose and they want the garment to fit a little more snug, hence my cutting it a bit shorter than suggested. Keep in mind that you will lose a little circumference when you stitch the ends of the elastic together, which is described more in a later step.
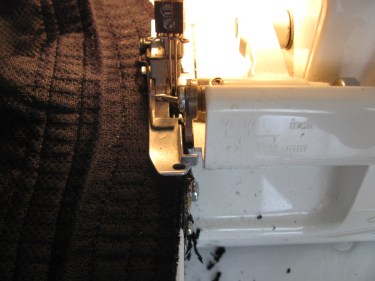
Now, let’s get started with the deconstruction! First, use a seam ripper to take out the rows of stitching that are holding the elastic to the waistband. It may mean that you have to pick apart each stitch.
However, some manufacturers use a machine that produces a chain stitch. You’ll be able to see it on the underside. If you have a chain stitch, you can clip one thread and pull the chain and the row will come out almost instantly. This pair of shorts didn’t have that chain stitch on them, so I took the stitches out one at a time. It won’t take very long.

Once I took out all the stitches, I could turn over the waistband and see that the elastic was sewn on one edge only.
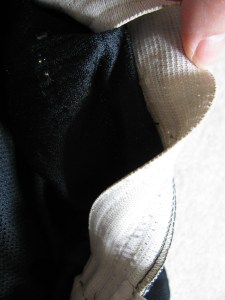
You can see how stretched out this elastic is. It was definitely time to replace it:
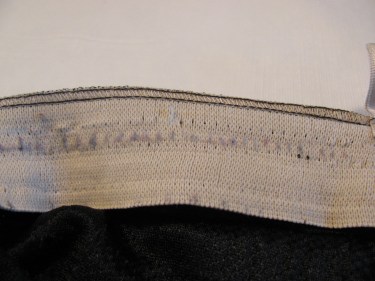
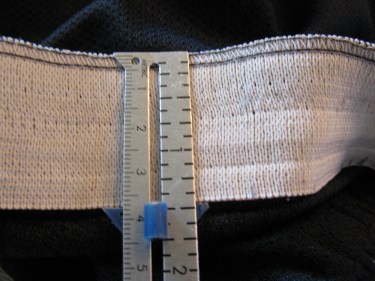
This is a good time to measure the width of the elastic. As you can see, it measures almost 1 1/2″. So this tells me that I can use elastic that is 1 1/4″ to 1 1/2″ wide.
In this case, I will use 1 1/4″ elastic, as you will see why in the next few steps. I love to buy swimwear elastic as it is strong, but very soft. However, I have a very difficult finding it anymore, so I opted here for the sport elastic. You can buy it in a package like this. It has 3.5 yards of elastic in it, which is more than enough for this project.
Tip #1: If the elastic is stitched to the outer edge of the waistband, there is no need to take out the stitches, one by one. You can take a sharp pair of scissors and cut off the elastic real close the the edge of the waistband. Be careful, obviously, to not cut the main fabric of the pants or shorts. When you cut off the elastic, you are only cutting off a small fraction of the waistband, usually about 1/8″-1/4″. If you can’t spare 1/8″-1/4″ of your waistband fabric to be cut off, then you will need to take off the elastic one stitch at a time. But, I try to avoid that whenever possible because it takes alot of time.

Once the elastic has been cut off, you can throw it away. I can’t imagine a use for it now.
Next, I like to finish the raw edge of the waistband. You can serge it if you have an overlock machine. If not, sew a zig zag stitch along the edge. This will keep some fabrics from fraying and it will give the waistband a nice looking edge.
Tip #2: Most patterns suggest that you stitch the waistband casing down but leave a one inch opening so that you can feed the elastic through that casing, or channel, with a safety pin. Then once that elastic is fed through the casing, you can take off the safety pin and stitch the elastic ends together and then machine stitch that opening of the waistband closed. I find that too time consuming. What I do, is make a circle with the elastic, overlap the cut ends of the elastic, and stitch the ends together like this:

Then, fold over the waistband on the original fold line and press it again. If you are using a new width of elastic, you may need to press a new width into the waistband.
Next, I’m going to divide the elastic circle into 4 equal parts. To do that, I lay the elastic flat, as shown in the photo below. Do you see the stitching on the far left of the photo? Put a pin in the far right end of the circle as shown below:

Next I match the seam and the pin together and lay the elastic flat again. Then I put a pin at both ends of the circle as shown below:

When you open up that circle of elastic, you have three pins and the seam of the elastic in 4 equal distances around the circle.
We do the same pinning technique with the waistline of the garment.
Now, tuck the circle of elastic under that fold that you made in the waistband, matching the pins. We will match the seam of the elastic with the center back seam of the shorts first. Put one pin in to hold the center back of the garment to the center back of the elastic.
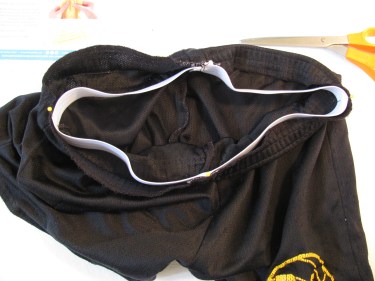
Next, we match the other three pins of the elastic to the other three pins of the garment. You can see that you will have excess fabric on the waistband. In other words, the elastic circle is smaller in circumference than the waist of the garment. Does that make sense?
Do you see, in the photo below, that the fabric of the waistband is sagging under the elastic? You can see a little of it off to the right of the elastic.

You’re going to hold onto that shorts waistband while you stretch the elastic to fit the waistband and then sew it down. Sew between pin #1 and pin #2. Make sure the edges of the waistband and the edge of the elastic line up.
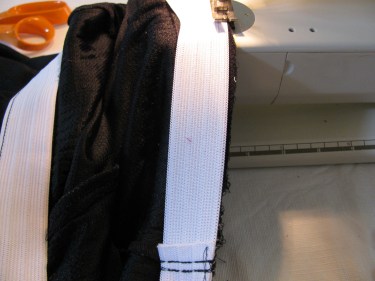
Once you sew to pin #2, do the same between pin #2 and pin #3 by stretching the fabric between those pins and stitching. Go slow so you don’t slide off the edge and have to rip out stitches.
Once you stitch that elastic edge to the edge of the waistband, fold over the waistband and begin to stitch on the old stitching lines for each row of the waistband.
If you have a drawstring you need to put back in, just position it in the middle (you might have to thread the ends through the openings, just make sure you don’t catch the drawstrings in your stitching.
Or, you can leave out the drawstring and stitch the openings shut.

And that is all there is to it!
Your garment is good to go for a long time!

Wonderful description and instructions. Thank you, thank you.
P
So glad it helped. Thanks for letting me know!
Couple of thoughts:
A: You can also just cut the elastic if sewn on one edge. Leave it in place. So instead of taking of the edge of the waist band, you leave the edge of the elastic.
B: I like a snug elastic. Start with you 2 inches under the waistband measure, then safety pin them together. Try it out. I usually end up 3-4 inches under waist band.
C: Might cut a chunk of cardboard that fits the waist band. Tack the new elastic at two points at opposite ends of the card board.
D: If you don’t have a sewing machine that handles elastic thread, and if it’s going to be inside the waist band, what about just doing a bar tack with a zig zag sticch every 3-4 inches across the width of the elastic.