A customer brought me two jackets to take in at the shoulders.
Both of these jackets had shoulder pads, too, which she wanted removed.
You don’t see those much anymore!
The other jacket can be found in the post entitled, A Finely Tailored Jacket.
Both were custom made in England for my customer and they were a delight to this former tailoring student!
For this jacket, as I mentioned, she wanted the shoulder pads removed which meant that the jacket shoulder hung off of her natural shoulder. She wanted to see what I could do to take out that excess.
So, I had her try the jacket on and I put a pin marking the spot where she wanted the sleeve to be moved to.
See the white pin head about one inch in from the armscye (sleeve seam)?
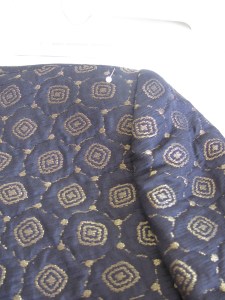
The fabric was a quilted silk.
Doesn’t the pattern just scream “1980’s” to you?!
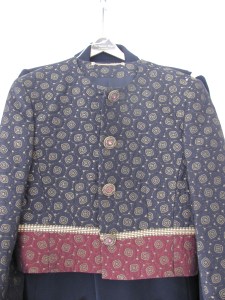
That’s one fun thing about living in this world of sewing…you get to see all sorts of fabrics from all over the world and styles from all decades!
Let’s get started.
The first thing you want to do is, turn the jacket sleeve inside out.
You are going to open up the sleeve seam of the lining only.
We do this to access the shoulder seam easily and when we close it up at the end of the alteration, it’s super easy and this seam doesn’t show when you take your jacket off.

Open the seam up about 5 or 6 inches (I usually open it around the elbow area and up towards the shoulder) using your seam ripper.
Then, pull the shoulder area out so you can work on it.
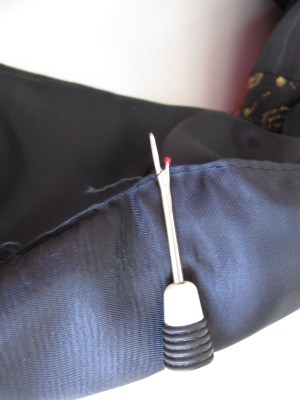
Unsew the lining seam with your seam ripper. :
If you have sewn blouses or jackets with a pattern, you know that there are notches on the pattern of the sleeve.
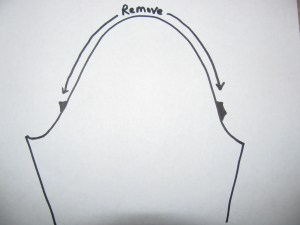
Your jacket may not have notches in it, like the diagram below, but just open a large section of the seam.
This diagram shows how far you should take the seam out:
Next, take out the shoulder pads.
These particular ones were made of foam rubber!
That’s the first time I’ve seen foam rubber shoulder pads….ick!
They just disintegrated:
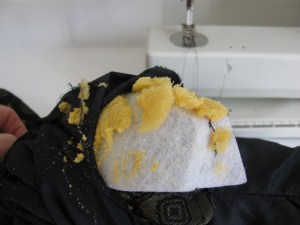
Shoulder pads are usually just attached with tacking threads.
Just clip those threads to free the pads.
In rare cases, however, you may have to open up the shoulder seam, take out the shoulder pads and restitch the seam together again before doing any alterations.
Once you take out the shoulder pad, you’ll notice that there are a few items you may not be familiar with.
One of them might be the white interfacing strip (or a strip of seam tape).
It is there for support
The second might be a flannel-like sleeve cap (or one made of a similar material).
In this case, it is the lighter grey fabric strip:
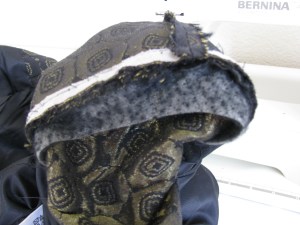
This gives the sleeve stability and shape.
Take that off.
Before you take apart the shoulder seam, put in a tailor tack instead of a pin at the top of the sleeve.
Use a contrasting color of thread so you can see it against the jacket fabric.
You will put it in the seam allowance of the sleeve, where the shoulder seam meets the sleeve.
You need this tack in order to match up the sleeve after you make the alteration:
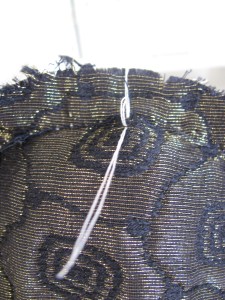
Next, match up the tailor tack mark to the new pin mark you made earlier on the shoulder of the jacket:

Be sure you are matching the seam allowance of the sleeve to the pin mark, not the cut edge of the fabric to the pin mark.
Next, pin the sleeve all around the arm seam. Use the stitching line as your guide and make sure it looks nice and smooth and natural as you pin.
If it fits well, just stitch over the original seam line and you’re finished.
However, if you have more sleeve than armhole, you’ll need to make that sleeve circumference smaller.
That’s easy to do.
Let’s say it’s too big by 1/2″.
Take a pin and place it 1/2″ down from the seam allowance right under your tailor tack (which isn’t showing on this photo.)

Now, your new seam line will be similar to the original one, but it will look like this (where the dotted line is drawn). I don’t actually draw a line on the jacket, but you could, using a washable marker.

Then, stitch the new seam of the arm, all along the dotted line, to close it up.
Once you’ve sewn that seam, check how the sleeve looks by turning the garment right side out again.
Make any adjustments, if necessary, and sew again.
Next, don’t forget to sew the grey matter back in there! Just use the same stitching line.
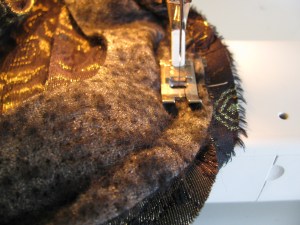
If it looks good, trim off the excess fabric:

If your jacket came with these “stays” (this one has blue stays), be sure and sew those back on. One end should be sewn to the jacket on the seam allowance and the other end gets sewn to the shoulder seam allowance of the lining.

These keep the jacket and lining from straying too far from each other.
They are not necessary if your jacket doesn’t have them.
Stitch the opening closed in the sleeve lining down by the elbow.
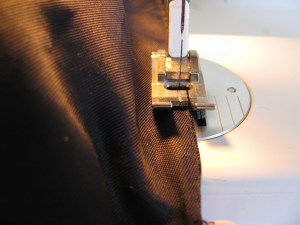
Make the same alterations to the remaining sleeve and the lining on the other shoulder of the jacket.
It is easier than it sounds and I hope it gives you incentive to give it a try!
Update: 2/28/12:
Below in the comment section, you’ll see a comment from a Linda M.
Here are the photos which go along with her comment (below).
She adds pleats in the seams to take in any extra fullness, if you run into that problem.
Its another option if your customer would like that look.
(Or you could add gathering stitches. It really depends on what your customer would like.)
Since one of you posted a reply asking for photos, here they are:
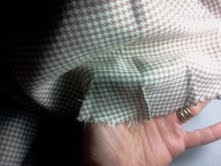

You can see how they look in the photos above.
Thanks Linda, for sending those to me.
Oh my goodness, you are talented!!
My guess is that if you are making costumes, you are the talented one! Thanks for the nice compliments. 🙂
I have a lovely Talbots jacket that needs the shoulders altered, so this is a very timely subject. Thanks for your sewing knowledge and your great step by step pictures.
And I see that you have a Bernina, Yeh!
Julie S.
Yay, Bernina! Glad you have one too and I’m glad the post was so timely for you. Thanks for your comments.
hi.
thanks so much for this. i always thought it was a much more complicated procedure! i was wondering, what is the most that a shoulder can be moved in toward the neckline with this technique before the sleeve starts to sit funny? also, does it work the same on men’s jackets?
thank you for all that you do, i live for your blog, and it has saved me many times.
arianna
Hi Arianna,
That is a good question. I have not had to worry about that problem before. I figure it is a safe guide that if the jacket fits otherwise, the shoulders can be taken in. If the jacket is three sizes too big all over, those people probably don’t want to pay for an all-over remake of their jacket. You can take more up in the shoulder seam to accomodate for taking it in even more than one inch. You could also take the whole sleeve off and take more in at the side seam of the jacket if you had to.
Does that help?
Linda
hi linda.
that does help.
thanks again for all that you share with us!
arianna
Hey Linda,
I just got a customer who has a dress with the same issue. However, she has lost weight since the 80’s so her dress also needs adjustment in the shoulder seams to accommodate weight loss and smaller shoulder pads. But I don’t see where you show that step. Can I assume that if you take the excess out of the shoulder seams, then the sleeve cap also needs to be decreased? Otherwise there will be too much fabric to ease the sleeve cap back into a smaller area.
Another easier solution is to add darts if it does not give the garment a bulky appearance. But then your sleeve cap still has too much fabric.
What is your take on this (hopefully before I ripped out these sleeve caps)?
Hi Linda,
I only take in at the shoulder seam if I have to. If your sleevecap is too big, you can take off the entire sleeve and take it in at the underarm seam of the sleeve. Or if the sleeve is two pieces, you can take in at one of those seams. I’m not sure if this is what you’re asking. If she has lost alot of weightm it may not be easy to take in much more than an inch or two without it compromising the shape of the sleeve.
Hope that helps!
Linda
Hi Linda,
This is what I did to get rid of the eighties look in my client’s sleeves. While doing some further research and talking to my mentor, Cindy Bell, I decided not to take the sleeve out since that is too time consuming. Cindy suggested that I put in three darts to reduce the size of the sleeve. I found a picture of the technique in a book I refer to often called Sewing 911 (pg. 102) by Barbara Deckert but it does not have a lot of details on how to do this. Cindy suggests that the dart be 1″ in length and to make sure that the darts are equally apart from each other. BurdaStyle also has a tutorial on darts that helped me to achieve a smooth look by sewing a curved dart. It turned out beautiful!
When I learn how to upload pictures, I will send it on later.
Thanks for posting this timely information.
Linda M.
@ Linda M.
i’m curious about this technique and would love to see pics, but meantime, did you put darts in the sleeve or the shoulder seam? i’m not clear, but very interested.
thanks
arianna
I put the darts into the sleeve cap. When the sleeve cap is unsewn between the 2 notches as Linda indicates in her illustration, the width of the sleeve cap is reduced by including 3 darts at the top of the cap. Make sure they are spaced equally apart with one dart placed at the center of the cap and the other 2 darts placed with one on each side of the center dart. Does that make since? I don’t know how to add pictures to this site, yet.
If you send me photos, I’ll add them onto the post.
Thanks!
Reblogged this on Sewingpro4u's Blog.
wonderful precise tutoring. I have done these myself, and it is always helpful to see another professional. I am 51 and always love to learn more.
Hi Judy,
Oh, I am glad to see you do these this way as well. I have had several people tell me that. It’s always good to hear feedback, even when it’s that I need to update my techniques!
I like your email address with seamripper in the name. Hopefully, you don’t have to use it very often!
Linda
Thanks Linda for posting the pictures.
As you can see, the garments from the eighties were designed to include those football size shoulder pads. Therefore, I found that some of the fullness still remains in the sleeve cap area. This technique only reduces the sleeve cap. In Barbara Deckert’s book, Sewing 911, she suggest adding darts, gathers or tucks. She says you can also take-in a deeper seam on the sleeve only.
If anyone uses this technique, make sure you inform your customer of what to expect. My customer came back to me and said her dress is beautiful!
Linda M.
I am sure she did! Thanks again for sharing your photos and information with us!
Linda
I just found your blog also and am now a fan and student as well.I think I will be able to learn so much from you.Thank you for taking the time to have such a great blog,as I love to sew but am not the greatest at it and now I can learn from you!
Thank you, Alice, for leaving a comment and your sweet words. I hope you enjoy the site!
I am working on a dress for someone that needs the shoulders take in too. Am I right to assume I can use the same technique? Thanks so much for this blog. I am a self taught seamstress and really like seeing all the pictures you show. It makes it so much easier for me to learn more!
Linds Malley
Linda,
Try this post and see if it is what you are loooking for:
http://sewfordough.wordpress.com/2010/02/11/shortening-shoulder-straps-on-your-dress-or-top/
Glad I found your blog – I can tell it’s going to help me step up my game. I have a blazer with the “80’s shoulders” puffy problem. I removed the shoulder pads and would like to remove the extra fabric in the sleeve cap. However, the fabric pattern would not do well with the dart technique mentioned above. How would I remove the extra puffiness at the seam for a smooth look, without adding darts? (Time isn’t really an object for me, personally).
Hi Callie,
There may be a way to take off the sleeve completely and cut out a new one from it, but I can’t guarantee that. I would use a sleeve pattern that would fit there and see if it is possible. Other than that, darts, tucks or gathers is all that’s left.
I am so greatful that you have this site. I have been sewing for quite sometime both at home and industry…..however, I have found that the retailers have different ways of ‘tailoring’ depending on which store you work for…where can I find a tailoring book….
Loved removing the shoulders on these tailored coats…worked out beautifully…thank you thank you….
Used this technique today to alter a lace jacket for mother of bride. Turned out perfect and saved a bundle of time. Thank you!
Oh, I’m so happy to hear that. I hope the wedding is wonderful! Linda
Thank you for this tutorial! I wouldn’t have thought to do it this way. I have narrow shoulders so I’ll probably use this a lot in the future.
Great! Glad it helped you, Holli. Thanks for writing in.
Linda
How about altering shoulders on over size t shirts. I have a number that belonged to my husband that are really nice from Disney and hate to get rid of but shoulders too long . Would there be a different method for t shirts because the materal is different?
The technique is the same. However, t-shirt fabric is a knit so you’ll notice that the edges curl when you work with it. You’ll also need a stretch needle for your machine.
Try one and see how he likes it.
What a life saver you are. I was altering a scrub jacket for my sister from an XL down to a Small. I took in the side seams and underarms without a problem but was having difficulty with the shoulders. I had a general idea on how to do it, but with the pictures and reading how you did it, I now feel confident it will turn out perfectly. Thanks SEW much!
Linn
Oh, that’s music to my ears! Glad it helped. Thanks for letting me know. Thank YOU sew much!
Love your blog; was wondering how to shorten sleeves at the shoulders. The bottoms of the sleeves have 4 buttons/holes and very nice looking. Hated to think about removing all of that & will definitely take up at the shoulders! Thanks. Linda C.
The only way to do that, if you can’t shorten at the wrist, is to shorten at the shoulder and underarm. It may mean making adjustments in the circumference of the sleeve to do so.
Nice site! Great instructions and photos.
I see by the date on the last response that you’re still answering questions on this post, so here goes…I just purchased a magnificent long wool coat at a thrift store. The style is manly — straight with no shaping — and it has big shoulder pads. My questions are more style related: I’m wondering whether 1) to *replace* the shoulder pads with smaller ones or take them out altogether; and 2) whether to shape it a bit by taking in the side seams. FYI, I’m somewhat petite, 5’4″ and 118 lbs. THANK YOU.
Hi Ellen,
If it were me, I’d take out the shoulder pads and see if you like the fit and look. Then, if you need to put smaller ones in you can. I’m not sure I understand what you mean when you say to reshape it by taking in the side seams. Perhaps you can spell that out for me a little more. Does that mean you’ll not touch the shoulders and just take in the side seams?
Thank you so much for your response. I went ahead and removed the huge shoulder pads and the coat already looks better but I think a smaller pad just for shape might be good. I’m also taking in the side seam up to the armpit and down part of the sleeve (easy because they raglan). I think I’ll also do some darts in the back so that the shape is not so straight. Thank you!
Everything you’re doing sounds perfect! i’d love to see before and after photos if you think of it.
Thanks!
Linda
Hi. I just had the same request from a lady. She brought me a beautiful (pricey) suit to remove the shoulder pads, which gave it a distinct 80’s look. I needed to back the sleeve into the shoulder area to take up the extra slack that was being filled by the great pads. My only comment would be, to be sure of an adjustment on the lining as well. Sometimes it too has to compensate the fit of the shoulder pads depending on their size. This was a very informative diagram that you put here. Thanks for that.
I took sleeve off and now the sleeve is 6″ bigger than armhole. It doesn’t make sense! What’s going on?
Was the sleeve cap (top) gathered before you started the project? Send me some photos if you can so I can see what you’re looking at. Thank you.
This was extremely helpful. I am in the process of altering and refashioning an outdated, much too big suit that has a lot of sentimental value and everyone was telling me not to bother because adjusting the shoulders as much as I needed to is very complicated and never looks right. Your instructions and pictures made the process very clear and unintimidating so I gave it a try. It came out great! Thank you!
I am so happy this helped you! Thank you for letting me know!
You’re a genius. I just found your blog and as an aspiring fashion designer, this is going to help me so much!
Thank you, Shivani. I have to give God all the glory! I am so glad this will help you and I wish you well in fashion design. It’s a tough industry, but having great sewing and alteration skills will give you an advantage over your competitors.
Hi,
I enjoy your advice, thank you very much for them! I have a raglan sleeved thin wool coat, a-line or mor tent-ish, several sizes too large for me, as I am petite and the coat is size L. The material is good, I like the color and the width that the large size gives the hem. I like flare and volume. BUT. The shoulders, the shoulders. First of all, I’d love something else but tje eighties round, sloped raglan with pads or at least some shaping stuff inside. I like fitted sleeves, maybe even with some tucks, I could see a yoke or some kind of AA-shaped yoke with the top parts of the raglan still attached but sleeves cut off and refitted with an additional seam to the “straps” left intact.. and of course the whole shoulder width is wrong, so I’d have to take in the top part. The hem width I like as it is. Any chances to accomplish this, what do you think? I know my way around the sewing machine but re-tailoring something this odd I’m not familiar with. Thank you for your thaughts, suggestions, and/or ideas!
Wow, that sounds like ALOT of work! I wish I could be more encouraging, but the coat is way too big for you in the first place. Secondly, you are proposing design changes that most likely needed to be done before the fabric was cut out. If you make these changes now, I don’t think you would be happy with them. They’ll make it look like a homemade coat, especially if you don’t have any tailoring experience. My advice would be to give this coat away or sell it and go and buy a coat that already has fitted sleeves and only needs minor alterations.
Bless you for giving such a detailed description, and with pictures too.
Hi there, I have just read your blog on removing shoulder pads, now outdated and reinstating sleeve. I have a lovely all wool winters coat which I purchased in the 90’s in Vyella. It cost me a lot of money even back then. The fashion at the time were large padded and quite wide sleeved raglan sleeved coats. would it be possible to remove raglan and create a set in seam. The coat otherwise is unwearable as looks very old fashioned. I would very much like to save myself the cost of a new coat as am now retired and anyway the fabric is lovely. Thank you in advance if you can advise.
Hi! Your coat sounds beautiful! However, I don’t think it can be made into a set in sleeve because when you take off the raglan sleeve, and look at the shoulder area, you wouldn’t have any fabric for the area from the neck to the shoulder, if that makes sense. Perhaps you could take in the underarm seam of the sleeve from the armpit to the wrist and make the sleeve slimmer than it is. Perhaps that would help. Or perhaps, taking out the shoulder pads is all it would need because a lot of people are wearing retro clothing these days and it may look good that way.
I hope those suggestions help.
Looking at the comments about overly large coats..if enough fabric is there, I would take the coat apart and cut out a new one. I am a fabric freak and have taken apart garments for just the fabric. Just a thought…I prefer making an entire garment to doing alterations anyway!
Yes, that can work, especially if the new coat is much smaller than the original, but many times it won’t work because of placket or sleeve curves, etc. (Here is another example of someone who either likes to do construction or alterations, but not both!)
I have learned a lot.
Good information I have seven suits to alter