Have you heard of a tailor tack? If you’re 50 years old or older, you probably have.
If you’re a young whipper snapper or you’re new to sewing in the last 25 years, you may not have any idea what I’m talking about.
So, let me first tell you what one is and what it does and then I’ll show you how to make one.
A tailor tack is a way to “mark” fabric without using pins or a marker. You use thread instead.
There are several reasons why you would use a tailor tack:
1. You might have very slippery fabric and the pins might come out easily.
2. You might have expensive fabric like a satin or a silk or any other fabric where the pins could leave a big pinhole.
3. You might not have any pins available.
4. You need to mark two layers (or more) at the same time and be accurate about it.
5. They are a good way to “mark” darts when you are constructing a garment. You can make a tailor tack without using carbon paper and a tracing wheel, which may leave permanent marks on your garment.
I’m sure there are many more purposes, but those came to mind quickly.
I use them alot when I am pinning up a train to a wedding dress and I pin where I want the bustle to be. Then, right after the customer leaves, I put in tailor tacks to mark the spots. That way, I don’t get big pin holes by leaving pins in a long time and I don’t have to worry about the pins falling out as I’m working on the dress.
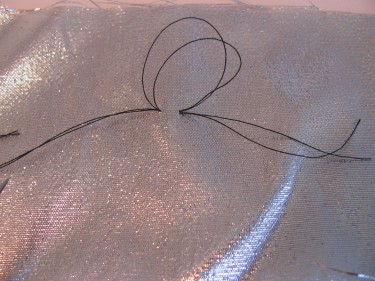
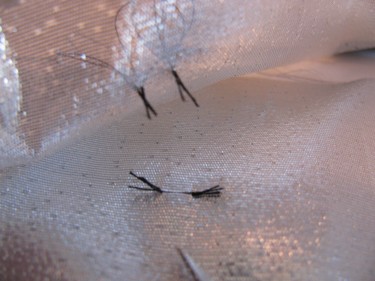
This is what one looks like. I know they look weird, but stick with me here. They are worth knowing how to make.
And they are really simple to make.
Ok, let’s make a tailor tack.
I am using a scrap of metallic fabric here to illustrate, but I most often use tailor tacks on satin type fabric.
First, take a small stitch into the fabric where you want your mark to be.
Again, you can mark a fabric for any reason: darts, bustles, shoulder notches, etc.
If you have more than one layer of fabric, stitch into all the layers at once. You don’t need to knot your thread, but you do need to keep the ends of your threads the same length.
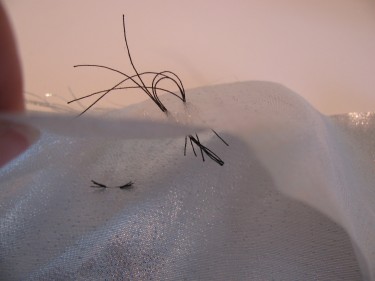
So, take a stitch and leave the end about three inches long:
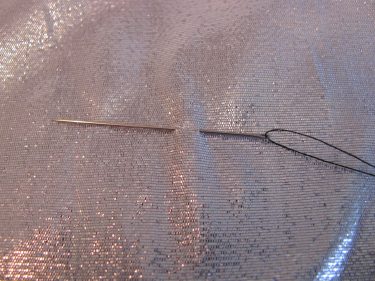
Now, take another stitch right into the same spot as your first stitch:

Don’t pull it tight…leave a loop above the surface of the fabric like this:
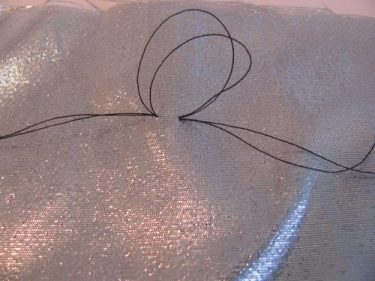
Cut the thread leaving a tail about three inches long.
So, you’ll have a tail on one side of the stitch and a tail on the other end of the stitch. In the photo above, there is a tail to the right and a tail to the left of the loop. That is how it should look.
Now, carefully, peek underneath the first layer of fabric. You’ll see if you pull the two layers slightly and gently apart, that there are threads in between the layers:
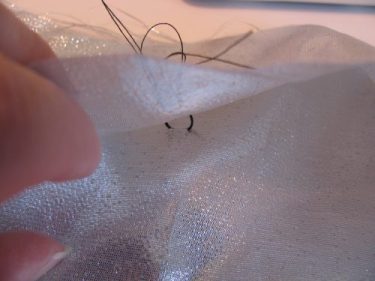
If you pull too hard, you’ll pull out most of the threads and you’ll have to do the process again.
Once you get them pulled a little bit apart, cut the threads between the layers of fabric like this:
If you only have one layer, then you don’t have to cut anything until after your garment is finished or until you don’t need the mark anymore.
As you can see, you have some threads marking the spot on the top layer of fabric and some marking the spot on the bottom layer.
Leave these threads in the fabric while you do your sewing.
When you are finished sewing, you can easily pull these threads out. Sometimes, I need to use tweezers to pull the threads out.
Whatever color fabric you are sewing on, you’ll want to use a matching thread so that if you can’t pull the threads out for some reason, you won’t have a contrasting color stuck in there.
I used a contrasting thread here so that it would show up in the photos and be easier to see what I had done.
Try some tailor tacks. I think you’ll find them very useful!
