I admit I don’t get a request to sew on satin covered buttons very often.
It’s happened twice in the last eight years.
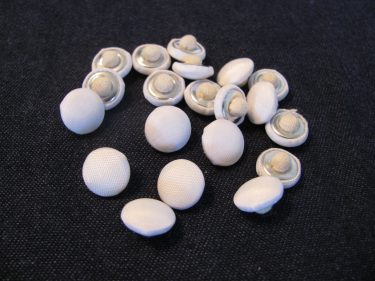
But, you’ve seen satin covered buttons before, right?

They are usually seen on wedding dresses or other bridal items.
The button is covered in white satin on one side and has a softly padded shank on the other.
As you know, my daughter is getting married soon and she wanted me to add satin covered buttons to the back of her dress.
I thought I could run down to the local fabric store and buy a pile of them.
Wrong!
They don’t carry them.
Thankfully, they were available in the big city 75 miles away.
Some of you buy them on the internet.
Here’s a link to buy satin covered buttons from various vendors on Etsy. The prices are very reasonable.
I thought of that, but I wanted to make sure they’d match the dress closely as her dress is not a bright white, but a cross between white and candlelight.
I took a swatch of the fabric to match and wouldn’t you know, they had a bag of bright white ones and a bag of candlelight!
So I chose the candlelight color because the bright white made the dress look dirty.
Have I lost you in the details yet?
The owner of the store (they’ve been in business 50 years this year!) told me to figure two buttons per inch, and a few extra for the bustle, (that’s if she chooses an over bustle.)
So, I put a pin in the zipper area every 1/2″, starting at the 1/4″ mark.
You can see how I did that in the photo below:

To begin, use one long continuous double thread to sew them on.
Be sure and put a good knot on the end of the thread and come up from the back of the dress with your needle. I’m doing this because I want to hide that knot.
Make sure your knot doesn’t get in the way of the zipper.
Using one long continuous double thread saves me major time sewing on the buttons one by one. You don’t want to cut new thread, thread the needle, and knot the thread for each and every button, right?
So, let’s look at how to sew on satin covered buttons in the easiest way possible.
Look at the photo below. Do you see how I sew these on?
As I’m sewing one button on, I put the needle in just past the next pin. You can see the very tip of my needle poking through the fabric just to the left of the next pin to the left of the button. I do this so that you cannot see the thread on the under side of the fabric, or the underside of the dress, to be more precise.
I’m making my stitches through the dress, like going through a tunnel, not letting my needle go to the underside and show. If you flip it over, all you’ll see is zipper tape and no stitches.
Does this make sense?

Then, I push the needle into the button shank making sure it is horizontally inserted all the way through the shank. I want that button laying as flat as possible against the dress. And I run the needle as close to the shank as possible…going through the thickest part of the shank., as seen below:

Here’s a side view of the buttons after stitching them on:

They look like little mushrooms all lined up!
Then, repeat the process, following the photo below. Do you see that you backtrack about 1/4″ with that current button before pushing your needle to the next button spot? You are bringing that needle up a little past the point of the next button placement:

when you are finished sewing on all of the buttons, push your needle through to the back of the dress and knot the thread securely. Trim off the thread.
(If sewing with one continuous thread scares you a little, sew half the buttons on with one thread and the rest of the buttons on with a second thread. Or use three if you need to, but this method will surely make your job go quicker!)
Halfway through attaching these buttons, I poked my finger with the needle by accident.
I drew a little blood.
Do you know how to get blood off your wedding dress?
There are all kinds of chemical solutions out there, but the very best solution I’ve found is….
Saliva.
Yes. Saliva!
In the photo below, on the middle button, you can see where I have already dabbed a bit of my saliva on the blood stain.
It was bright red, but now it’s pink. Sorry, I know that sounds gross. But, when it happens to you, you won’t forget the remedy!

A little bit more saliva and the stain is gone! (I’m not kidding! See the second button from the left):

In the above photo, look at the third button over from the left.
That one is not the one that had the blood stain!
This button has a flaw. It looks like there are wispy little threads under the surface of the satin. I didn’t want to take the risk of ruining the button by trying to remove them because, unfortunately, I only bought just enough buttons to do the project, so I had to use this one somewhere in the lineup.
I also didn’t want to drive 75 miles for another button, or shop online and wait for it to come.
Can you relate?
I don’t think it will show. I don’t think anyone will be looking that closely to that area of the dress.
I’m glad it’s not on the front of the dress.
See how easy it is to sew on a set of covered buttons?
P.S. If your buttons have a metal shank, you sew them on the exact same way, but the shank is very thin so your stitch to hold them on would not be a full 1/4″. You could do it with a much smaller stitch.
Happy Wedding Day!
If you are sewing on buttons that don’t have a shank, here’s a post on how to sew on buttons with a thread shank.

This is an awesome tip. Doing bridal parties is one of my favorites. This idea will go a long way in saving me precious time. Thank you, Thank you, Thank you. Saliva!!!! Who would have thought? Two thumbs up!
Louise
This is going to look stunning. Do hope we get to see the dress (after the wedding of course!). And a great tip too, thanks!
Yes, finding covered buttons is HARD! And getting the right fabric match is also difficult. I have found an Etsy shop that will make these buttons from fabric that you supply! The price is reasonable too. It is possible to buy the supplies in bulk and do it yourself but with carpal tunnel, I have a hard time holding the material circle and pushing the two halves together even with special tools. For these buttons visit http://www.etsy.com/shop/LiDDesignsSupplies
Great ideas. These are very helpful. Thank you!
If you have a business license you can go to http://www.thebridaloutlet.net and get bridal buttons for $14.95 per gross in White or Ivory. They have the Metal or Canvas back in Shiny Satin, Matte Satin, or Shantung. Or you can call them and order 1-800-758-8779
Forgot to add my name!
I had a bride that wanted me to add buttons down the back of her dress. She wanted them beaded too. I wasn’t given much time to do the job, so I found some left-over beaded applique ( I don’t throw anything away) and was able to glue them on to the buttons. It turned out beautifully and you can’t tell they weren’t hand beaded! I wish I could show you pictures.
I use waxed horsehair thread to sew hand sewn buttons on. Great stuff !!!! This thread doesn”t knott up!
Hi Becky,
Thanks for the tip.
Where do you buy that type of thread?
Linda
Hi Linda,
I came across your blog searching for information on altering the hem on some flared pants. Thanks for the information.
Love your blog! Sonia
your tips for sewing covered button and procedure is very nice and easy. Thanks for sharing tips.
Hi,
So glad you found this helpful. Thanks for letting me know. I really appreciate it.
Happy Sewing!
Linda
Approximately how many buttons did you use? I want this same look and the store told me to expect to pay $3/button. That could add up quickly!
Figure one button every half inch.
Go to this website they are $4.75 per dozen buttons.
http://www.baltazor.com/bridalbutton.html
I bought my from there and was very happy they sell the bridal loops for the buttons as well!
Do you have a favorite place to buy a corset kits, for putting in a lace back when removing a zipper? Thanks Sue
I don’t. But I believe there is a comment under the “How to put a corset back in” post. Type that in the search box above and read through the comments on that. I have always made my own.
Hi, Great photos and instructions – I have a button press and cover buttons for Dressmakers using their fabric. Feedback that I have been getting is that the wire shank buttons don’t sit flat enough, I have done (hours of) research on the internet and found a supplier of parts to make my own canvas back buttons. I am going to send out samples to my clients and wondered if it would be okay to pass on your photos/instructions to them? Thankyou very much, Amie-Jane.
HI, do you use candlelite colored fabric? Not just a light ivory fabric. What is the cost per gross? Sue “I DO” Alterations
Hi Amie-Jane,
I read your comment and got a spark of hope that I’d actually be able to find out where I could get the hardware to make my own canvas back bridal buttons. Are there kits for these buttons? HELP
Any information you can give would be so gratefully appreciated. Thanks for your time, Jan…..
Thank you. Thank you. For this how-to. I actually had 13 buttons left to sew onto my wedding dress that the seamstress did not put on. what a Blessing. Your method was so easy.
Thank you so much for this!
I wanted to make my wedding dress into a ball gown dye it blue, so I took all of the buttons off (there were 100!!) to dye the dress, as I was worried the buttons might not dye consistently with the dress and I figured I’d rather have a buttonless dress than a blue dress spotted with a white mushroom trail of buttons.
Turns out they did dye pretty well, just took a two hours longer.
I had to cut a hefty chunk of train off of my dress in order for it not to drag the ground, but I saved some of the fabric to make into something (which I’ve since decided will be an attempt at a shoulder shawl.)
I’ve sent the dress off for professional hemming and they said they’d charge £30 for the hemming (bargain, I thought) but an extra £85(!!!!!) to sew on the buttons since there were so many.
I thankfully found your blog and just did a practice run sewing some buttons on the shoulder shawl to see if I could do it. It was so easy and they look beautiful.
I can’t wait to get my dress back from the dress shop to reinstate the buttons again.
Thank you so, so much! You’ve given my wedding dress a second life and me a marvellous ball gown!
That’s a wonderful story! I’d love to see a photo of your “new” dress, if you’d like to email it to me at thesewinggarden@gmail.com
Thank you for sharing about this transformation!
Una vez que Ya están cosidos los botones y las presilla Forma rápida para dé ponerse y nos poner nerviosa s las novia Gracias
In English: “Once the buttons and loops are already sewn Quick way to put on and make the brides nervous Thank you”
Hi Antonia, I’m not quite sure what you meant by what you wrote, but I think you mean that sewing on satin covered buttons helps the bride from becoming nervous. If you meant something else, please write back and let me know. Thank you!
Thank you! This really help me figure out a mystery.
I had a big box of random buttons, from my grandma. These satin covered ones really confused me, never saw them before. Now I even know how to sew them if I ever need to!
What a treasure to get a box of buttons from your grandma! There are so many buttons from years gone by that are just precious and beautiful. So glad I helped you figure out the mystery. Enjoy that sweet gift from your grandma!!