When your dress or top needs to be taken up at the shoulders, the process is not difficult.
Often, my customers will tell me to just stitch across the strap and cut off the excess.
Yes, you can do a version of that, but it leaves a very large lump that doesn’t always lay flat, is difficult to sew through and seldom looks professional.
In addition, often, that procedure won’t work because when you pin it up, the front strap is narrower than the back strap. (We’ll cover what to do about that problem near the end of this post.)
If you want to know how to shorten spaghetti straps, here’s a post on how to shorten spaghetti straps.
But, if you want to know how to shorten shoulder straps that are wider, stay right here because this is the place to be.
Here’s an example of a wedding dress that I got in this week where the straps are too long:

The customer tried the dress on and I just pulled up the straps and pinned them where the customer wanted.
This made the dress fit 100 times better.
You can see the closeup of where I put the pin in on one shoulder:

If you turn the strap over, you’ll see that this dress has lining and under stitching:

You could take some of the understitching out now, or you can turn the strap inside out and remove the stitches that way.
It’s up to you.
I reached up into the dress between the dress fabric and the lining and pulled the strap inside out:
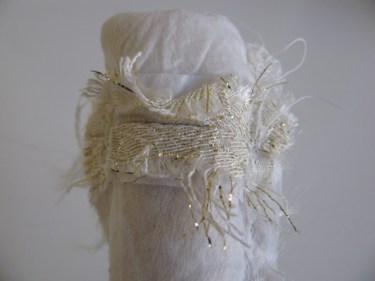
You can see the seam in the above photo.
You can also see that this brocade fabric frays easily.
You might want to stop the progression of that by using Fray Block on it.
Next, I flipped the strap over and you can see the lining seam:
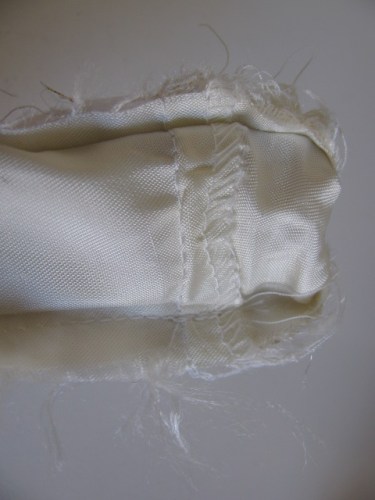
So, we have to take out a portion of the side seams here so that we can take up these two seams.
On the left strap, I needed to take up 1 1/4″.
So, I remove more stitches than I need because I want extra room to work.
I ripped out about 2 1/2″ of stitches on each side of the shoulder seam with my seam ripper:

Since I hadn’t removed the under stitching before, I will do it now.
You should see two rows of stitching (one is the seam and the other is the under stitching) and I am removing both of those rows with my seam ripper.
The under stitching is the stitching that is closest to the cut edge, so I take a little more of that out so that I don’t have puckers when I resew the seam later.
I remove the stitches on both sides of that strap.
Once that is finished, you can see inside where the rest of the strap is:
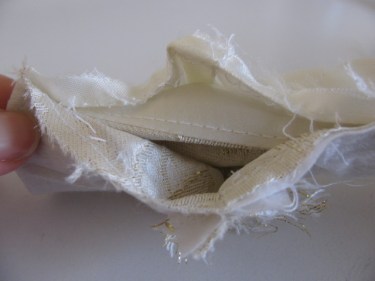
The only reason I am showing you this scene is that you won’t want to catch that inner strap when we go to sew it up later.
But right now, we are going to take up the 1 1/4″ at the shoulder seam.
To do that, get out your seam gauge if you have one.
Measure the amount you need from the shoulder seam down.
In my case, it’s the 1 1/4″:
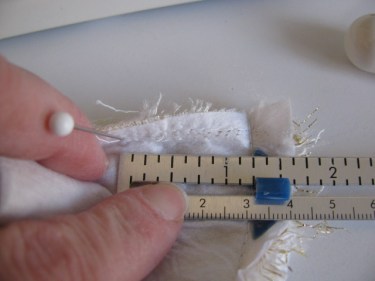
Stick a pin at that point.
Now, I want to match up the two layers. My goal here is to make sure the upper layer matches the lower layer.
On most fabrics this is easy because you can see the old pin holes:
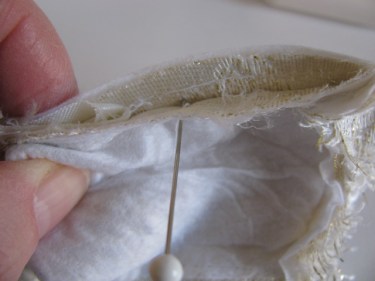
Once that pin point is in the right place, I go ahead and finish pinning:

Do that process again on the other side of the strap.
In the photo above, do you see the spot where the pin first went into the fabric?
That is where I’ll begin my stitching. Actually, I begin on the edge of the fabric, but I sew right where the pin entered the fabric.
Some people would rather draw a line from one pin to the other. That works great too.
I have been doing this so long that I can just “eyeball” the seam I need to make:

See how I am stitching from the entrance of the first pin to the entrance of the second?
Now this seam is parallel to the original seam:

Sometimes that is not the case. It would not be the case if you needed to take up more fabric on the arm side of the strap in comparison to the neck side of the strap, since many people’s shoulders are not straight across. Many people have sloped shoulders.
Once your seam is stitched, trim off the excess.
Since my fabric unravels quickly, I didn’t trim as closely as the manufacturer did when they constructed the gown.
I trimmed the seam off at about 5/8″ and put Fray Block on the new cut edge.
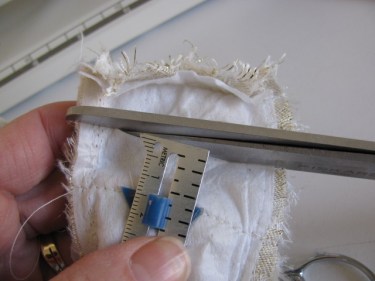
You could zig zag the edge to keep it from raveling if you like, or use the Fray Block, but since it is a wedding gown, it will probably only be worn once. It’s your call.
Now, you’re going to repeat the process with the lining seam.
Again, take your seam gauge and measure 1 1/4″ down from the lining shoulder seam and stick a pin there:

Then, be sure to match both the upper layer and the lower layer at the side seams and pin the fabric accordingly, just like you did with the main fabric.
Next, stitch across the strap being careful not to catch unwanted fabric underneath:

Trim the seam:
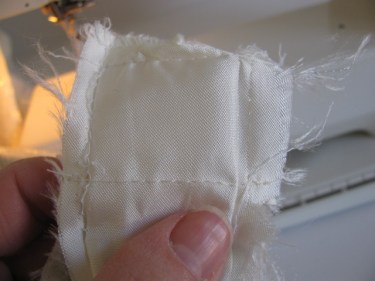
Now, you are going to stitch up the side seams following the original seamline.
It may be easier to show you what I mean with this drawing:

Make sure the shoulder seam is open flat.
Then, stitch your side seams like it is shown in red in the drawing above.
Here is what it actually looked like as I was sewing:

(Note: I find that it’s almost impossible to understitch a strap that is narrow like this one is. And really, it’s not necessary. A good pressing of the strap usually makes the strap lay down well.)
Now, turn your strap right side out:
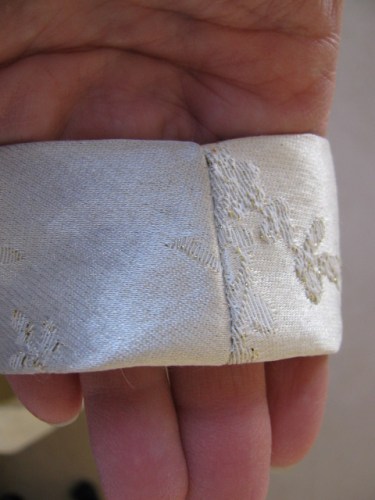
Here is what it looks when I flip it over and you see the lining:
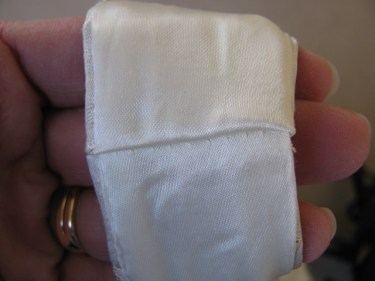
If the straps need pressing, do so from the wrong side, or else use a thin white cotton cloth and lay it over the right side of the strap. Make sure the strap doesn’t have any wrinkles in it and it sitting the way you like. Then press on top of the cloth. The reason for the cloth is so that the iron doesn’t cause a permanent “shine” on the fabric. It’s a sign of the fibers melting and it doesn’t look good when that happens.
Now, what if you pinned the strap and once you make the alteration, the front strap is narrower than the back strap as shown in the diagram below.
In that case, if the side seam edges do not line up, follow the instructions above until you get to the part where you sew up the side seams of the strap.
Your straps will probably look something like this:

You’ll stitch your new side seam along the red lines like this:
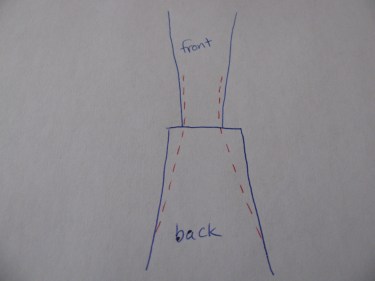
Make sure you have an adequate seam allowance. My diagram shows them a little skimpy, but you’ll need to have at least 1/4″ seam allowance on both side seams.
Once you sew the new seam, trim off any excess fabric and turn the straps right side out.
That should take care of the problem and make your straps look great!
If you’ve got very narrow straps to alter, here’s a post on how to shorten spaghetti straps.
Hi Linda,
This is really a cool alteration and you posted it just in time. I just got a request to shorten shoulder sleeves on a dress. I’ve done it before, but not like this. Your method gives the garment a more professional look, inside and out.
Thanks for the tutorial. I will be doing this one tomorrow.
Linda M
Custom Alterations
Jacksonville, FL
By the way, how long does it take you to do this alteration? It helps to know about how long it should take so that I can charge for my time appropriately.
Linda M.
Custom Alterations
I am so glad the timing is perfect for you!
It took me about 45 minutes on this, but it might not take you that long. Keep track of how long it takes you tomorrow and let me know what you come up with. I also add in the time I spend with the customer for the fitting.
Hope that helps!
Linda
It took me 40 minutes to do this alteration but this does not include fitting. I noticed you were working on a wedding dress and was altering a regular dress with a lined bodice.
When I performed this alteration previously, I would open the shoulder seam of the lining from the inside, then take up the desired amount and reclose the lining shoulder seam with a hand-sewn whip stitch. This was very time consuming and did not look very professional to me.
Thanks to your website, I get professional results, the job is done in a timely manner and I am able to get paid appropriately.
Thanks,
Linda M.
Awesome, Linda! I’m so glad this website has been helpful for you.
OH, thankyou!! An answer to my bprayers..just needed to see it to get the confidence to do it! GREAT instructions! YOU are super!
So glad this post helped you and you got the confidence to try it. That’s all it takes. Send me a photo of it when you are finished if you think of it!
I accidently made my fabric shoulder strap on a camera case too long-but it is now finished. Any ideas on how to shorten?
I asked Maxine if she’d send me a photo of the strap so I could help her figure it out. She replied back that she thought about the dilemma and a solution came to her mind and it is already fixed! I think that happens in alot of situations…we think about a problem long enough and the answer pops into our minds!
AH! I went to start this project on the dress and the lining is totally attached to the dress..I can’t turn it right side out or get good access to the shoulders! I guess that I will have to do it all my hand? or ? HELP, any ideas? What a bummer is all that I can say. I was so trhilled to find your “instructions” and that it seemed so easy..ugh..there must be a way to do this nicely?
HELP, please, anyone??
meb
If you could send me photos, that would really help. Otherwise, doing them by hand is always an option and they usually don’t take as long as you might think.
Thanks so much for this walk through! I seem to be the only one in this bridal party that can sew and I was stupid enough to agree to put a hem in a bridesmaids dress which of course turned into “can you shorten the straps a bit?” I managed to pull it off with your help and they look better than I could have hoped for!
So glad it helped! Yees, when people learn that you sew, you get all sorts of requests for help!
Thanks sfor your help with the shortening of the dress straps! What a job. Couldn’t do it byturning inside out, so it was done entirely my had, it works. I had to recut the back neck area to make the straps the same width. I was so nervous, but you pics and instruc. were GREAT !! Yeah!
cheers.
Thanks sfor your help with the shortening of the dress straps! What a job. Couldn’t do it by turning it inside out, so it was done entirely my hand, it works. I had to recut the back neck area to make the straps the same width. I was so nervous, but you pics and instruc. were GREAT !! Yeah!
cheers.
Thanks for the instructions! They were great. I waited too long to get my bridesmaid dress altered, so I couldn’t take it to an alterations shop…. so I decided to do it myself! The altered straps turned out beautiful. It took me 1 hour 20 minutes to understand the instructions and finish the straps.
That’s Awesome! I’m so glad the instructions helped. Sounds like you had great success!
Have fun at the wedding!
Linda
This is a wonderful post.
I’m looking to alter shoulder straps, but realize that my dress cannot be flipped totally inside-out all the way to the shoulder seam. There is a ‘slip’ that’s sewn completely together with the bust/shoulder strap portion where the skirt portion begins.
Is there an alternate way to sew the shoulder straps and still have it look decent? I want to avoid taking the entire dress apart at the waist since there’s also elastic there as well.
Thanks!!
I had the same problem adn just did it by hand..I carefully unpicked the stitches by the strap and attached it again at the right place. I have also picked apart the shoulder seam and then just followed Linda’s tutorial that she posted and it worked like a champ..but I did have to make the back strap a little narrower. It came out perfect and looked super!
Thanks Marie-Elena. I went to post this answer and saw yours already on here!
Whenever I have had to alter a shoulder strap that I cannot turn inside out, I do it entirely by hand. I just take apart that shoulder seam and tuck in all that I need to and restitch by hand. I don’t know any other way.
As far as the slip goes, (without a photo, I’m going from your explanation) perhaps as you take it out, just stuff it down in there (shortening it the same amount you are shortening the dress) right before you hand stitch everything shut.
Hope that helps!
Linda
Thanks for this guide. I have a dress that I did a temporary fix on, but I will use this to shorten the straps permanently.
Great! Thanks for the comment. Enjoy your project!
Linda
how much should this cost if I was getting it done at a tailors?
I would call your local tailor. It depends on if there is lining, piping or any special interior you have to get around. I always instruct to write down how long it takes you to make the alteration and then charge by your hourly rate.
Hope that helps, Linda
Do you have any suggestions for doing the opposite? My daughter’s wedding dress is too high up under the armpit and needs to be dropped.It’s sleeveless and a v-neck. We have unpicked the shoulder seams and thinking about adding something like diamante strips or some decorative chain to extend the straps.
When I see a dress like this, I usually first look to see how it is fitting in the bust area. If that fits well, you might consider making the underarm area lower by taking some of it out. Otherwise, if you like the look of extending the straps, that is certainly an option.
Linda
Thanks for your quick reply. I think taking out some of the underarm is more difficult (at least for us) as the dress is lined ,ruched and beaded on the bodice. We’ll have a good look around to find a good match for the straps. I’ve searched everywhere online for any photos of someone previously having done similar and came up empty but it did lead me here. I think that your confirmation that what we intend to do isn’t ridiculous will help. 🙂
Thanks again
No, it is not ridiculous at all and much simpler than what I suggested, as you said. I don’t know of anything online where you could see it either, but I’d love to see a picture of it after you are finished because it sounds beautiful! I hope you find just what you are looking for! Oh, and I do try to get back to people as soon as possible because most people are working to get something altered fast. Have a blessed New Year! Linda
I usually do my own alterations but I have a very special dress I need to shorten the shoulder straps on and wasn’t feeling up to it until I read your article. I love the approach and now feel I can swing this! Thanks so much for your detailed yet simplistic explanation.
So glad to hear that! I know you’ll do a great job! Linda
I recently got a very nice wedding dress that has chiffon attached to the straps and the lining is attached at the bodice so that you cannot turn the dress inside out. I found out that you can go into the side of the bodice and reach up under to the strap to do the alteration.
My question is, what do you do if there is something attached to the outside seam along of the length of the strap? Like a long piece of chiffon fabric? I know I will need to gather it up so it can fit in a small space. It is hard to describe so I hope to send you a picture.
Sorry, I can’t share a picture here. Maybe one day I will learn how to download it into a cloud so that I can share the picture that way.
Anyone has any ideas?
Fantastic clear instructions. I am an amateur and I have just finished shortening the straps of a dress for a friend’s wedding outfit. I am so pleased with the result. Thanks Linda!
Hi Linda,
Do you have any recommendations for altering straps that have rhinestones on them? The stones are all different shapes and sizes. Thanks!
If you could send me a photo, that would help immensely because I don’t know how many rhinestones are on there and what the pattern of them is. Thanks!
Hi Linda,
I am trying to follow your steps for shortening the straps on a wedding dress for a friend. I opened side lining and pulled straps through wrong side out and understand all the sewing part. What I don’t understand is how to pull in all back through right side out. It seems impossible because and isn’t working for me. Did I do something wrong?
I’m thinking something you did wasn’t quite right. Go back through one more time slowly and double check all the words to make sure you’ve got it. You shouldn’t have any trouble.
Thank you SO much! I know this is an old post, but boy oh boy did it help 🙂 I have had a dress sitting in the closet for 2 years, and now I can finally wear it!
The post might be old, but never outdated, as the alteration is a common one. Glad it helped you!
my delima is that my dress is crocheted cotton and has a spaghetti strap as well, I don’t think that i can cut the strap as U can with a regular fabric do U have a solution?
Lucy, Can you send me a photo of where the strap meets the crocheted part? That would help me alot. Thanks!
Yet again you come to my rescue. I have two dresses to alter like this for a client and needed a quick solution. Thank you so much xx
Thanks for letting me know, Jo. I’m so glad this helped you!
Would this work if there is sequins on the shoulder straps too ? Please help , it’s for my prom dress .
It should, but you probably have to take off the sequins first, do the alteration, and then sew the sequins back on.
About to do a mother of the bride dress, had same idea how to do shoulders but just needed a bit more confidence which you have certainly given me by reading your instructions, Great help, Thankyou Tina
Thank you for your tutorial! It was perfect. I altered my daughter’s wedding dress today. Before reading your post I had no idea how to begin. The dress shoulders came out great. I had to remove 2 1/2 inches.
Wow, thanks Tyra, for letting me know. So glad you found it helpful!
So, I’ve always wanted to know how professionals did this altering. I just did a bridesmaid’s dress like this. Love it!
I appreciate the time and effort you spent in detailing each step, and explaining WHY each step was necessary. This article was extremely helpful, especially with the clear close-up photographs. Thank you.
Excellent info. Well written and presented. Worked great! Not the way I used to do it, but this method came out clean.
Thank you, Darren. So glad it helped you and I’m grateful for your feedback.
Never tried turning it inside out. I usually unpick the entire strap quite a few inches and remove understitching. I do mark with s pencil where my sewing lines will be on the fashion fabric and the liner. Then I just twist the strap ends so right sides are together. I line up my pencil marks and stitch the fashion fabric and the liner. Cut off excess and then sew up the side with the understitching with my machine. Then lay fabric flat and do the understitching. I then flip strap right side out and tuck in seam allowance on opposite side and slip stitch the strap along the opened edge so it looks very professionally closed. This takes time but turns out very professional. I may have to try your method next time to see how it works out for me.
How would lyou do this on a dress with no lining and is a knit material. It is always narrower on front than back and do not know how to adjust this to look all one. Thanks.
Hi Sandra, Is the strap constructed the same way as this strap was? If not, could you email me a picture of the strap you are working on? I’d love to see the top and the underside. Thank you!
You are great! Thanks.
Thanks for leaving a comment, Tanya. I’m so glad it helped!
Doing this again, with your great explanations and photos, you are a lifesaver. Thanks so much, Tanya
You’re so welcome, Tanya! So glad it helped you!! Thanks for the feedback!
Hi Linda,
I’m in the process of following your instructions to shorten the straps on a wedding dress for a friend. I successfully opened the side lining and pulled the straps through to the wrong side, understanding the sewing steps. However, I’m facing some difficulty in pulling everything back through to the right side out. It feels quite challenging and isn’t working as expected. Did I miss a step or do something incorrectly? Your guidance would be greatly appreciated.
Thank you!
Hi Sophia, I’m sorry to hear you’re having trouble with the straps. I’ve been trying to think of how that could have happened. The strap should just slide back out the way you turned it when you first began the alteration. I think the best thing would be to send me a photo of the area or a video via my email address so I can see what you’re looking at. My email address is TheSewingGarden@gmail.com