There are many instances where you may need to sew just part of a hem. Maybe you have a skirt that is uneven, too long in the front or back, or maybe you have pants with the same problem.
Many times, when I get a bridal gown to alter, the bride likes the train length just fine, but the front of the dress is too long. If it remains long, she might trip over the front edge as she walks down the aisle. That would not be good. So, instead of taking up the entire hem, you can take up just a portion of it.
Today, I am going to use this bridal gown to illustrate how to sew a partial hem.

As I mentioned, this bride asked that the entire front edge be hemmed up, but that I should leave the train alone.
So, have the bride try the dress on with the shoes she plans to wear for the ceremony. If she plans to go barefoot, she doesn’t need to have any shoes on for the appointment.
Take your pins and pin up the portion of the dress that she wants raised.
Many times, the transition from front to back is not much.
But, sometimes, you’ll be raising four or five inches of the hem and you wonder how to make that smooth transition to the back of the skirt.
In this case, I am not raising the hem too much, but I still need to taper the fabric so that it has a smooth transition from front to back.
For most long dresses, I like the front edge of the dress to be one inch off of the floor to give the customer enough clearance to walk without feeling like she is going to trip on her hem.
At the side seams, the hem should almost touch the floor, so pin the dress so that it gradually tapers back to the train. From the underside, it will look strange compared to other hems you have sewn, but don’t worry about the underside as long as the hem looks good when you pin it.
So, to create the new hemline, I took out the stitches about two inches beyond the side seams toward the train, like this:
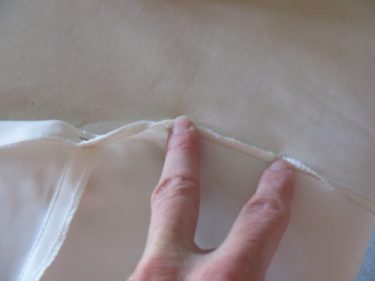
You’ll need to do the same. Take out about two inches of stitches into the hem area that you are not going to alter (You may be altering the back of the hemline and not the front, for example, so your pinning will be the opposite of what I’m pinning. Does that make sense? It just depends on what area of the hem you are going to raise.)
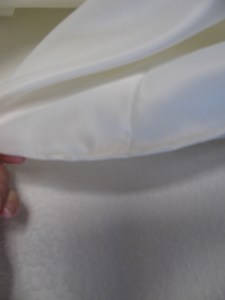
Fold the fabric back along the new foldline and press the new edge:

Next, press the rest of the hem, taking out pins before you get to them. Can you see the slight unevenness of the hem on the back? That’s correct. originally, the manufacturer put in an even hemline, but we are changing that and will eventually trim off the excess before we sew.

If you look at the photo below, you’ll notice that the original underside edge of the dress was finished with a serger or overlocker (that’s the stitching you see on the right or underneath side of the hem). The right side of the dress was top stitched (the stitching on the left).

When I go to finish the hem, I’ll do the same to it.: I will use a serger to finish the edge and I will fold the hem up and topstitch the edge with my sewing machine. Don’t stitch it yet, as I have a few more thoughts below.
Take note of how your hem is finished because you’ll want to finish your new hem area in the same way that was originally done, if possible. (Sometimes, you can’t duplicate what has been done, but you can come close enough.)
If your dress has a rolled hem (fully encased inside the seam), you may want to look at this post on Rolled Hems, or you may want to use Rolled Hems…Another Method.
Next, trim off any excess fabric and finish the raw edge.
If you don’t have a serger or overlock machine, then you can cut the edge with a scissors. Then you can zig zag the edge using a sewing machine. Chances are, no one will be looking at the underside of the dress.
But, I happen to have a serger, so I used my serger to both trim the edge and serge it all in one step. This saved me a little time:

If you serge it and you have the loose thread tails at the end of the seam, you can weave them back into the serged edge with a large eyed needle or you can tuck them into the hem when you top stitch the hem.

Now you can see that all I have to do is fold over the finished edge:

Notice that the transition isn’t really noticeable.
Now, you’ll need to topstitch the edge.
I like to topstitch from the right side of the dress (hem).
Since the original stitching is really close to the edge, I move my needle all the way to the right and then stitch:

When you get to the end of your partial hem, just meet the original stitching and back stitch to hold it tight.

This is what the new hem looks like at the side seam:
It has an even flow to it. There are no strange waves in the hemline and the hemline lays flat.
You could also use a rolled hem foot to hem the area. It depends on how much fabric you need to hem. Here’s my post on Rolled Hems if you’d like to try that method. And if that one isn’t what you’re looking for, try Rolled Hems..Another Method. This method is similar to what I just described above, but it is used on a hem that is totally encased and not just serged to finish the edge.
I hope that helps! Send me a photo of your dress if you have any questions to: TheSewingGarden@gmail.com

Hi Linda-I was looking at this post and wondered what you do if the bottom of the dress has horsehair trim sewed in and you have to shorten the dress.
Thanks-
Bev
First, you cry! Just kidding (sort of!) I am dealing with one of those right now. I pay attention to how it was put in first. For instance, is it just attached to the outer layer or is it also attached to the lining as well? Is there topstitching, understitching, etc? Take mental notes on all the construction because you want to put it back in the same way you took it out.
Go ahead and press up the new hemline. Then, on the original hemline, measure how far up the horsehair is from that and reattach it at the same distance all the way around. If you have lining as well, I take the piece of fabric that I trimmed off the hem and trim that same amount off the lining. Does that make sense? Oh, and before I do, I make sure that it will work, be sure to figure in seam allowances as well. Don’t forget those!
Then, I taper the horsehair and new hemline to meet the old.
Let me know if you need more explanation on those steps.
Great explanation, thank you. My husband and I are celebrating our 30th wedding anniversary with a beach vow renewal this August in Maui. As we had a quiet wedding with each of us wearing suits…I will be getting a wedding dress for this one! :) I ordered a dress in silky satin and as I am quite short 5’1.5″ …my hollow to floor is only 51″ and so I always have to hem. I was thinking I’d leave the back hemline as is and add embellishment applique on the lower portion of back hemline as I am also adding the same onto the plain waistband in the front. I was confused about how to hem to achieve this. So as I have now learned…I will hem the front as you would normally in hemming and then begin the taper for 2″ going back after the side seams and leave the balance as originally made. I think this will end up with about a 10″ sweep train. I will use the chiffon method for a rolled hem as that is how the dress has been originally made. Thank you for your clear explanation and photos. Fingers crossed it works! Corie 🙂
Oh wow, congratulations, Corie! What a sweet idea to wear a wedding dress for this very special occasion! Not many can say they’ve been married 30 years! It sounds like a beautiful dress and you sound like an accomplished seamstress. I have no doubt you’ll do a wonderful job. Let me know if you have any questions along the way. I’d love to see photos when you’re finished and wearing it. Best wishes to you and your husband! And thank you for the nice comment. 😊