This is a close up of a rolled hem:

You’ll find them on prom dresses, wedding dresses, casual dresses, skirts and men’s shirt tails. In fact, they are found on all sorts of garments made from all sorts of fabrics.
You can make a rolled hem “by hand”. You simply press up 1/8″ along your hemline with a mini iron (or a regular iron) and then press up another 1/8″ and stitch it all the way around.
However, I can’t seem to do this well. My pressing job doesn’t look quite professional enough and I tend to stitch a crooked line.
You may have better success than I do at it.
Since I am usually sewing these types of hems for customers, I want them to look professional, just like it looks when you buy one off the rack.
So, I prefer to use a rolled hem foot to do the work for me.
This is what my rolled hem foot looks like:

(Don’t put the rolled hem foot on your machine just yet.)
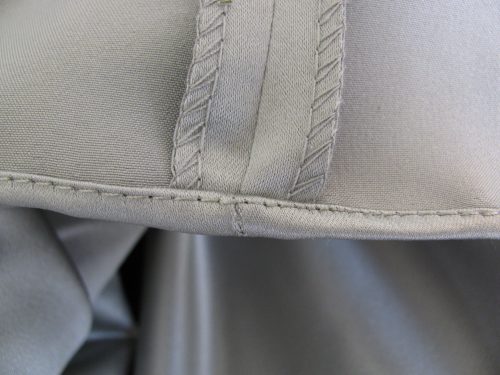
First, I have the customer try the dress on and I mark the hemline with pins.
Then, I press the dress along the fold that I just pinned up.
You can see the fold line in the photo below:

Many times, the original hem isn’t even, as shown above, so don’t let that concern you if the excess that you cut off is uneven.
Once you press the hem on the fold, cut the fabric 3/8″ beyond the fold (toward the original hemline).

The amount may vary from the 3/8″ depending on your rolled hem foot.
I have tried cutting it 1/2″ and it is too much fabric for the rolled hem foot to handle and the frayed edges stick out and the hem looks awful.
Cutting less than 3/8″ means you won’t have enough fabric to successfully roll it.
Experiment on a scrap piece of fabric until you have the amount that works best for you.
You don’t need to finish the raw edge.
Since you cut off the hem edge, you cut off seams. Go back and reinforce each seam edge using your regular all purpose foot.
Just sew a few stitches into the seam and then backstitch and trim your threads.
This locks your seam and keeps it together when you go to feed it through the rolled hem foot.

Now, put the rolled hem foot on your machine.
To sew the new hem, I start at a seam.
You’ll need to take the cut edge of the hem and turn it up to meet the fold. Then, turn it up one more time on the fold. In other words, you are going to turn up the raw edge twice and place a pin in it to hold it until you can sew it.

Put this pinned section under the presser foot, (don’t take the pin out yet) put your needle down into the fabric and then drop the presser foot.
Now, carefully, take a few stitches making sure you don’t run over the pin.
Once you have taken about 4 or 5 stitches, put the sewing machine needle down into the fabric and lift the presser foot.
Take a pair of long tweezers (short ones will do if that’s all you have) and work the raw edge carefully around the curve part of the foot like this:

Once you have it in the correct spot, make sure the pressed fold is laying flat as you see on the right side of the photo.
(I didn’t take enough photos with the green satin fabric, so here I have a cream colored crepe fabric).

As you sew around the hem, your job is to make sure the pressed fold of the fabric is laying flat. You don’t want it to get pulled down under the presser foot or the rolled hem will turn into a mess and you’ll have to rip it out and do that part again.
If you have a full skirt that is wide at the bottom, you’ll need to pull the fabric a little to the left while you sew. This helps to keep the hem from turning on you and helps you keep that original curve.

When you come up to a seam, you’ll notice that you have extra fabric in the seam allowances that you need to feed into the foot.
To aid with that problem, I cut little triangles off of the seam allowances like this:

Then, I use a glue stick to hold the diagonal edge down. Sometimes, that glue stick won’t hold it together, and in that case, you’ll just need to work slowly with the tweezers to get it onto the curve of the foot.
So, use those tweezers like you did before in getting the fabric around the curve like this:
Sometimes, the fabric is much too heavy to make it through that foot. In those rare cases, I take the fabric out of the foot and hand roll it like you did at the beginning and pin it. Then, just sew until you get past the seam.
Once you are past the seam, take the tweezers and again, pull the fabric over the curve and continue sewing until you get to the next seam.
You may think that that’s too much trouble, but I don’t mind. I like the way it turns out much better than if I were to do it “by hand” as I mentioned before.
If you do have to start and stop alot, just make sure you pull your thread ends to the wrong side of the dress and then clip them off. That way you won’t have threads showing on the right side.
If you didn’t have any trouble at the seams, then continue stitching until you get to about an inch from the end of the hem.
Backstitch a few stitches.
Take the hem off of the rolled hem foot:

Hand roll the hem at the end like you’ve done before and pin it.

Swing the pinned section under the presser foot and put the presser foot down.
Carefully, stitch without running over the pin.
Backstitch again.
There’s a rolled hem anyone would be proud of.


Thanks so much for the tips. I am going to have to practice using your methods. My past experiences doing a curved hem with this foot were not as sucessful as I would have liked, so I also did it the long way: edgestitching, cutting close to that stitch, folding up again, finally stitching once more.
Hey! Do you use Twitter? I’d like to follow you if that would be
ok. I’m absolutely enjoying your blog and look
forward to new updates.
Hi! Thanks. I do have a Twitter account, but I basically only have the posts post to it when I publish them. You can get them the same way through subscribing through your email or Reader. I know it’s lame, but I just don’t have time to post to it like the rest of the world! Most of my time is spent answering questions that people ask in emails or post to the comment section of a post.
I’m glad you are enjoying the blog. 🙂 I’m hoping to write more soon!
Linda
On Thu, Feb 28, 2013 at 6:04 PM, Sew for dough
How about chifon fabric? Using the rolled foot takes alot of practice but once you get the hang of it, it is a priceless time saver. I still have a hard time with chifon light weight fabric, it can be a nightmare! Any tips?
I also have trouble with chiffon and similar fabrics. All I can suggest is to hold your fabric in different positions until you find what works best for you or baste the hem first and use a regular foot.
Sent from my iPad
thank you so much for the tips.
Linda, I’d like to thank you for the advice you gave me on hemming wedding gowns. I did a casual wedding gown and used safety pins as my marks instead of chalk. I will share my link of the post with you here:
This hem was a rolled hem, but without the special foot. It did turn out well. Thanks and have a great day!
I’m glad this helped you. You are brave to use safety pins on a wedding gown! Mine are kinda big and I’d be afraid they’d punch large holes in the fabric.