This is a fast and easy way to make a professional looking rolled hem on your wedding gown, formal dress, blouse or on an accessory like a scarf.
In my first post on how to make a rolled hem, I used a rolled hem foot.
This method doesn’t use a rolled hem foot.
In fact, you don’t need any extra gadgets on this one.
First, fold up your hem and press it:

Stitch close to that folded edge.
I like to stitch 1/8″ away from the fold:

Then, as carefully as you can, trim close to the stitched edge, on the wrong side of the dress, taking great care not to cut the dress:

Now, turn up the edge 1/8″ more and press:
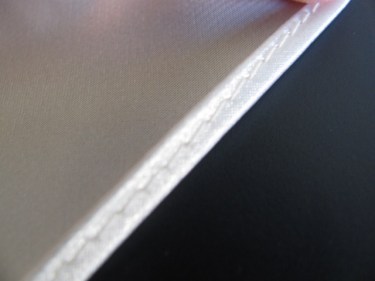
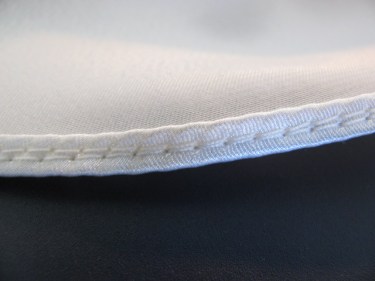
Turn to the right side and stitch close to the edge, about 1/8″ away from the edge:

Once you are finished, you can look on the back side of the hem and see that there are the two lines of stitching:
Because there are two lines of stitching, I don’t typically like to use this method on see through fabrics that are sheer.
But it works great on satins, crepes, silks, cottons, most polyesters, etc.
But on the right side of the dress, you’ll see only one row of stitching:

I like to press the dress from the wrong side to ensure that there isn’t a “shine” from the iron.
That’s all there is to it.
See, I told you it was easy!
***The reason I don’t teach you to just fold the hem up about 1/4″ twice, press it and stitch it, is because it rarely lays flat on the curved edges. Even if you pin it really well, it can twist and turn on you and the result is less than professional looking.

Hi Linda,
There you go again. I just finished marking a BM dress for hemming and thought I would use my serger but I like this method that you shared today even better. I have done it before and the person I learned it from called it a lingerie hem.
Thanks for the reminder!
Hi Linda,
I didn’t know it had a formal name. That’s good to know. Glad it was timely for you!
I came from a family of professional taylors (but way back to the depression) – but it’s skipped several generations. I sort of envy people who do this… its such a skill and an art all wrapped up into something useful…
Tracy
That’s awesome you have such a wonderful family heritage! It is a dying art, but this blog and many others are here to revive it! It’s not so difficult. You just have to know the right techniques and that’s what we’re here for. 🙂 Glad you stopped by.
Hey Linda, I need to sew a patch to a scrub top. Do you have any tips for doing this project by machine? I was thinking of using an iron on adhesive to hold it in place and then sew around the perimeter of the patch. How does that sound? Is there anything else I should do or not do? 🙂 Thanks!!
Yes, that adhesive should hold it well. If not, just pin it well. Stitch around the perimeter pivoting as you go. For a close up of that process, check out this post:
http://sewfordough.wordpress.com/2009/06/08/job-opportunity/
I love this site! I have neve rbeen able to use a hemming foot. I have tried the two stitch hem at the beginning. Works, yes, but isnt too pretty. I have pinned, pressed, and used my serger. That works. It is better if you only use one needle with thread. I remove the outter tread and use the inside needle. If you do this and roll the smaller serged edge, it WILL work. I found this easier than chasing down some of the lighter weight fabrics. Serge, roll, hem, and press. CHARGE for it.
I need to alter a hem on a wedding dress that was bought on consignment. The previous owner had apparently had the dress shortened however the front of the dress is about an inch longer than the back. Oddly enough, the length in the back is perfect so I only need to shorten the front hem. Any suggestions on the best way to do this? Thank you!
Yes, you’ll need to rip out the seam on the front of the dress and several inches into the back and then re hem the dress at the new length blending it to the back.