
One of my customers has more than 60 vintage kimonos in her closet. She loves them!
Each one is so unique.
Most of them are made from a solid colored pure silk fabric with gorgeous embroidery on them.
This one is different. It is a multi colored fabric with no embroidery. Most of the kimonos she owns are too long when she buys them and she doesn’t know how to hem a kimono.
So, she brings them to me.
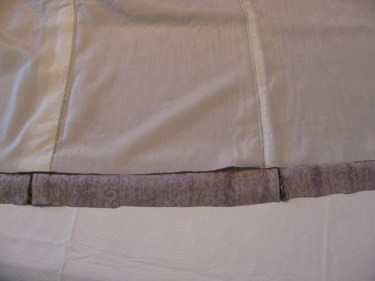
Here is one that she wanted hemmed:

As you can see, it is fully lined.
(I will talk about the lining later in this post. Pay close attention to the details on it or you might ruin the kimono, like I almost did!)
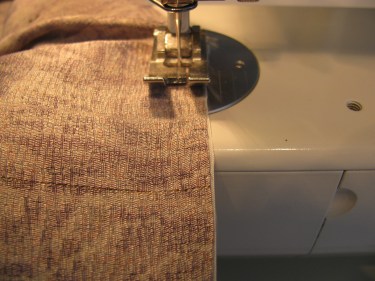
My customer wanted 5 inches taken off the length, so I put a pin in the kimono 5″ above the current hemline to begin the process.
If your customer does not know how much hem they want taken off, have them try the kimono on and pin it up to the desired length.
In the photo below, you can see that I put a pin in the kimono 5″ above the bottom edge of the hem.

On the lining, I put a pin 5 1/2″ above the bottom edge of the kimono.
That is because I want the lining to be shorter than the hem of the outer fabric.
Let’s take a time out from this tutorial for a side note…a field trip, if you will…..
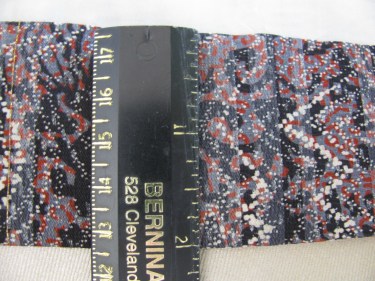
I want to show you the incredible stitching on this kimono.
The entire kimono was stitched by hand!
There is not one stitch done on a sewing machine.
That is common for many vintage kimonos.
Can you see the small white stitches down the center back seam on the lining and then some along the edge of both sides of the opening on the kimono fabric?

Look at these tiny stitches!

Here’s another view:

And now look at the knots! Aren’t they beautiful? They look like flowers.

Here is an example of some mending done at some point in the life of this kimono:

What a treasure to be able to see someone else’s hand work from decades ago.
Now, let’s get back on track and resume the tutorial here…
Let’s talk about the silk next.
Silk is a natural fiber so you don’t have to worry about the fabric having a “shine” when you press it, like you would a man made fiber like polyester or nylon.
But, it also demands a very low temperature iron, so please be careful and start with a low temp, slowly increasing the temp until you get the desired effect. That is a good rule of thumb on any garment where you don’t know for sure what the fabric content is.
Because I want a 5 inch hem on this kimono and I want the finished hem to be 2 inches total, I will cut off 3 inches from the bottom of the kimono.
Does that make sense?
In other words, because I want to have a 2 inch hem in this kimono, I will trim off 3 inches. 2 + 3 = 5″ total.
You can make your hem any length you’d like.
If I wanted to make a 3 inch hem on mine, I’d just cut off 2 inches. You can make your hem any length you like, but don’t make a hem less than 2 inches on a garment like this. It won’t hang well or look professional.
Do you see how I have trimmed off 3 inches in the photo below?

You can trim the outer fabric and the lining fabric at the same time.
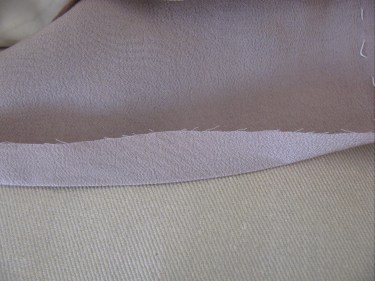
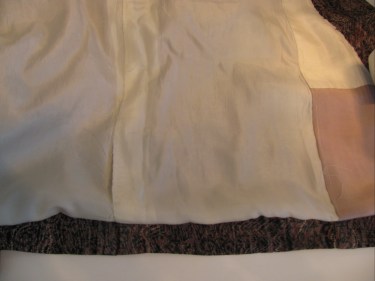
Here’s another look at it once the fabric has been trimmed off:

As you can see, the facing fabric is pink and the lining fabric is white.
One observation I have with all the “every day” kimonos I have hemmed, is that the makers of kimonos were generally frugal with their fabrics, often piecing several different fabrics together for the lining. I’m guessing they didn’t take off their kimonos much in public.
Once the bottom edge is trimmed off, take out the stitches necessary up the center front openings. You will be separating the kimono fabric from the facing fabric on this step.
Take out about 4 to 5 inches of stitches on one side of the garment. It doesn’t matter which side. You’ll be using this “hole” to turn the fabric right side out later when the hem is sewn.

Now, measure up 2 inches on the hem of the kimono being sure to keep any fabric together and press with your iron:
Next, trim off 2 inches on just the lining and facing fabrics only.
As you can see, I had trouble trimming exactly on the pressed edge of the lining fabric (in the photo below). As long as you are close to the pressed edge, it won’t matter if it is a little off.
DO NOT trim off any kimono fabric! You already did that in an earlier step.

Here is another look at the hemline at this point:
Next. press up 1/2″ of the lining fabric all around the kimono. If you have facing fabric, include that as you press as well.
After you’ve pressed it up, you can see how it will lay on the kimono once it is finished. This is just a peek at what it will look like, not the actual ending just yet:

Now, place the kimono fabric right sides together to the lining fabric matching all seams and pin it if necessary. The raw edges of the kimono fabric and the lining fabric should meet as you sew. I separated them just a bit in the photo below so you could see them:
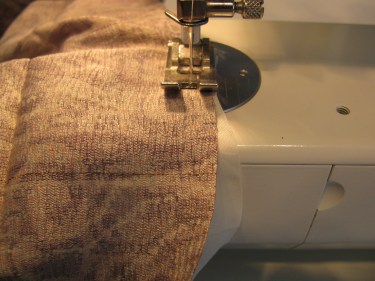
Stitch all the way around the hemline.
Once you are finished, it should look something like this from the lining side:

This is what it should look like from the kimono fabric side:

Now, pull the lining out through the “hole” in the side seam. It should now look like the photo below.
Stitch that “hole” closed.
Now let’s talk about the lining again.
BE VERY CAREFUL WHEN PRESSING VINTAGE LINING.
PUT YOUR IRON ON THE LOWEST SETTING POSSIBLE.
Ask me how I know.
I touched the iron to the lining and it melted immediately.
It happens to all of us sooner or later. And I should have known better. In fact, I told my self to remember that when I started this project. Ugh. I was able to piece in a new spot to fix the problem, thankfully.
Linings made before say 1970, were mostly acetate linings.
Acetate is very heat sensitive.
You might even choose not to press the lining and it would be a very safe choice!!
Hand stitch (with a tack stitch) the lining to the kimono fabric at the seam line on the seam allowance, so that they stay together when the garment is turned right side out. In other words, you are going to tack the lining to the kimono fabric on the inside, matching all the seams so that the lining stays put while the kimono is worn.

I can’t believe I forgot to take a photo after I finished the hem!
But, just imagine this kimono below with 5 inches taken off.
The hem lies just below the exterior looking facings in the photo below.
I hope you enjoyed this process.
It’s not difficult to do.
I’m hoping to show you soon, how to alter a kimono that has embroidery in unusual places on it.
Let me know in the comments at the bottom of the page, if you have any questions.
I’d love to know your experience in altering kimonos!

Well done tutorial. Thanks.
Thanks for your kind feedback, Sue.
Very helpful. I have a handful of vintage kimonos I am altering and the hem has been the hardest part for me especially since they are so long!
Oh Michelle, what a treat to hear that you have several vintage kimonos! I would love for you to send me a photo of them as I’d love to see them. (TheSewingGarden@gmail.com) How did you acquire them? I feel like they are not easily found in America and I’m not sure where you are writing from. Thanks so much for leaving a comment. I’m so glad it was helpful!
Hi’, being only 5’ tall, all my dresses,etc have to be hemmed!! I needed a kimono hemmed but It needed to be cut almost in half. What do I do,short of taking it to the cleaners for alterations. Thanx
The cleaners usually charge quite a bit for alterations. Ask your friends and neoghbors for a tailor shop or seamstress that they recommend.
Dear Linda, just a note: most kimonos are really long because traditionally they’re meant to be tucked at the waistline & the tuck held in place by a sash. To each their own, but it helps to know the original context of how the garment is used, especially if further down the line someone else acquires the garment & decides to wear it traditionally.
See step 5: https://voyapon.com/wear-japanese-kimono/
“All of the excess kimono material should be above the [cotton sash], which you can now fold down over the sash to give the kimono a flat and neat look. It is perfectly normal to have this excess material, which will be mostly hidden under the obi later.”
Hi Edie,
Yes, I knew this about kimonos, but thank you so much for sharing this information! I should have added a note about that in the post. My customer didn’t want to wear an obi, she just likes to wear kimonos as jackets with her outfits. The only time I’ve seen a kimono worn with an obi here in America was when my sister-in-law wore one at her own wedding reception, as she is half Japanese. It was a beautiful kimono and so special to see one worn in person!
Thank you, again, Edie for pointing that out and sharing that link with us!
Hello Linda,
I appreciate you posts and your amazing skill. I was drawn to the post about altering a kimono.
I have two Japanese Haori that I love to wear, but my regular use has started to cause both garments
to come open under the armpit. I believe that both use what the Japanese call “invisible stitching”.
Would you have any ideas either about repairing them or about anyone you might recommend that I
could send them to for repair?
I would be happy to send pictures of the garments and the problem areas if you have time to take a look.
Thank you for any assistance!
Stacey
Hi Stacey,
I’m so sorry for the delayed response. Comments that went into the comment box on my About page ended up in a category I’d not seen before until last night so I am answsering even though your project may already be finished. It may also help other readers.
Yes, please send me photos if you still need to fix your Haori’s. I would love to see them regardless! Many have an open underarm area, so I would love to see what happened and give you an answer on how best to mend them.
Hello – your instructions made this so easy – thank you for sharing….I have done 3 so far and have 30 vintage kimonos/jubans. I take the leftover fabric and make belts for them. ( I know they are supposed to be long, but my family and friends want them as robes) I would love any suggestions on how to hem the kind with the print on the bottom – I am taking one apart to shorten from the seams around the waist area, but with the long lapel panels, I’m so nervous!
Thank you for your kind comments! Making belts is such a great idea! That is a good question about the prints at the bottom. I had one with embroidery in different places all over the kimono. When I shortened it, it would have cut one of the embroidered areas right in the middle (horizontally). So, I cut out the embroidered section plus a lot of solid fabric all around it. Then I pieced in a block of solid from the bottom to fill in. Basically, it was like piecing a jigsaw puzzle together. But it looked nice because it had a few blocks on the front panel by the time I was finished. If possible, you could also take off the embroidery and then restitch it onto the section you need it to be (if it was sewn on like an applique to begin with). Hopefully, one of those suggestions will help you! I’d love to see photos of your kimonos if you get the chance. My email address is TheSewingGarden@ gmail.com