Have you ever tried to alter a blouse that was lower in the front than you were comfortable with?
It can be a little intimidating to try and figure it out.
I have a frilly blouse here that needs this alteration and I hope after reading all about how to alter this top with a low neckline, you can do the same with any blouse or top you have.
To make this alteration, we are going to do two things: take up the front shoulder seam and take in the collar.
Generally, you don’t need to take up the back of the blouse, but have the customer try it on so you can see how the back fits.
If the back fits well, don’t touch it.
If it doesn’t, you could pull up the back and front at the same time. That means, you’ll take up the same amount on the front shoulder as the back shoulder, meaning: the entire top needs to be raised up at the shoulders.
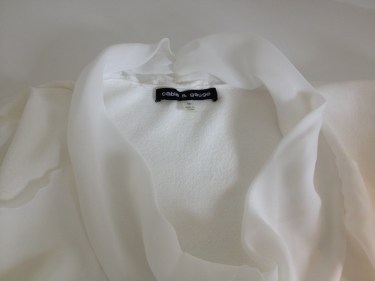
The back of this blouse fit great, so it didn’t need to be altered.
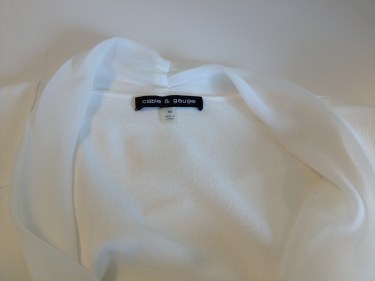
Now, let’s look at the collar. I decided to choose a more difficult collar so you can use the same technique on your collar, which most likely has a simple center back seam.
The only seam on this collar was at the center back:
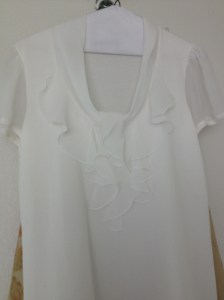
and I was glad because I didn’t want to mess with the “fluff” on the front.
The center back neck seam was stitched and then gathered to fit:

Let me explain what we’re going to do and then we’ll get after it.
We are going to decrease the circumference of the neck at the center back seam and when we do that, we’ll need to decrease the circumference of the blouse as well. Does that make sense?
If we just decreased the collar, it wouldn’t fit back onto the blouse, so we need to do both.
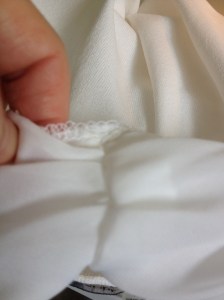
To begin, take a seam ripper and unstitch (or rip out) the stitches that hold the collar and the shoulder seam together:

Take out the stitches from just past one shoulder seam, all around the back of the neck to just past the other shoulder seam like this:

Next, you’ll want to open up the shoulder seam. This was a delicate knit and I had to be careful where I placed my seam ripper so as not to cut the knit, but just cut the stitch:

I opened up the shoulder seam halfway:

Once that was opened up, I was able to shorten the front of the blouse by pinning the front higher than the back. Can you see in the photo below that the back is in the foreground, but the front of the blouse is behind, and it’s the front of the blouse that we are taking up:

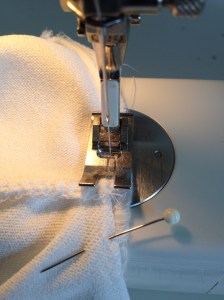
Stitch that new shoulder seam by sewing along the original back shoulder seam line and trim off the excess front fabric.
Next, you’ll need to take in the center back neck seam on the collar. Can you see the excess collar material?

Since I took one inch off of the front of the blouse on the left and the right for a total of 2″, I need to take up 2 total inches on the collar as well.
I took the seam apart and stitched up two inches of fabric and trimmed the seam. You may not need to take the seam apart. You might just fold the collar at the original seam line and stitch across at the one inch mark (you are taking one inch from the left side and one inch from the right side to equal 2″) But, since this fabric was see-through, I decided to re-stitch the seam and trim off the excess.
I apologize that the photo is not real clear, but I hope you get the idea:
Now, stitch the collar back on to the neck edge of the blouse. The collar and the blouse should fit perfectly.
You can see the newly adjusted collar:
You might want to re-serge or zigzag any uneven edges.
Taking up 2″ of collar, takes the blouse up 2″ in front. Isn’t that awesome?
That’s all there is to it!

If you have a t-shirt type top, you may need to take in the ribbing or if you have a different type top, you might need to take up the facing.
Use the same principle of taking up the shoulders and taking in the circumference of the collar to the measurements you need.
This will work for tank tops too.
Unless you have a really long top, you may not be able to adjust more than a couple of inches before it affects the length of the blouse or top.
But this should help those tops that are just a little too low for your comfort level.
You might also be interested in How To Alter a Dress or Top With Binding.

The neckline would be fixed but wouldn’t that then shorten the top itself at the center front? I would think it would no longer hang straight across the center front and need lengthening there.
You definitely need to check that on your top. This one actually hung better after the alteration.
Thank you for the directions! I’ve been sewing for years, but haven’t dabbled much in alterations, this helps!
I love getting your tips on alterations. Thanks so much for opening up new doors for me when I “bargain” shop for clothes. Now, with your help, it is much easier for me to refit items to fit me better!
I have seen some blogs where women purposely buy items that are too big and cut them down to size. What a great way to save some money and learn new sewing techniques! Thanks for sharing your reason for altering clothes.
Hi,
What would you do if you had to do this with a shirt that had decorative stitching in front which would require you to take it in all the way across so that the stitching was even? Thanks.
Send me a photo if you can.
Hi
Thank you for posting your tips on alterations. I do this for a little extra pocket money.Somethings I’m not really sure how to do it . Your site is fantastic
Thank you so much for your kind feedback!