Have you ever had a halter top or halter dress fit loosely on the side of the bust area? It’s a very common problem.
And since halters are so “in” right now, I thought I’d show you how to fix that problem.
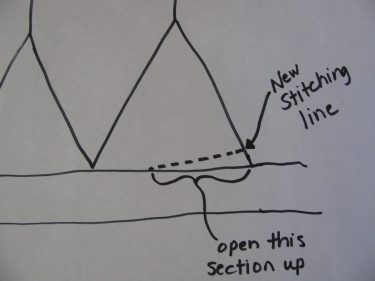
First, let’s look at the superb diagram below! Aren’t you impressed?
It illustrates the basic idea of what we are going to do.
In essence, what we are going to do is to open up the seam, as indicated on the diagram, and move the upper section down and then stitch it back up on the new stitching line as shown.
If you have a halter top or dress that doesn’t have lining, that’s literally all you do. You may have to take out some serged (over locked) stitches on the edge first, if you have them. But if not, you have a very fast alteration ahead of you.
But, most halters have some lining fabric inside.
The instructions I am about to give are for a wedding dress that has lining in it. Once you know the technique, you can use it on any halter garment you have.
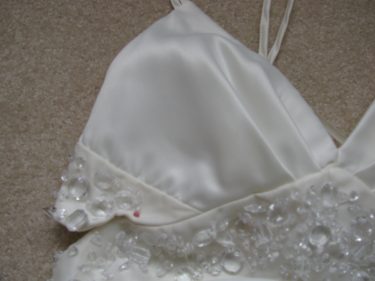
This wedding dress has lots of shiny beads and if your garment has anything like these, you might have to remove the ones that will be in the way of your stitching before you begin.
Believe it or not, I did not have to remove any of these! The beads were stitched below the bustline and I didn’t have any of them get in the way while I performed the alteration on the dress.
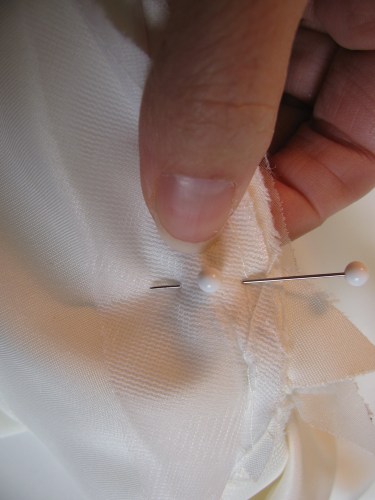
Have your customer try on the dress or top. If this is for you, you may need someone else to do the pinning for you. Pin up the excess fabric as shown by the pink pin in the photo above. I just pinched the excess fabric until it made the halter fit snug. Make sure you pin the fabric that is above the seam as shown. You don’t want any of the fabric from below the seam involved.
On this dress, it looks like there’s a hole in the outer left part of the garment, but it is not a hole. It is actually part of the bare back of the dress.
On the inside of this dress is lining. Yours may not have lining which would make the alteration alot easier because you can see the seams without having to remove lining first.
In this dress, there was some interior stitching that had to be removed so I could get inside the dress. Use a seam ripper for this if you have this scenario.
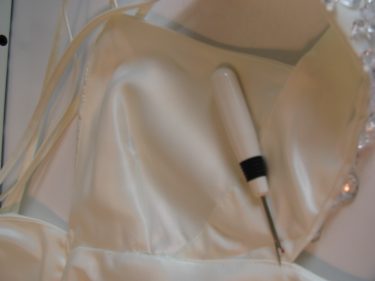
This allows you to open up the dress and work inside where the adjustment has to be made

Remember, when you pinned the excess at the bust, there was some fabric on either side of the pin you put in. It may look like you’re taking in 1/2″ (for example), but you are really taking in a whole inch if you measure the front and back of the pinch where the pin is.
Referring to the hand drawn diagram above, you might want to either hand sew a basting line with long stitches or draw a new stitching line with a washable marker. This is represented by the dotted line in the diagram. Do you see how the line gradually meets back to the original sewing line near the center front?
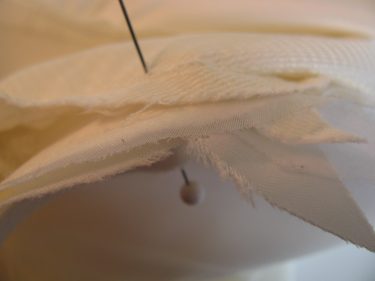
So, in this case, I’ll begin stitching my hand basted line one inch from the original one starting at the side seam and gradually tapering toward the middle.
Again, this basted line is the new line that will be machine stitched on. Do you see it on the right side of the photo below? You can see the original seamline (it is closest to the cut edge) and the new basted line to the right of that. It looks like a faint line.

Sorry, but I don’t like to use a colored thread when I’m working with a wedding dress. It would be awful if it left a mark. Not that that has ever happened to me, but I sure don’t want it to!

So, if you look at what you’re working with, you have three separate parts: the skirt fabric, the lining fabric and the bust area fabric.
If you don’t have lining, you would just have the two sections: skirt and bust.
If you have a halter top, it would be the area below the bust and the bust piece.
So, I put a pin through all three of those layers, starting with the layer closest to you. Let’s say that’s the skirt. Put a pin through the original seam allowance, then stick it through the new basted line on the bust section and then through the original seam allowance on the lining section.
Do this pinning about every inch along the seamline.
You should see that the bust area is sticking up a little bit above the others:
Once you put that pin through, keep it there (do you see the bead head in the photo below?) while you put another pin in (vertically). Once you have the vertical pin in, you can take the other one out. Keeping that first pin in, ensures that the layers won’t slip around before you put the second one in.
If you just put a vertical pin in, those layers could shift quite easily and you’d see the old seamline on the right side of the garment. Plus, this ensures that you get the rest of the dress to fit correctly like it did before you started the alteration.
Stitch, using the original seamline as a guide. Because you pinned the new seam within these layers, it will automatically get sewn at the right spot.
You can see the altered part sticking up out of the middle of the seam.

You can trim the excess fabric off if you like.
You may need to hand stitch the opening closed if that would look better.
Turn the garment right side out and you’re finished!
It wasn’t as hard as you thought, right?

This is pretty cool! You did a great job and made it look easy. 🙂
Hey, question for you… what is the best way to “repair” torn leather. My husband snagged a leather jacket on a jagged edge and it has a 3-sided-box tear in the arm. I know it will never be “exactly” perfect, but is there anything I can do to make it wearable again?
Don’t know if this question is appropriate for your blog. Just wondering if you had any advice.
Thanks for all of your wonderful posts!!
Ok, about your husband’s leather jacket. Let me just begin by saying that I’m no expert on leather. I haven’t had the opportunity to sew on it that much and my machine is so old now, that I don’t want to risk it unless I know I will have success. Sewing on thinner leather isn’t a problem, it’s the thick ones that are tough.
A few questions for you as you consider doing it yourself: Is it a nice jacket (meaning, does he wear it out in public or is it one he wears to shovel the snow in winter?) If it is a good one, is the hole in a prominent location where everyone can see it or is it hidden like under the arm? If it is right out there,you can do a couple of different things.
If you’re going to fix it yourself, I would put something behind the tear on the inside of the jacket to stabilize the back of the leather while you sew it. This could be a piece of cloth, felt square, corduroy, just something that would keep it from slipping while you sew and adds some support. It would be dificult to pin this square to the leather, so you nmight want to tape the edges down while you work with it. Here are some options:
1. You can use a leather hand sewing needle and stitch it together. With this method, you’ll see the individual stitches, so you’ll want to make sure to make them uniform in size.
2. If the leather isn’t too heavy and if the jacket fits underneath the presser foot without having to cram it in there, you can use a leather machine needle to sew it. I would use caution as you begin to sew. In fact, I would turn the fly wheel towards you several times while the needle goes in and out to make sure your machine can handle it. If it works just fine, I would probably tighten up your stitch width a bit and use the widest zig zag stitch you have. If you tighten up your zig zag all the way, you might be weakening the leather. If when you turn the fly wheel toward yourself several times and it keeps getting stuck and/or you have trouble getting the needle into and out of the fabric easily, you should stop because it will be worse when you use the foot pedal and some speed. In that case I would go back to the hand stitching method or:
3. If #1 and #2 don’t seem like good options, see if anyone you know has an industrial machine and would be willing to fix it for you.
If you don’t know anyone like that, I would go to a leather shop and talk with the seamstress there. I would ask them what they would do to fix it, what stitches they would use and how much it would cost. That way you’ve got some options. In fact, you may want to talk with the seamstress first to see if you could use their ideas to fix it yourself.
I wish you the best and hope it turns out beautifully!