Alot of what we do as seamstresses, is construct items that enhance a garment or upholstery project.
Making spaghetti straps (or straps of any width) or fabric covered tubes falls into that category.
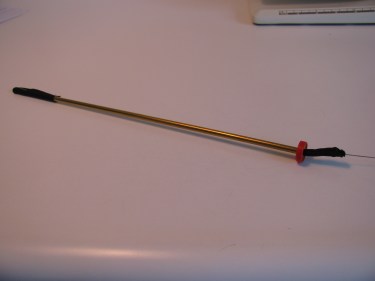
It’s an easy process how to make spaghetti straps, so let’s make some like this one in the photo below:
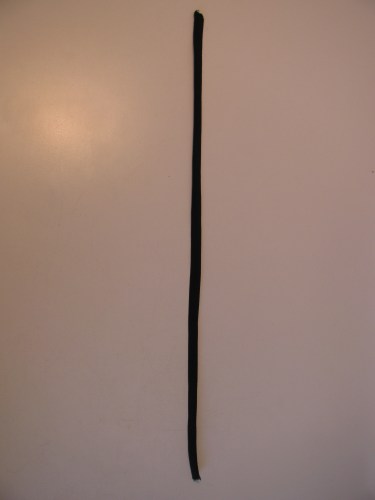
I borrowed this great tool from a friend of mine years ago. It’s called a Fast Turn.
It has that name because it helps you turn these tubes of fabric right side out in a matter of seconds.

The Fast Turn is sold here on Amazon. There are other brands that claim to do the same thing, but I haven’t tried them. I love this Fast Turn and if you do alot of sewing, it will be worth the price. Actually, turning a spaghetti strap once without this handy tool will most likely ensure that you never make another strap without one! If you use a different brand, let us know in the comments how you like it and I’ll link to their website.
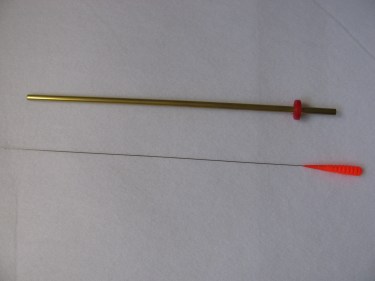
There are two main components to the Fast Turn. One is a brass tube and the other is a wire with a squiggly pig tail looking tip at one end and a plastic knob at the other.
The squiggle tip looks like this:

Each kit comes with several sizes, so that you can make many different widths of straps or tubes.
You can use the turning technique for anything you are making.
Today, we’ll be making spaghetti straps. The measurements I give you make perfect spaghetti straps.
If you need to buy fabric to make the straps, you’ll only need to buy 1/8 yard. However, they won’t take up much of that 1/8 yard. You may find that you have small narrow scraps lying around that might work perfectly.
Each strip of fabic will only be 1 1/8″ x 18″. Eighteen inches might be a little long, but you’d rather have them be too long than too short. Right?
We can trim them down later.
First, cut your strip(s) 1 1/8″ x 18″. I use a rotary cutter and mat, but you can easily do this with scissors if you don’t have the cutter and mat.
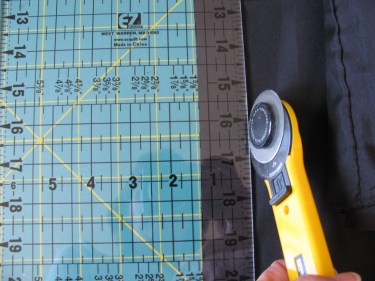
The strip looks really narrow, doesn’t it?

Good. You have it right.
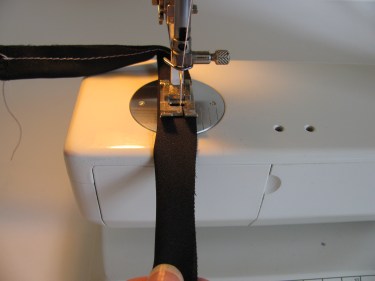
Now fold the strip lengthwise, right sides together, and sew down the long edge of it with a 1/4″ seam allowance. Back stitch at the beginning and the end of the seam.
Choose a brass tube that will fit into the hole without being too big (tight) or too small (loose).
Insert the brass tube into the hole you just made in the strip:
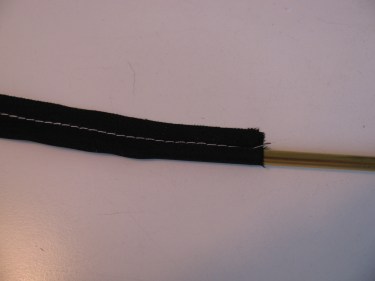
Push it all the way through the tube of fabric until it sticks out of the opposite end.
Next, slide the coordinating wire (which has the squiggly tip) into the tube.

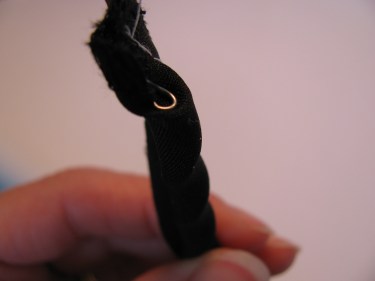
Fold over the very top edge of the black fabric so that the edge it covers the brass tube. Hold it down with your finger.

Now, slide the wire up through the brass tube and twist it so that the point of the squiggly end comes up through the fabric like this:

Now, gently pull the plastic end of the wire gizmo. As you pull the wire back through the brass tube, the wire will be bringing the fabric along with it.
Keep pulling on that wire portion and soon you’ll see the fabric come out of the end
Once you’ve pulled it all the way out, untwist the wire and gently pull it away from the strap.
Sew your straps into the dress or camisole or whatever project you’re working on.
Wasn’t that easy?
I don’t have any “ties” with Fast Turn, I just love that they make such an incredible product!

Cool tool. I also used the wire one that has a small latch on the end.
I like to make my spaghetti straps using bias strips because the seams seem to pucker less, giving the strap a smoother look. I insert 1/8″ ribbon inside the strap to stablize it and add strength.
Hello Linda:
Thank you for the email.\
After turning the strap right side out, I use a bodkin threaded with the ribbon to insert the ribbon inside the strap. The bodkin I use looks like a jumbo needle with a small ball on the end instead of a point. After the bodkin comes out on the other end, I smooth the strap along the length of the ribbon to eliminate the stretch.
I have used the wire that has the latch on the end. The only trouble is that if you accidentally go backwards, the latch unlatches and you lose the strap material. Have you ever had that trouble with them?
I haven’t had any trouble with puckering when I cut my straps on the straight of grain. Usually, I am shortening all sorts of straps on dresses for customers because they were cut on the bias and the customer hung the dress by the spaghetti straps and they stretched out. However, I have not tried reinforcing them as Mpressive Threadz states. I will have to try that. Thanks so much for the input!
How can I put cording in the tube at the same time as I turn it? I need to make straps for purses and want them to have some body.
Thanks…Jane
I think your best bet would be to sew it to the top of the tube before you turn it inside out. That may not work if your cording is thick. In that case, check out my post on how to make piping:
http://sewfordough.wordpress.com/2009/05/20/piping-lets-make-some/
nearly in a state of tears , i’ve been trying to make your spag straps but cant get a Fast Turn in UK and anything else wont turn them inside out as there two narrow at 1/8th , for my daughters wedding dress, someone over here could make a fourtune just selling very neat narrow ready made, spagettii straps.
Hello I found a similar tool in hobby craft. (I’m in the uk)
Ok, that’s great to know. We have alot of readers in the UK and I know they’ll find that info useful. Thank you!
If you can’t get a Fast Turn in UK, there are some ideas here on using a hairpin or a bodkin and sewing thread.
http://sewing.patternreview.com/cgi-bin/review/readreview.pl?ID=288
use a sailmakers needle about 2-3″ long. double thread, sew at the end of the strap, insert needle backwards, slide gently through to the end turning the strap as you go. can make the straps as thin as you want. chuck in hawaii
I have done this! It helps when you have a REALLY thin tube to turn…
Thank you, whoever wrote in with this idea. I’d love to know where you find a sailmaker’s needle!
I use a rouleux hook for this in the UK, however I was wondering how you manage to turn through the 3 yard tie for the corset..
Am I reading this correctly…you have a three yard tie? That seems very long.
I was previously reading about putting a corset in a wedding dress, this page was a hyperlink so I assume d it was the same writer, sorry, the tie is to lace up the corset..
Yes. I don’t think you’d need anywhere near 3 yards of tie. The Fast Turn should be able to turn the tie that you need for the corset. Let me know if you run into trouble with it or a similar device.
I have no idea what a fast turn is, in the UK we don’t have a fast turn only the rouleux hook, so a think maybe knitting needle or I supose sewing in some string to pull through? Again 3 yards is stated on previous page, I did check and it is the same author of this page I believe..
Yes, I have used something very similar to the Rouleux hook. That would work pretty well too, but sometimes the hook comes undone before you finish turning the tube. Have had good results sewing a ribbon to one end and pulling it through as well. I haven’t tried a knitting needle.
I am looking for someone or a company that can make large amounts of Satin Spaghetti tubes
hi your site is very helpful love it
just wondering if the tie for the corsett dress is cut on the cross
thankyou for your help
Thanks so much for your comment. So glad the site has helped you!
That is a great question! I’m guessing that you are using a satin type material, and if so, yes, using the cross grain will work well. If you’re using another material, just check to see if the cross grain stretches. If it stretches, use the lengthwise grain. Usually, it is recommended that you use the lengthwise grain, but satin fabrics don’t stretch in either direction, so it will use less fabric to make them from the cross wise grain. The only problem in using the cross grain is if you need the ties to be longer than the measurement across your fabric.
Just make sure you never use the diagonal of a fabric to cut the ties from. The diagonal will stretch out and the ties won’t look good or work well.
Hope that helps. 🙂
Thank you for your help!
I have sewed off and on for 30 years. I needed to make some 1/2″ wide straps for my daughter’s dress. Fast Turn is expensive here in Canada and I wanted to make straps right away if possible. I improvised. I had some pex tubing (?) available and a rod with a hook at the end. I worked just like a Fast Turn but it was 5/8″ wide. If that was all I could do, it would have worked. I then found some 5/16″ OD clear vinyl tubing and cut a similar length as the pex tubing. I placed the rod inside the tube and tied the fabric to the hook so it wouldn’t slip off. I started to pull the fabric into the tube but it became difficult (almost stuck) so I ended up using the tube as a bodkin and slid the fabric off the tube and over the leading part of the fabric. Then I backed out the “stuck part” and unlatched the hook. Worked. Maybe not as easy as a Fast Turn. Final strap was 1/2″.
I am a dad so it is not unusual to keep such things in the basement. The tubes are standard hardware items and not particularly expensive.
I tried to cut with the grain on the first attempt and there was a lot of fraying. Not sure if it matters. When I did the bias cut, it was so much easier to feed over the tube and no fraying.
Anthony!!! Wow, thank you so much for jumping on here and telling us how you improvised to make a tool to create those spaghetti straps! This is so inspiring and is what I love most about my readers….to come up with solutions and then share them for others to follow. I’m so glad you kept trying until you had success! There are many ways to turn fabric tubes, but this is the most creative I’ve seen.
I don’t know what type of fabric you were working with, but many dress type fabrics fray easily. You can use a product like Fray Block to keep that from happening (or zig zag or serge the edges before you stitch). I am guessing that your daughter’s dress is for a special occasion, which means she might only wear it once or twice. If it’s a dress that she will wear alot, you might consider making new straps that either go with the grain or across it. As you probably already know, but some readers may not, the problem with straps made on the bias is that they can tend to stretch too much. If she plans to wear this again, just make sure not to hang the dress by the straps as they will stretch on the hanger.
Great job, Dad! I’m sure this dress has put a huge smile on your daughter’s face. And ours too!
It is a special occasion. It is her wedding dress. I am sure she will be thrilled when she sees it. My wife and I made her high school prom dress from scratch and she was real proud wearing it. The dress we modified for her university formal never was worn because of COVID. Thanks for the advice regarding stretching. Will probably use the first set of straps that goes with the grain. Hope your readers appreciate the trials shared by others.
Oh my goodness! This brings tears to my eyes! Wow, what a blessing you and your wife are to your daughter. To have made her prom dress and university formal is pretty incredible! I’m sorry she never got to wear the latter, but maybe another occasion will come up where it will be perfect. Having you make her wedding dress will be such an incredible memory and part of her special day. And then, you will walk her down the aisle in it…my heart is bursting already! I wish you all a very special time on that day and many wonderful married years ahead. Sounds like she has an amazing start!