
Several of my customers leave their pants to be hemmed on my porch without ever coming inside.
It’s because I hem their pants using their inseam measurement.
The inseam is the seam on the inner leg that runs from the crotch area to the hem edge of the pants.
Once I know what their inseam measurement is, they never have to try pants on for me again.
I just hem each pair of pants at that same length for that same customer.
This works well for men’s pants especially.
Men’s pants fit pretty uniformally across the board.
I’ll use the inseam measurement for some women too.
Women’s pants, however, can fit differently in the crotch area depending on the style and brand.
Some hang low in the crotch area and some don’t.
That can make for a variation in the inseam measurement.
Women’s pants also are known to have the intersection of the crotch and inseam sit forward towards the front of the pants and not sit evenly between the front and back. Does that make sense? It’s especially true if your pants have a stretch in the fabric.
Today I received a few pairs of men’s slacks for hemming.
This customer wants his pants hemmed with a 27 1/2″ inseam.
(Just so you know, that is a very short inseam. Most inseams are between 28″-36″)
There are two ways to find out what your inseam measurement is.
First, you can measure a pair of pants, of which the customer loves the length.
Second, you can measure their body (or your body, if you are hemming your own), from the crotch area to the point at which they want their hem to be.
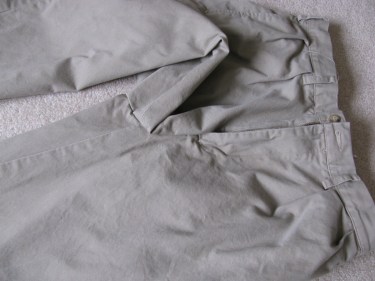
For this example, I will show you how to measure the pants.
In this photo, you can see that I have laid the pants on the floor so that the inseam is showing from the intersection of the crotch area to the bottom of the pants:

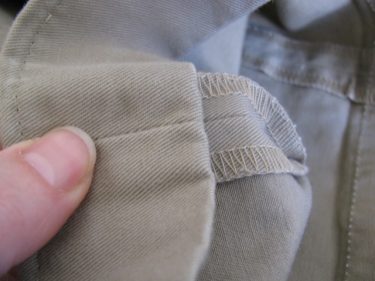
Here’s a close up view of that intersection of the two seams:
To get the inseam measurement, place a measuring tape at the point where the crotch seam and the inseams intersect:
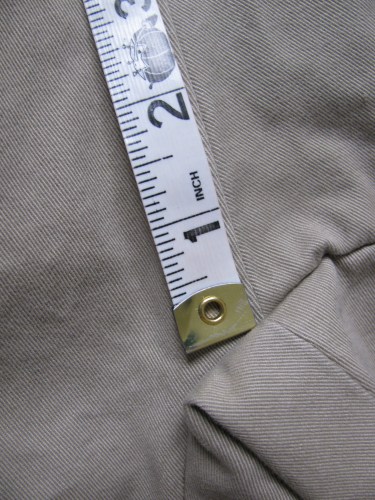
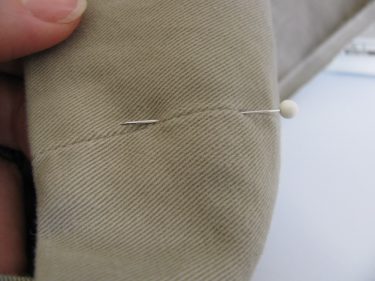
Run the tape measure down the inside leg seam to the bottom of the pants. Whatever that measurement is, that’s your inseam.
Because my customer wants his pants to be at 27 1/2″, that is where I put a pin. The pin will mark that measurement:

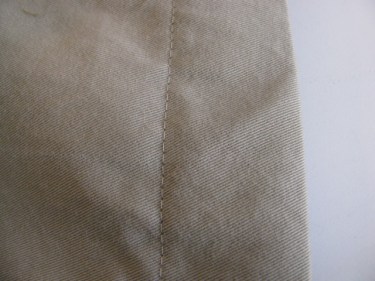
Notice the current original hem. It is stitched in with top stitching with a sewing machine. I always try to duplicate the original hem when I put the new one in. In other words, if the original hem is stitched with a sewing machine, I use a sewing machine to put the new hem in. If it is stitched by hand, I usually stitch the new one in by hand. I also try to replicate the exact stitches and stitch length whenever possible.
First, I take out the original hem with a seam ripper:

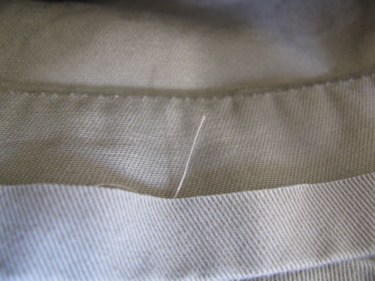
Take note that the original hem was folded up 1 1/2″:

Once you have taken out all the thread, spread out the entire hem so you can see all the way to the raw edge of the fabric.
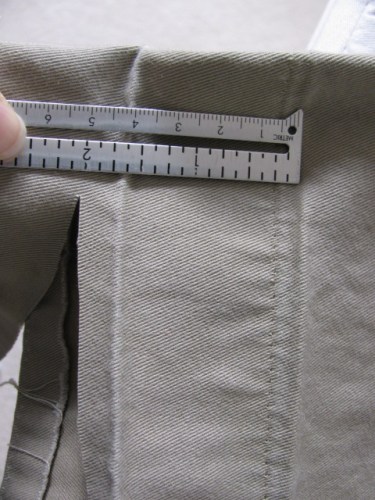
If you measure from the fold of the original hem at the bottom of the pants, you’ll see that there is, in this case, 2 inches of fabric beyond that fold.

Measure from the folded edge to the folded edge (above).
That will tell you how much fabric to press up for the new hem.
Or you can measure from the original fold to the pin (below):

Press up that amount (in this case, I will press up 1 1/2″) all the way around the pant leg. Your original folds and stitches will probably not match up since you are putting in a new hem:

Then, measure out 2 inches from the new fold. Measure again and be sure everything is exactly how you want. Once you are sure of your measurements, trim off the excess:
You’ll now fold up 1/2″. I know it is 1/2″ because I left 2 inches of extra fabric and my original hem was 1 1/2″ deep. So, 1/2″ is what’s left to turn under.
Fold under the hem twice (once at the 1/2″ mark and again at 1 1/2″) and pin in place, matching the side seam lines:
You don’t have to pin this hem in place. You can just stitch if you like and if you feel comfortable doing that.
If I do pin the slacks, I like to pin on the outside (right side) of the pants. This ensures that I can stitch a very even hem. If I stitch from the wrong side, my hem may not look as professional.
I place a pin at each side seam and one in the center front of the pant and one in the center back. Four pins is usually all I need to hold the hem in place well to stitch it.
Then, top stitch the hem in place:
This blog has all sorts of posts on different ways to hem garments on many different fabrics and for all sorts of occasions. Just click on “Alterations” above and then click on “Hemming”.

thank you! You’re instructions are excellent and you give very helpful tips! keep up the good work!
I’m so glad it helped. Thanks for the feedback and I hope you’re working on a fun project!
This is is an excellent beginning tutorial and one that should be requited before marriage! I have 5 kids, 4 aren’t married but I am still hemming everyones pants. I think I have failed.
One thing you didn’t mention is the fact that some peoples legs are not the same length and there require a measurement of each leg. These measurements I keep on a recipe card in my sewing room
Thanks again for your sewing tutorials.
Oh, Julie, that is such an awesome point! I usually write these things in a hurry and just get it published, but that is such an important point. Thanks for taking time to leave the comment. It’s great that you keep track of each person’s measurements. I keep everyone’s measurement information on an Excel spreadsheet and for some reason it took me forever to find his yesterday. Thankfully, I did, or it would have been embarrassing to call him and have him come back over to remeasure!
Five kids to hem pants for…I bet that is a full time job in itself!!!
Linda
Hi Linda,
Thanks for the timely advice. I just received 3 pair of pants to hem with an inseam of 30″. I usually like to measure the pants on the customer, but I like the idea of using an inseam and keeping the information on file. I will do the same thing in the future; sounds like good customer service. However, do you think this method works consistently? I hemmed a very expensive pair of pants last week using the inseam but it came up just a little short. Thankfully, I was able to let them out so no big deal. He liked is pants hemmed on a slant in the back so that they touched the top of the heel of the shoe. I think that is the way they do it in the military perhaps? Should I hem his pants differently?
Great job on the photos!
Happy Sewing,
Linda M.
Thanks for the information.
When do you angle a mans hem?
That’s a great question. I actually don’t do that anymore. I find with the new fabrics that I can’t get the hem to lie down flat. I used to clip the front edge to make it lie down, but I can’t do that with success anymore, so I always hem straight.
How about you?
Linda
I use the out seam so that the length of the crotch does not make a difference. I have found that some pants have a bit longer crotch than others. Top of waistband to end of pants works for me.
You’re right, the crotch can be different on pants, but so can the outseam since pants sit at different parts on the waist and hip. So there’s no easy answer like there is on men’s slacks!
I guess I have been lucky, I have not found that the waist sit differently, maybe my husband chooses the same fit for his pants.
Susie
Ok, I thought you were referring to women’s pants. Yes, men’s are pretty universal in crotch length.
i’m learning (just getting started sewing) I find your instructions and photos very helpful. better than any sewing class.
Thanks for the feedback. So happy to hear it has helped you!
How do I add a slant seam below the knee of ladies pants/jeans.
Hi Deb,
I think I know what you’re asking, but I don’t have time to write out a post on this. Perhaps this post will help answer what you’re looking for…
https://sewfordough.wordpress.com/2009/06/01/how-to-hem-without-puckers-for-flared-and-tapered-pants/
Thank you so much. This article help out a lot.