I haven’t written in almost a month. Not because I didn’t want to.
I was preoccupied with altering a bridal gown.
I should have known that taking in 8 inches at the bust was going to prove to be difficult.
Isn’t there an unwritten rule that you shouldn’t take in more than like three inches or something?
This dress was a size ten and I think the bride is a size zero.
To complicate matters, there was an extra band of fabric sewn in around the top edge of the dress.
As in many strapless dresses, the front of the dress was higher than the back, so when you take it in at the side seams, the new seams don’t match up.
Here’s a diagram of the side view of the gown. I’m drawing this out so you can see what happens with most strapless dresses when you take in the side seam:
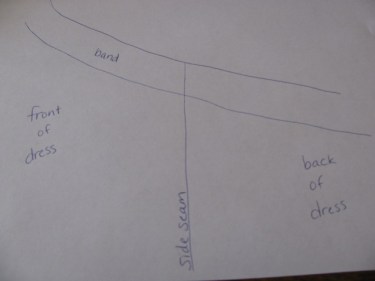
If you take in an inch from the front and back at the side seam (which makes a total of 2″), you can see how it changes the side and the top edges (as well as the band in this case) don’t line up and match each other:
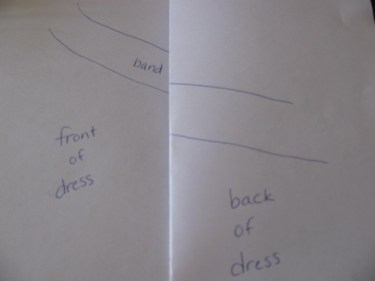
My alteration was double the amount of the one in the photo above.
I needed to take in at least 4″ total on her side seams (which equates to 8″ total in the bust area!) Now, you can see my dilemma. Hopefully, that is not what you are facing.
Plus there was beading involved.
And appliques.
But those were the least of my problems.
Here’s how it looked midway through the project:
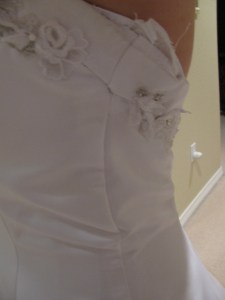
The band is lining up fairly well with the main body of the dress. I’ll need to tweak it a bit, but do you see the “sagging” at the bottom of the photo?
My next challenge was to pull the band down lower on the dress to take that excess out of the bodice of the dress and get it to lay smoothly.
This was much more difficult than I thought it would be.
The more I pulled it down, the less circumference of the band I had to work with.
Eventually, it worked.
I also added some boning to give her support on that side seam.
The manufacturer had added the original boning to the inter lining (yes, it’s a third layer…not the dress, not the lining, but an additional layer!)
The interlining was made of self destructing fabric (ha!) and there wasn’t much of it to begin with. So, I needed to use some Fray Block on it to save what I could.
I would have loved to tear it all out and get rid of it, but time was of the essence and I knew whichever way I went, it was going to take time. (Oh, maybe I should have just cut it out! Hmm. Hind sight is always 20/20, isn’t it?)
I think my mind was on getting ready for Christmas and not stressing out!
Haven’t you had alterations like this before?
The farther you dig in to the garment, the more work you find to do?
I don’t run into this very often, but this was just one of those times.
Notice in the photo above that the band seam is now not perpendicular to the floor.
That is because it wouldn’t match up if I tried that.
Thankfully, this seam was under her arm and mostly covered with the applique when finished, so no one cared. Or noticed.
I forgot to mention that I also had to take up the hem.
It had horsehair along the bottom and a huge train (which I didn’t have to alter, thankfully)!
The bride had a rough work schedule, but we got her fittings in when we could, sometimes at night.
I finished the day before Christmas Eve!
There were bridemaid alterations that had to be done the following Monday and the wedding was Tuesday!
I thanked the Lord profusely that He got me through it.
So, the bottom line is, what is the rule of thumb as to how many sizes you can take in on a garment? I learned after the fact, that a garment shouldn’t be taken in more than 2 sizes down from where it started. Now, there are exceptions to this and you’ll know when you see them. For instance, a straight line, like a hem can generally be taken up as high as you need it to go. It may mean altering the side seam or the front facings or other considerations.
But, when it comes to altering a fitted garment, the reason two sizes is the max is that it changes the whole fit of the garment. It’s difficult to change the curved areas of a garment especially. But, it’s also difficult to change pockets, linings, hips, etc.
But, if you’ve got the time and the desire to figure it out, try it. You’ve got nothing to lose. Just don’t trim off any seam allowances or clip any curves until you’re sure that your experiment is going to work well.
Sometimes, it’s worth it to buy a cheap garment at a discount store just for the purpose of practicing your alteration skills. Or, you may have found, for example, a pair of pants, very inexpensively, and it’s worth the trouble to figure out how much you can take in before they don’t hang well or before they get too tight in the crotch or side seam. Then you’ll be prepared when the customers ask you to do something that you’re not quite sure about. On this particular dress, I figured it would work. I hadn’t had anyone ask me to take in so much before, but I didn’t factor in the band at the top or that the curve of the bodice would be so complicated.
Not only was it time consuming, but it did increase the level of stress. However, you may be the type that doesn’t get rattled by stress and this may be right up your alley when it comes to trying to fix something. I don’t mind the challenge, unless I have a deadline that is looming quickly, with several other sewing items needing attention as well.
What about you, have you ever had a project that consumed you or stressed you out to the point that you didn’t think you could finish it on time?
I’d love to hear about it.
Also, are you making any New Year’s resolutions?
I think you know mine!!!!

Wow, that is quite an accomplishment! I’ve never altered any garment that much. 🙂 But, you’re the pro and I’m the novice.
I did not have any stressful projects this year (unlike past years). I managed to get gifts done early.
Main New Year’s resolution: exercise more.
Hi Michelle,
Thank you for your nice comments. Actually, I don’t consider myself pro, more like stupid in this case!!! That is my New Year’s resolution…to be more smart about what I take in to alter! I am so glad you didn’t have any stressful projects this year. And I’m so impressed you got your gifts made early. What did you make?
That’s a great resolution about excercising. I need to do that too.
Hope you have a great day!
Linda
Are you sure you weren’t working on MY project????
Wedding is next week and I have to bustle a huge train that I’m struggling with—thanks for your pointers-they are very helpful!!!
I also had to take in the bust a few sizes and the extra underneath to compensate for a short body length. Not to mention hemming it and taking out the sides a little. Oh yeah….I have to re-sew on microscopic beads on the bust yet. I’m not sure about getting done!!!!
My new year resolution is to rest when I’m done!
Oh, wow, this sounds just like it. Try not to let it stress you out. Take alot of breaks. I wish you the best!
Hi Linda, I just stumbled onto your blog ( i am just starting one, also), and read about taking in the wedding dress so much! I had to chuckle, as I had the same issue a couple years ago. I do bridal and formal wear alterations and custom dresses so I understand! I am collecting other ‘sewing’ blogs, and plan to build myself a network of them. I look forward to reading more from you!
Hi!
I’ve got to hand it to you making custom dresses. That is alot of work.
I am glad you are starting a blog. This one has been very rewarding. I never dreamed I’d have this many followers. It’s great to meet people from all over the world. I’m just so glad the information is helping so many people.
Linda
Okay, Linda…
I’m beginning to think that you’re writing just for me. I just got a bridesmaid dress that is 8-1/2 inches too big for my client. Nonetheless, I have taken on the task. It has princess seams in the bodice with boning attached to the fabric. The dress gaps a little in the front, too. At least there isn’t a band with it. Approximately, how long (excluding a learning curve) should an alterations like this one take?
Thanks,
Linda M.
Hi Linda,
Well, it looks like I’m going to take this dress apart and resew it too fit. There is just way too much gap between the front and back under the arm.
Pray for me and I will be sure to take plenty of breaks.
Sounds like a great plan. I will be praying for you!
Hi Linda,
I just got a wedding dress to take-in the sides. The dress is strapless and is covered with a netting and some beading. I have not worked on a wedding dress before so I have a little bit of apprehension. Do you take in the sides by turning the dress inside out and then take out the threads just at the armscye area?
Also, the bust area is a little big going across the front. Do you put elastic across the chest area so that it can fit closer?
Hope I am clear. Thanks, Linda M.
I love the Bridal gown adjustment 5 sizes. As a costumer I have run into the same kind of thing, but thought that I was the only one crazy enough to do this!! LOL..I needed a size 26 wedding dress for a musical, of course couldn’t find anything at Goodwill, etc..so I had to buy a size 12 and remake it to a 26!!! IT was fun and challenging and a lot of sleepless nights. I sort of remade the bodice to the measurement I needed adn ungathered the very gathered waist, and reattached it to the bodice. I used a combination of the underskirt, laces, etc. to do this. I was so proud of myself and the actress looked great, even though the director has her wear converse , high top, of course!
Isn’t sewing just grand!! I love it!!
I did one recently where the dress fit perfectly except it was 6″ too big just from the apex of the bust to the top. It was so heavily beaded that it took 3 hours just to remove the beads to get to the seams! Then I discovered that the gown was the best constructed one I had ever had to tear apart (four layers to be adjusted plus boning to be relocated). After everything was sewn back together it took five hours to rebead it.
Oh, my goodness, Adrienne. What an incredible story! That’s 8 hours worth of work. Were you able to charge for all your time? That was incredible. Thanks for sharing your experience. I know you did a wonderful job!
When you run into a situation where you have to do a lot more work than originally thought because of construction issues, how do you decide how much more than the original estimate to charge?
When a project turns out much longer than thought..I usually call the person and talk with them. I just explain
what a how it is evolving into and if they want me to proceed..I also keep tracxk of the hours so that I can show them WHAT a deal they are getting! I have nver had any problem with this and even calling while 1/2 way trhough can happen. I don’t always get what I SHOULD get, but it will be come compensation for all the extra work and time!
cheers,,
I have just found your site and think that it is wonderful. I do bridal alterations and custom (I draft patterns) and would love to have a place to chat about clients.
Thanks
Oh my heck! I thought I was the only one who, in the middle of the project, felt I had “bit off more than I could chew”!
In the middle of prom season, I altered a dress from a size 32 to an 18! The girl and her family were so happy that she found a dress that they didn’t mind the cost or the tweaking i had to do to make it right at the side seam under the arm where you are talking about. What a job!
My horror story is about the bride whose aunt offered to do do her alterations and bustle. As it had a laced up back, it only needed a hem. So far so good. The night before the rehearsal, the bride admitted to me that the aunt had said it couldn’t be bustled! It took me an hour to convince her to let me look at it. Turns out, it was identical to my daughter’s dress, although I didn’t tell her that, so I did the bustle overnight and got it to her at her rehearsal. Phew! She loved it.
Thank you for this very informative site! I have done many of the alterations you have discussed, learning as I go. It is good to see my problems are not just mine!
I will be making a 50’s short full dress for my daughter-in-law to be. Your information is very helpful.
Margaret, I’m so glad to hear that this website is accomplishing the goal that God gave me 7 years ago….to be able to help people all over the world learn to do alterations for fun or profit. Thanks for your sweet comments and I’m so happy to hear of your successes!
This dress (2014) made me cry, rethink my job, pray, pray and pray even more. The bride had purchased a size 20, then lost weight to about a size 12/14. I would like to take credit for making this fit but, after much frustration, I just reminded the Lord that it was His business and He would have to take over. I have Psalm 90:17 taped to the top of my sewing machine; I prayed that verse over this dress over and over. Praise His high and holy Name, He took over and worked through my hands to make a happy and beautiful bride.
OH MY, YESSSS! I have a real knack for under-budgeting my time and difficulty saying “no” to jobs I have no rightful business messing with. My most recent was a $1500 bridal gown that needed a lace hem shortened, bustle, sides out, modesty panel, and here’s the part that I should have said “N.O.” – the back was a beautiful sheer mesh with lace appliques in an intricate design. But, it was 4 inches too small! I had to remake the back entirely. Add in a short deadline. There were a few late nights, and one 24 hour sew-a-thon, but I got it done! I always take your advise about praying before I sew, and that’s probably the only thing that got me through that one!
Oh, wow! That was a huge job! I’m so glad you got it done and I love your comment that praying beforehand is so important to you! If we think about it, we can’t do anything on our own, not even breathe, so it’s always good to acknowledge Him and ask His help for all we do. So glad He got you through it! Thanks for sharing your story.
Sweet Lord. I have a 26 that I am taking back to a 20ish. 🙏🏻🤬. It had to be taken in 4” under each arm and I took the zipper out, about 2 inches there. Did I mention that it had sequins and a buttload of beads??? It took me almost 6 hours to tear it a part and pull ALL the beads loose. I needed wine afterwards. Had to run a gathering type stitch in the sweetheart neckline because, yes , it was too big and wide. This was a “church dress. I cussed a bit, them I prayed a bit. 🤷🏼♀️ Still haven’t figured out her charges. I’m sure at a bridal shop it would have been $500. Yep. There is a reason that I call myself the village idiot. Lol. Have fun you crazy ladies!
I hope you were able to charge what your time was worth. Yes, taking out beads and re stitching them in takes alot of time. Thankfully, not every gown has that many beads. I hope you had success and both you and the customer were happy. Thanks for sharing!
I love your blog Linda, and your thoughts about praying before you start every project.(I end up doing it backwards- Pray after working till the wee hours of the morning, and waking up thinking about them!) I wish I would have remembered to do it before THIS dress!!
Is there a trick to removing appliques/lace? After many dresses, i still have not mastered finding it!!I have a dress that is an illusion gown where the applique stitches are so tiny you can barely see them, and the bodice needs to be shortened about 2 “., I feel that I need to lift a lot of the lace, so that I can cover the seam. It has a mesh back with fine lace appliques sewn on. Or, do you have another method of working around that problem? She also needs 2 ” taken off on each side, a total of 4″.I’m going to need to find a way to add that to the mix!
If there is no other way around it. I might have to resort to shortening the bodice by tucking the top under the skirt. But, I thought maybe another opinion might be helpful! I am afraid, with that method, it will be noticeable, as, presently, the lace has no seam in it. I like things to look as authentic as possible when they leave, or I won’t be happy. (they probably won’t notice it!!)
Whoever came up with the idea of these styles of dresses?? What happened to the good old satin and tulle?
I worked for a bridal shop where the owner would try to honor her seamstress’s sanity and horror stories, and would hang specific dresses on the far side of the racks where, hopefully, they wouldn’t be the first dress her brides would lay their eyes on!
Jeannie
BTW one of my nightmares was a girl that brought 3 dresses 2 weeks before her wedding. One for the ceremony, one for the reception, and one for her going away dress. She couldn’t make up her mind which one she liked best, and they were all “such good prices!! She obviously didn’t include the price of the alterations in those prices, though. I got them finished, but I dropped the going away dress off at her house for her the day before the wedding.
Thank you for your sweet words. As you know, it’s never too late to start praying over a dress and the bride who will wear it, even if it’s 2 a.m.!
Thank you, also, for sending me a picture of the bodice you are working on. That helps so much.
I don’t have a good trick for removing appliques of lace from tulle or netting, because, as you know, each manufacturer, attaches them differently, and yes, you are correct, many times they use tiny stitches, or the stitches end up being tiny because the background tulle is so fine. So, yes, it is a tedius process.
However, one technique I do, especially on trains where I need to take them in or up, I cut around the lace appliques right next to the edges of them (your cuts will be curvy), do the alteration and then stitch them back on, overlapping pieces of the applique to match as best I can and hide the cutting I’ve done, but I don’t know if that’s an option for you on this dress. I wold do the same thing for the side seams as you’re taking them in. You are hte best judge as to whether this will work on your dress or not. I cannot see the dress in person, but I can tell you that has worked for me. If it is an option for you, don’t worry about hand stitching the applique back on, just use your machine for all the stitching, you won’t be able to see the stitches and they will stay better.
If it’s not possible to cut the appliques, I agree with what you’re talking about…detach the appliques stich by stitch and lift the lace as best you can, make the alteration and then stitch it back down. If that’s not possible, you’ll have to make the alteration using the best technique you can with the least amount of bulk.
I’ve always wanted to write a post on this technique and this may spur me on next time I have a dress I can do this on!
I wish you the best on this. Write back and leave a comment here so we can all hear what you ended up doing. I’ll be praying you have an amazing experience and love the results! Let me know if I can help in the meantime.