
Today, I am going to show you how to cover a foam pad to make a bench seat cover. This process can be applied to covering any sized foam pad (cushions for a couch, chair, boat seat, outdoor furniture, indoor furniture, etc.) All you need to know is how to sew a straight line and even if it isn’t perfectly straight, it’s a very forgiving process.
Be sure to read through the instructions completely before beginning your project!
Again, this post is Part 1.
Part 2: How To Make Piping
Part 3: How To Finish Covering Your Pad
First, you need to buy a piece of foam the length, width and thickness you want. Chances are, you won’t find foam in the perfect size, so, of course, you’ll need to get it larger than what your measurements are for the length and width (but always try to buy the thickness you need. The thickness of the foam is quite difficult to cut down, but it is possible if you don’t have an alternative.) You can buy foam at a Joann Fabric store, Hancock’s, upholstery store, etc. Perhaps you can find it on the internet as well. Use an electric knife to cut it if you have one. It makes the job like slicing through butter!
My customer asked me to make her a pad this week (above photo) and she had already bought the foam and cut it to size for me. If you are sewing for a customer, it is advisable that you have them do that step for you. That way, if there are any mistakes, you haven’t made them, which would cost you more.
Have the customer buy enough fabric for the project. To figure out how much fabric is needed, I like to draw the dimensions of each piece on a diagram that I have made.
If you don’t have time to figure the yardage, the clerks at the fabric store are usually very helpful. Keep in mind the width of the fabric in measuring. Upholstery fabric is usually 54″ wide. Don’t forget that you’ll need a thin strip of fabric to go all around the middle of the cushion as well. If you or your customer want piping, add about 1 yard of fabric to the total. If you need 2 cushions, add about another 1/2 yard of fabric to the total for the piping. Here is a post on How To Make Piping, if you’d like to know how.
Just for clarification, cording is the name of the cord inside of the piping. It is usually made of cotton, but can be made of other materials as well. It is sold by the yard at most fabrics stores, and you can almost always find it in the upholstery section of the store. Once you cover that cording with your choice of outer fabric, then it is called piping. If you want to put piping in, measure around the entire rectangle on top and multiply that by two because you’ll want to put piping around the bottom edge as well. Putting cording in is not difficult, but it does add a few steps, which we will go over in the How To Make Piping post.
Once you have the foam cut to the desired measurements, set it aside.
Now prepare the fabric to be cut. If you are using a washable fabric, and it is made of cotton, you may want to prewash your fabric before cutting it out, in case it shrinks next time you wash it. You are now going to cut the top of the cushion and the bottom of the cushion out of fabric. Note what the foam measurements were and add one inch to each of those measurements. This will give you 1/2″ seam allowances all the way around.
For instance, the foam for the pad I made measured 87 1/2″ long by 14 1/2″ wide. The foam was 2″ thick.

So, I needed two pieces of fabric….(one for the top of the cushion and one for the bottom) that each measure 88 1/2″ by 15 1/2″ wide. Do you see that I added the one inch of fabric all the way around giving me a 1/2″ seam allowance?
***Before you cut the fabric, notice if there are any patterns on the fabric that you don’t want cut off and you want to follow. In the photo above, notice that I tried to “center” the pattern so that I didn’t cut off the important parts of the design. It actually looks like I had 2 main designs running down the middle of the cushion. Another way I could have cut it was to put one main pattern down the center of the pad. To do this, trace the pad shape out of something clear like one or two sheets of waxed paper taped together, so you can see through it. Lay that over the top perfectly positioning the fabric underneath it. Double check your measurements before you cut.
Once you have the two main pieces cut out, you’ll want to cut the long narrow strip that goes around the cushion and covers the thickness of the foam and separates the 2 pieces you just cut, when the pad is sewn together. To get that measurement, add the 2 side measurements to the 2 end measurements. In this case add: 87 1/2 + 87 1/2 +14 1/2 + 14 1/2 = 204″. Most likely, you don’t have a length of fabric that is 204″, so you’ll need to cut however many pieces you’ll need so that when the segments are sewn together, they’ll make a piece long enough to fit around the middle of the pad.
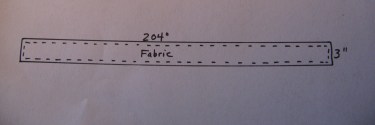
I had a piece of fabric 3 yards long (108″). I figured I needed to piece together 2 strips of fabric to equal 204″. (204 divided by 2 = 102″) So, the length of those strips when they were sewn together was 204″ But, I needed to add seam allowances, to both the length and the height of these strips before I cut the fabric. Because the foam is 2″ high, add an inch (total) to it (3″) and cut each strip of fabric to be 3″ x 103″. For my particular cushion, I cut the following pieces from my fabric:
2 strips that are 3″ x 103″ and 2 rectangles that are 88 1/2″x 15 1/2″.
Now you are ready for Part 2: How To Make Piping.
If you do not want piping, skip ahead to Part 3: How To Finish Covering Your Foam Pad.
There will be many more photos in the posts ahead.

Thank you for these instructions. I’m trying to cover a foam pad for a cedar chest my brother built for me and I had no idea where to begin. When will you be publishing Part II? I would really like to get that done as well. Mainly how to make the corners, which I assume are in part II??
Yes, Patti, I do have Part 2, but it was about how to make the piping. So, I am sorry that was confusing. Thank you for letting me know because now I will go back and fix that. I also wrote Part 3. I’ll give you the link to both of those posts below. For any readers who may not know: Whenever you need an article, just type in the words in my search box located on each page of my blog, or you can look at the left column of my blog where it says “More articles” and search by category. There are usually mmany pages of articles for each category.
Here is a link to Part 2 and Part 3 of How to Cover a Foam Pad Bench Seat Cover:
http://sewfordough.wordpress.com/2009/05/20/piping-lets-make-some/
http://sewfordough.wordpress.com/2009/05/21/cover-a-foam-pad-bench-seat-part-3/