Want your jeans to look good after you hem them? It’s easy. You just need a few pointers, the right needle and thread and a special inexpensive gadget.
This method on this post is for straight leg jeans only. (To hem tapered or bell-bottomed pants, there’s a few extra steps involved, and you’ll want to look at this post on How To Hem Your Pants or Jeans Without Puckers.)
If you’d like to hem your jeans using the original hem and all it’s character, read and follow this post on How To Hem Your Jeans Using the Original Hem.
But, this technique is the easiest and most of my customers choose this method because it looks good and is the least expensive hem…
First, I have my customer try on the pants and put on the shoes they will most likely wear with them. Then, I tuck the excess material up and underneath until I reach the length the customer wants them to be in the back of the pants. I put a pin in to hold it there. Then, I measure the amount I folded up. I measure this same amount in the front and on the 2 side seams and put pins in those areas as I go around the pant leg putting a pin in each spot. There should be a total of four pins on each leg. Once the customer approves, I get to work on them.

Double check the measurement at each of the 4 spots. You can use a seam gauge for this.
The measurement should be the same at each pin. If not, make the adjustment.

Now press the folded edge so there is a crease.

I press on the inside of the leg so there is no chance of “shine”. That shouldn’t happen on cotton, but if there is any man-made fibers in there such as polyester, nylon, etc. the man-made fibers can produce a shine.

Now, look at the jeans hem. How wide is the folded edge right now before you do anything to it? Most jeans hems are 5/8″ wide. Since it is folded over twice, double the measurement. In this case. 5/8 + 5/8 = 1 1/4 inches.

So, as you can see in the photo above, I will cut the jeans one and one fourth inches longer than the new fold line (or one and one fourth inches towards the original seam edge.)

Now fold the cut edge to meet the fold and press a second fold into the jeans. Get your sewing machine ready to stitch on denim. You’ll need a Schmetz “jean” needle and thread to match the color of the original hem.
I like Gutermann’s heavy duty thread. It is much thicker than regular thread but works great in most machines. They have an amazing copper color that matches most hems. (I buy Gutermann color #887 for most topstitching).
Don’t go for the bright gold thread…ever! It doesn’t match well. I know they market it as the gold used on jeans, but you’ll never use it for that. I use a regular thread in the bobbin that matches the denim (blue of some shade). For some reason, the thick thread doesn’t work well if you use it in both places. It gets caught up in the bobbin.
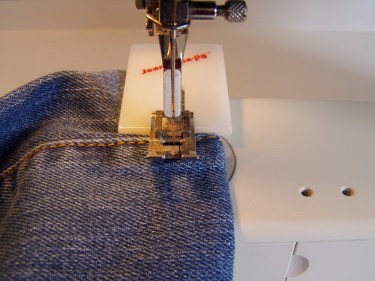
Now, fold the new hem up twice at the fold lines . You’ll stitch from the right side of the jeans. Start stitching at one of the side seams and stitch all around the hem using your 1/2″ mark on your machine.
(If you don’t have the seam allowances marked on your machine, measure from the tip of the needle out to the right 1/2″ and place a piece of masking tape parallel to the presser foot edge.) Stitching 1/2″ away will insure that you don’t go off the folded edge and miss some stitches (Remember, we folded it at 5/8″, so you shouldn’t have any trouble if you stay on the 1/2″ mark!).
Be sure and use a “Jean-a-ma-jig” when going over the bumps at the side seams. Also, use it when you return at the end of the seam because that’s where I start.

Here’s the finished product. Now go hem those jeans! It’s easier than you think with the right tools and gadgets.
Update: If you don’t have a “Jean-a-ma-jig”, just roll up some fabric and use it in place of the gadget!

Thank you! This is just the information I have been looking for. I am turning my kids’ (who grow much to fast) jeans into long shorts. I just didn’t want it to look like a ‘home job’ and I think that your tips are the key.
I have been dying to know how to do this. My sons both have short legs and I “try” to hem every single one of their pants. Thank goodness for summer. It’ll give me a chance to practice my hemming.
Years ago when working at a tailor shop I learned to flatten the bulky seams with a hammer. The presser foot will go over them easily after a few whacks.
I did it! I did it! It took me forever to get set up and do it but I did it and it looks great. Thanks so much.
Nice. But what about the bleaching at the new bottom of the jeans? It is not professional unless you have the bleach marks
Very good question. Some people say that you can cut off the original hem with an inch of extra fabric attached to it and then reattach it to the jeans where you need it to be, but it leaves that area of the jeans looking strange because you can’t hide that new seamline. Sometimes, the jeans even curl up exposing that seam. Also, it can be bulky there. Another problem is that most customers don’t have that much fabric to spare at the bottom, so there isn’t a good answer for that that I know of.
I have never tried bleaching a scrap of denim to see how that works in my washing machine. I think if that worked, though, everyone would know about it. So, this is the best solution I’ve seen. I hope that helps.
You can fold up the extra fabric on the inside and stitch just above the original hem, with thread to match the jeans. The seam blends into the dimple above the hem, and you preserve the original hem! If you’re removing more length you can cut off the extra. I’ve used this technique several times and it’s wonderful.
Mix some bleach with a little bit of water and brush edge only with toothbrush and this mixture and as soon as amount of bleaching you want is completed rinse out denium and let dry. Practice on old jeans first!
I am also wondering about the bleached look at the bottom. My hem job looks great but you can tell it’s a home job because the bottoms don’t have that “distressed” look. Any suggestions?
Alot of people have this question. I don’t know of a good way to bleach the end of the jeans except what I wrote in the comment above your comment. I think if there were a good way to do it, the information would be out there, but I haven’t heard of anything. Let us know if you do. Thanks.
If you’re not in a hurry, a VERY dilute application of ordinary bleach to the area south of the stiching soaked for an hour will whiten them up. Rinse well. Repeat as needed. Be careful with bleach.
To go over the bumps of the side seam, I take a small strip of the jean fabric remnant, fold it a couple of times, and place it behind the presser foot. Then I can continue to sew smoothly over the bump. I learned this trick from my sewing machine dealer.
Its also called a jean-a-ma-jig, you put it behind the presser foot when you have a high seam, it is plastic and works best i found. You can buy them for about three dollars. Also sewing machines with metal gears work better for heavy duty thread and fabrics, high seams and more. I have a singer machine dating back from the forties and it has metal gears and has only been in once for repair. The older machines are much longer lasting and simpler with less break down and easier fixes, since parts rarely need to be replaced. Unfortunately they don’t come with fancy functions like the new machines.
Thanks, Jamie. I wrote a post on the jean-a-ma-jig in May, 2009. You can read about it here: http://sewfordough.wordpress.com/2009/05/07/jean-a-ma-jigwhat-is-that/ I also like the older machines with the metal parts. Whenever I take my machine to get it fixed, they beg me to buy it from me. That’s another reason I know it’s a good one!
On Fri, Apr 19, 2013 at 3:41 PM, Sew for dough
Sorry didn’t see that post, but thank you. (: Yes couldn’t agree more, love my old faithful machine. Glad to hear other people have them still. Thanks for replying about my teddy bear, i’d like to get it done before his first birthday, and have begun to wonder if it is a little ambitious. I have found this site useful since my first hem looked pretty rough, it has since evolved and i was even able to make my own prom dress! Loved the step by step instructions for the corset backing!
Thanks again.
Sincerely, Jamie
Oh, hey, why didn’t I think of that? That’s totally a great tip and free!
A reader e-mailed me this morning with this question:
Hi there,
I’m planning on taking a pair of flared jeans I have and turning them into cuffed capris and decided it would be wise to hem them first. In your “Hem without Puckers” article, you briefly mentioned how to deal with the flare and I’m wondering if I’m supposed to do steps 3 and 4 (respective to the order of the pictures) before I delve into stitching straight from the fold line to the cut edge. I’m also wondering if after that I continue with steps 9 and on (also respective to pictures) on the “Hem Pants and Skirts” article.
Both, by the way, are extremely helpful!
To answer her, I wrote:
As you probably noticed, the first 6 photos on the “Hem Without Puckers” article refer to tapered pants. My guess is, that after you cut off the jeans to make them a capri length, that you will have cut off all of the flare. Is that correct? If so, what you may have left is basically a tapered pant leg. If that is the case, only do the directions for the tapered leg (not the flared.)
However, the tricky part comes in that you want a cuff, so I wouldn’t use the “Hem Pants and Skirts” article unless you want a wide hem. My guess is that you’d want a regular jeans hem in which case you might want to refer to this post:
http://sewfordough.wordpress.com/2009/05/06/hem-your-jeans-the-professional-way/
Let me know if your situation is different than what I described or if you want to do soemthing other than I suggested.
Thanks,
Linda
Another trick for making the new bottom edge look not-so-new — use sandpaper to scuff up the new hem.
For those that have a less powerful machine, be prepared to hand-crank the machine a bit over the tough spots, and be sure to use the proper needle.
Those are great ideas! Although I haven’t tried the sandpaper trick, it sounds like it would work great. You made a good point about walking (hand crank) over the tough spots.
Thanks,
Linda
Can you please tell me the actual color of Gutermann thread? I’ve looked through the Gutermann threads at http://store.quilting-warehouse.com/thread-gutermann-top-stitch-heavy-duty-thread.html but didn’t find a bronze. However, there is a ‘bittersweet’ that looks right.
I usually buy mine at the local fabric store, because i can’t tell what a color is online, but once I know the color, I should buy it online!
I don’t see a name of a color on the spool, but the color number is 887.
I hope you can find it or something close to it.
Linda
Thank you so much for posting this tutorial!! I just hemmed 7 pairs of Carhart work pants!!! I have had the gizmo for a long time and never knew how to use it.
Hi Loretta,
I bet your hands are cramped after hemming those thick pants! Yours is a definite success story. So glad the tutorial helped you learn how to use the jean-a-ma-jig! Thanks for leaving a comment.
Awesome! The jean-a-ma-jig was great and saved me a lot of broken thread, time and frustration. I’m a complete novice and easily will put the project away when it becomes too frustrating. Also the tip on hemming flared jeans, magnificent. Thanks so much!!!
It’s so fun to hear how these posts have helped you! Thanks so much for commenting here.
The jean-a-ma-jig was a life saver. My only problem is I am using the Gutermann Heavy Duty thread in a bronz color for the top stitch and a navy blue thread in the bobbin. Cannot get the tensions correct. I have read that the same thread needs to be used in the bobbin. Is this true or what am I doing wrong?
Hi Sandy, Glad you liked the jean a ma jig. I usually do what you did with the thread: Gutterman gold in the spool pin and dark blue in the bobbin and I haven’t had any trouble. But some people say that it’s best to use the same thread in both spots. It might depend on your machine. Have you tried using the same threads yet? If so, what were your results?
Hope you can help me. I am trying to find someone who knows what I’m talking about. In the 80s I had pants that looked like there was a cuff on the bottm but it wasn’t. If you know what I mean, please explain how to do it.
Was there topstitching at the top to make it look like a cuff? If not, please explain in a little more detail. Anyone out there have an answer?
Yes, it was topstiched about 1/4 to1/2 inch from the top. Yhere was atrick to folding it so it looked like a cuff
I am not familiar with the folding aspect, maybe another reader can jump in here and answer that.
I remember the technique was used in a stretch and sew pants pattern I was using. That was in the 70’s not 80s. I want to use the technique on a blouse sleeve.
What do you do when you don’t have enough fabric beyond the original hem to get 1 1/4 inches? So often my own jeans are just a hem length or so away from the desired length. If I cut the hem off and turn up what fabric i have left the hem is too thin. Thanks for this information!