Updated: October 19, 2020
I just got an email from a reader whose husband’s pants are hanging too low in the crotch area and she wanted to know how to take in the crotch seam on pants.
It’s a very common problem.
I thought about how to show you with an actual pair of slacks, but I think you’ll catch the idea much better and faster with a diagram.
It’s a very easy alteration.
(By the way, if you need more room in the crotch area, be sure to read this post on How To Put in Gussets in Pants or Shirts.)
But back to this alteration…
Please read the entire post before you begin because it will be easier for you to visualize the alteration and because there are some details you need to know ahead of time.
First, figure out how much material needs to be taken in in the crotch area.
If you are making this alteration on your own pants, it’s easy to pinch up the fabric, pin it and measure that.
But, if you are working on pants for a customer, it would be awkward for you to pin up that area on your customer while they are wearing the pants, so have them do it before they get to your establishment.
Or, if they aren’t confident in doing that, you can do it for them by first having them try on the pants and you making a good estimate on how much needs to be taken up.
To do that, I pin up an amount and then have the customer try them on again and make adjustments from there if needed.
Once that amount is known, measure that amount and write it down. Remember that you are measuring on both sides of the pin. In other words, if you pin it at 1/2″, then the entire amount you are taking in is 1″.
Next, you are going to open up the crotch seam (this entire seam is called the crotch length and is also called the rise. It is the seam that runs from the waist in the front down the center front and up the backside to the back waist seam.) See diagram below.
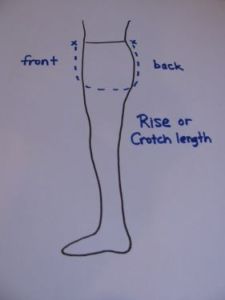
Think of it as the vertical seam where the crotch seam and the inseams intersect. The inseam is the seam that runs from the crotch, along the inner leg to the ankle area.
Open up the crotch seam (rise) at least twice the amount you’ll need to take in.
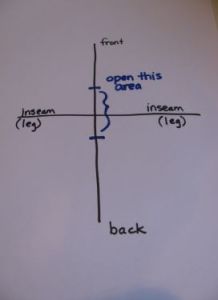
In other words, if you are taking in 2 inches total, then open up about 4 inches of the crotch seam.
Don’t open up the inseam though!
Keep that inseam intact. You might find that some inseam stitches become loose. Just stitch those loose stitches back up and backstitch over them to keep them intact.
The alteration will be done on the inseam. (See diagram below)
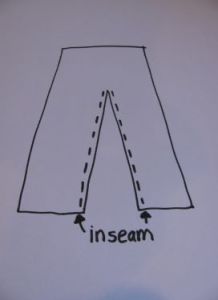
Let’s say that you need to take up a total of two inches in the crotch. That means you’ll need to take in one half inch on each inner leg seam as illustrated in the diagram below. You have 2 backs (a right back to the pants and a left back (1/2″ + 1/2″ = 1″ total) and 2 fronts (1/2″ + 1/2″ = 1″ total). If you add the two fronts and the two backs you get a total of 2″ altogether.
You can see what the new seam will look like based on the dotted line in the diagram below:
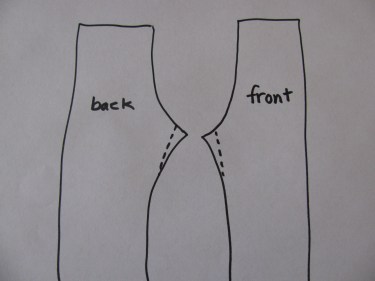
(The diagram is only to show you what the pattern pieces would look like if they were sitting on the table). I want to show you the areas where you’ll sew on the front of your pants and the back of your pants. To review and clarify, you’ll only be opening the crotch seam (or rise) and only sewing the inseam on this alteration. If you think about it as you look at the diagram above, when you take off that excess on the inseam it will automatically shorten the crotch seam (rise) in the pant. It is also important to note that doing this alteration will not affect the length of the pants, as you might wonder about that.)
Now, once that crotch seam is open, put the front left leg and the back left leg together and stitch along your own dotted lines (based on the measurements you figured out for your own pants) being careful to taper the seam back to the original seam line down the leg, just like the dotted line represents.
Do the same with the right front leg and the right back leg.
Once you do that, the crotch seam is the exact measurement it needs to be.
(This may seem like a strange way to alter the crotch seam, but trust me, this works!)
Once you have stitched the new seams, along your own dotted lines, you can pin or baste the crotch seam closed and have the customer try on the pants if you (or they) are not sure of the fit. If this is your first time at this alteration, I would suggest you do this. After you’ve done it several times, you will gain alot of confidence in the process and being able to know how much fabric to take up.
That’s what alterations and sewing are all about. Once you learn the concept, practice, practice, practice! Many people are excellent sewists, but they just lack experience. If you want to, take two pieces of fabric and try this first. Once you’ve mastered the technique, you’ll be able to quickly do this alteration!
Once the fit is just right, you can be confident that you are ready to stitch the pants back up.
Now, stitch up the original crotch seam along the original seam line. You should be able to see the stitching marks from where the pants were originally sewn. Follow those stitching lines and stitch the pants back up.
You can trim the seam allowances if you need to, if there is too much bulk. I like to trim the excess, because it makes the seams lie flatter and it makes the pants more comfortable to wear.
That’s all there is to it!
As I’ve stated in other posts, if you have to alter those pants more than two or three sizes, you may not be able to take in all the fabric you need to, but this is going to help immensely!
Leave me a comment or a question at the bottom of this page if you need more clarification. Or send me an email with a photo of what you’re looking at so I can better answer your question! My email address is: TheSewingGarden@gmail.com

That’s great. What about if the crotch is too short? Any solutions ?
An anonymous reader wrote in to say that you should put a gusset in there. I agree. Are you familiar with what a gusset is and how to put one in?
Sorry that was suppose to read sounds like a logical solution. Thank you
Good afternoon, I do these types of fixes seems like lately alot, my son is on a softball team, and they recently received their uniform pants. He said they were too long, and also to baggy. So I went over and measured and marked for hemming, and the inseam area, because when you think about it, if the crotch is hanging too low, and you know how softball pants look on these professional players, well that means that you have to actually take in some inches as well on the inseam. The end product turned out great, he was so happy, and now he told me one of his other team mates needs the same thing done as well. I only charged for my services one time, that was when I was asked to make a dress for a wedding. I also have a whole lot of experience in “period” or historical garments specifically for ladies, and all the way back to the Civil War era, is my favorite.
Thank you for this great information, I think it is very informative.
Jennah
Thanks for the gusset tip. Sounds ligi all solution. Thank you.
Put in a gusset to elongate the space.
Your timing is excellent. I have a request to do this alteration today and I wasn’t sure how to go about it. Thank you so much!
Great! Glad it helped and was timely.
What if crotch for front of pants shorter than the back crotch measure?
If I’m reading your questoin correctly, you’ve got two choices. You can take in equal amounts front and back or you can take more out of the back, as long as the total equals what you’re trying to take in, you should be just fine.
I do alterations and just recently found your site and love it.
So glad to hear that. There are over a hundred posts now, so hopefully, you’ll always find what you’re looking for!
Sounds interesting I will try this next time I have that alteration. Thanks for all the great tips. I used the gusset tips last week and it worked great!
Hi Lynn, thank you so much. I am glad that helped. My daughter is in Zambia now and the mamas LOVED the supplies you sent. Thank you and all your friends! They will get the sewing machines soon, maybe even this week!
Sheets from thrift stores are great for fabric, less expensive. I also make rag rugs from sheets. How do I contribute to the sewing group?
That’s great that you’d like to help! I don’t know their current sewing needs, but visit the website called http://www.Everyorphan.org and email them. They will be happy to let you know their needs. I am sure you’d send the items to their office in Texas and then someone would transport them on their next visit to Zambia. 🙂
Thank you so much for this information! I would have thought this was an impossible task but your diagram makes it very clear!
I do have one question though. You said if the total amount you need to shorten is 2 inches then you would take one inch off of each inseam. Would this not be a total of 4 inches? I am used to thinking you would take 1/2 inch of each seam front and back to equal 2 inches. Perhaps that calculation does not apply to this case?
If you think of it in terms of front and back (whether it’s inseam or crotch seam) then you’ll be taking one inch from the front and one inch from the back and then the crotch seams will match up. Try it on a sample and see if it makes sense.
Thanks,
Linda
HI Linda,
Your method is great on dress pants. What I have encountered on jeans,is that they are constructed with the inner leg seam last and you have to take the all apart to get to the crotch seam.It is a common problem and it is so great to see you teach these things. Hope the Mammas loved what we all sent to them.
thank you
Judy H sewing in NH
Thanks Judy, for the comment and for all the things you sent for the mamas. Michelle is still in Zambia and said she took video of the mamas reaction to receiving the items. When she gets back and sends it to me, I will post it for all to see. Thanks again for your part in making the mamas dream come true!
Sorry for the dumb question; I’m still new at this. What is the difference between a crotch seam and an inseam? in other words, where those four seams intersect at the apex, which two do I undo? and, for bonus points, how do I do that *easily*? The way these things are double-stitched, over-stitched, top-stitched and/or serged, it takes me 3 hours to accomplish anything; the first two spent undoing factory stitching. Thanks for any help.
Your question is not dumb. The inseam is the inner leg seam that runs from the crotch area to the hem. The crotch seam runs from the back at the waist, down through the crotch area and up to the waist in the front. Does that make sense? You should only have to rip out the crotch seam. Just leave the inseam alone. You still have to make the alterations on the inseam, but you don’t have to take any stitches out.
Are you taking stitches out on jeans? Those tend to be the most difficult, but sometimes they have a chain stitch. A chain stitch can be pulled out quickly by pulling on one of the threads. Otherwise, it just takes practice to get those stitches out quickly. However, I’m surprised it is taking two hours. That is a long time. Are you using a seam ripper? I do have a post on using seam rippers. Have you read it? If not, read that and then let me know how your ripping out differs.
Thanks, Linda
A suture kit has “scissors” with a hook, perfect for taking out thread seams. Fastest way I know. A Pharmacy & Amazon has one for sale & will last a long time; tweezers might come in handy too.
Thank you for your recommendation. I have sutures, but rarely use them. I do use tweezers on occasion. I like having more than one option for taking out stitches, so thank you so much for your comment!
The alteration you are speaking of is called the “Rise” and the best way to measure your clients for this altertion is to go to the back of the pants about 2″ down from the Center Back Belt Loop and pinch out horizontally across the back seam the amount your pants need to be altered. Then ask your client is the crotch feels better or if you need to pinch out more or less. ( if you pinch out 2″ , then this is the amount to take out as per you diagram!) I have had my alteration store for 18 years and I am still learning new things from you! Have you found a source for the heavy white thread for all the new jean hems?
I have just recently started my alteration business, and I love your Site. It so helpful.
I’m so happy to hear that. Thank you!
Can you tell me the basic difference between adjusting the crotch seam versus the inseam. If I need more space in the crotch area – and the seams are constructed simply, in the old fashioned way with no topstitching – I just sew a lower sweep on the crotch seam which immediately gives more area here. If the trousers are constructed with the leg inseam the last one to be done, as many modern trousers are (and not just jeans) then its simpler to sew this inseam a bit shallower into the seam allowance thus gaining a bit of space this way. However, I suspect each method has a slightly different effect on the look of the trousers after the adjustment. Could you explain this difference in result please for my future reference? Many thanks. Mary
Hi Mary. When you take a “lower sweep” on the crotch seam (or rise) and it is th last seam to be sewn, you lose some inseam by doing that.
If the inseam is the last seam to be sewn and you let out the inseam, you’ll need to do the same with the rise. The rule is…if you take up one seam, you have to take in the other or they won’t fit back together again. Conversely, if you let out a seam, you have to let out the neighbor seam so that they can meet together as well. If you don’t do that, you have to sew in puckers or gathers to make the one seam fit the other. Does that make sense?
Hope that helps!
Linda
Hi Linda, thanks for your speedy reply, but I think perhaps I didn’t explain myself well. I didn’t mean alterations made whilst making up a pattern or undoing already sewn seams, where there would be an issue of matching seams back together again. What I meant was when I simply alter existing trousers by sewing a lower sweep of the crotch or alternatively sewing into the inseam that runs the other direction if the last one to be sewn, without actuslly undoing anything I wondered if the outcome in trouser shape is actually the same whichever direction you alter. I always feel that doing a lower sweep of the crotch seam achieves the object of getting more depth in the crotch better, but sometimes getting to that seam would involve unpicking and then sewing up both the in seam and crotch seams in the opposite order. I wondered if it would be worth the extra effort to achieve a better outcome and are the changes in shape of garment slightly different depending on which way you do it? Thanks again!
I see what you are saying. I haven’t done that before. Perhaps you could try an experiment. I don’t think that the slacks where the inseam is sewn last and are stitched with a lower sweep would be as comfortable as the slacks where the rise or crotch seam is sewn last. I am wondering….if you sweep lower on the crotch seam, taking up the inseam at the same time, would the inseam rise up too much and make the hem crooked (leaving the outseam noticeably longer)? If you do the experiment, let me know. I’d love to hear how it turns out.
Thanks Mary!
how can you shorten the rise and still keep the inseam on the inside pant leg? every way i tried to shorten it the seam bunches up anyone done this successfully?
If you think about it, when you make an adjustment on one seam (the rise, for example), you have to make an adjustment on the other seam(inseam) too. If you don’t, you’ve got bunching like you’re experiencing. It’s just a rule of thumb.
Ok I get that, but from everything online it doesn’t even touch on that, like in the only one that has ever had that problem, so how could you fix that ?
Ok, let me see if we can look at this from another angle to help you understand it better. How much rise do you need to shorten? Pin that much. You already know that the inseam won’t match up and that’s because you’ve taken some fabric out of the rise seam at the intersection of those seams (the rise and the inseam), right? So, the only way to make that intersection fit, is to take up the exact amount on the inseam. Now the measurement of the inseam is too short, right? The only other option is to let out that same amount at the hem to increase your inseam, but the amount you take up for the hem will not be even all the way around the hem. It will be shorter at the inseam area. Does this make sense? IT requires extra work and I’m not sure how it will look on those particular slacks. Let me know if I am making this more confusing. Thanks, Linda
I have a pair of slacks I am reluctant to get rid of because I just love the colour and the material – the problem is too long from the waist to the crotch area. They have an elasticised waist so I have opted to cut the waistband off just underneath the elastic and then cut a couple of centimetres off the top of the pants and the re- attach the waistband – do you think this will work???
Yes, that’s what I’d do too!
I’m so confused, I’ve been sewing for years, but always have a problem with the crotch length. My son is short waisted and I need to shorten his work pants in the crotch and also the seat. what is the best and quick way to do this. Thanks
Deb
Yes, by following this post, it should take care of the problem. Once in a great while, you can lower the waistband on pants, but most of the time it’s not possible because there are so many obstacles to it. Try doing this alteration and see if it helps.
Thanks so much for all your advice. I am learning so much about altering pants. After following your post, I am ready to give altering a try. Lucy
Great! That’s what I like to hear!
Hi, Thanks for all your advice, it is making alterations much clearer! Would you have a description of steps needed to correctly take in the crotch more than two sizes? I realise there will be more work involved, but as the trousers are for a wedding: I’d like to do this properly. Thanks in anticipation…!! Lydie
Two sizes is a general rule of thumb. But if you can take in more, the technique is the same no matter how much you take in. Since I can’t see your pants, I don’t know how much you can take in on them. You’ll have to use your best judgement on that. Hope that helps.
Hi and thanks for your prompt reply! Here is a link to a photo of the jumpsuit I need to alter: http://www.phase-eight.co.uk/fcp/product/phase-eight//Saskia-Lace-Jumpsuit/202631351
It is a size 8 (smallest available) but the crotch, and leg length need adjusted to a petite size. Do you think the technique you explained will work well on this? Thanks again for your opinion and advice.
There looks to be a lot of excess fabric there, but I can’t see the rise or the crotch seam intersection, but in general, it’s safe to take an item down two sizes. So it’s hard to say on this item.
Sewfordough,
I need to shorten the rise on a pair of my pants.Would that be the same as your diagram for “How to take in the crotch seam on pants”? I’m short waisted. Could you show this with a real pair of pants. I’m not sure I follow the diagram. I always end up taking off the whole waist band and moving it down, but it takes so long and does not always give me the fit results I wanted.
Thanks ,
Debbie
Hi Debbie,
Yes, follow the instructions for your alteration. I find that a diagram is much easier to understand and follow because the actual pants don’t lie flat so it’s very difficult to see the actual alteration. Take it slowly and I think you’ll have success.
I need to take up the hem on a pair of hunting pants but the problem is they have a zipper down the outside of each leg. The zipper is about 12 inches long. Can they be taken up? Thanks..
Yes! The zipper can be shortened. You’ll just need to secure the end of the zipper so the zipper tab doesn’t fall off. To do that, make sure the zipper tab is above the area you are hemming. Then, just stitch over one of the last zipper teeth over and over in the same spot. Do that on both sides of the zipper. You can do that stitch by hand or machine. If you do it by machine, use a zero stitch length and hand walk the wheel over the spot so you don’t break a needle. Let me know if that doesn’t make sense.
I was a little confused by your instructions…I’m not sure what you’re calling the “inseam” and “crotch” seam. Do you have a video posted online that I could look at? Oh could you give further explanation to what you meant by: “…then open up about 4 inches of the crotch seam. Don’t open up the inseam though. Keep that intact.The only sewing done will be on the inseam.”
Thanks!!!
The crotch seam is the seam that runs from the front of the waist under your trunk and back up to the center back. The inseam is te seam that runs along the inner part of your leg. So, you’re going to open up about 4 inches of the crotch seam (2 inches on either side of the inseam). You’re going to sew your alterations on the inseams and then stitch up the crotch seam when you’re finished. I don’t have video capability, but perhaps you can have another seamstress look at the instructions and help walk you through them.
Hi! I am considering buying some vintage Culottes but the crotch is too low. I was looking for a solution to rise the crotch up and found your post. My question is: if you cut/stitch a new seam following your diagram along the dotted line, won’t the pants legs become uneven and rise up in the center? In another way: the bottom of your pants will no longer be horizontal but rise inwards?
It has always worked for me, but if you’re not sure, just pinch up the desired amount and see what effect it has on the hem. The other remedy is to take off the waistband, if there is one, trim the waist down and out the waistband back on. If there are any pockets, that would make them smaller, but it is an option. Hope that helps.
Helping a friend out who seems to be plagued by buying pants that have baggy crotch. Short waisted people like me have that problem a lot. Your diagram will save me having to take the waist band off and let me tell you(as if you didnt already know) that is no walk in the park. I was mostly a Costume designer and seamstress in my younger years, so alterations have never been something I did a lot of. Your wonderful advice has just saved me hours of tedious tearing apart. Thank you so much and I will be sure to check you out when I need more alteration advice!
I want to try this method. I am short waisted and pants hang in the crotch. But won’t taking
in the inseams make the pants fit too tightly in the thighs?
It shouldn’t. If you are really concerned, buy pants with a fuller thigh, like a relaxed fitting pant. Hope that helps!
You can try on the pants. In the back, pinch up the amount until it looks right and pin. Remove pants. mark where the pin is with soap. Measure this. This is the amount you need to alter. Now remove seam and proceed as explained above.
Hi Thanks for advice , I will try this and hope I don’t make a flop of it .
Your sketch shows front and back,but your instructions give you right and left sides if you remove crotch seam. I am confused.. can you please explain?
Hi Debra,
I just reread this post and I don’t see any reference to right or left sides. Was there a different post you are referring to?
I believe she is saying that if you remove the crotch seam, then stitch up the inseam, you would be working with the left & right inseams, but the diagram you have drawn shows a front & back. This has confused me as well & sent me searching the comments to see if anyone had already asked the question.
When I see front & back referenced in your diagram, my brain is telling me that I need to be stitching along the front & back of the pants, which would mean stitching the crotch seams. But your instructions say I should only be stitching the inseams. Could you please clear this up for me? It probably shouldn’t be throwing me off this badly, but it is. 😦
Hi Lori, Thanks for your question. Yes, I’m just trying to show the front and the back of the pants so you can see what area needs to be sewn when you make the alteration. It’s what a pattern piece would look like if you had it lying on the table. So, in summary, you should be only opening up the crotch seam (or rise) and only be sewing the inseam. I’ll go back and make that more clear.
Also, I rewrote this paragraph. See if it helps you understand the process better:
Once that amount is known, then you are going to open up the crotch seam (this seam is often also called the rise. It is the seam that runs from the waist in the front down the front and up the backside to the back waist seam. Think of it as the vertical seam) where the crotch seam and the inseams, intersect.
Let me know if that helps. Thanks!
Great it worked for me. And simple as well.
Great to hear! Thanks for letting me know, Anette!
Wonderful blog post! I can’t wait to fix a pair of velvet pajamas!
Thanks, Dana, I hope it woks wonderfully for you!
Can you please help me with my readymade pants? The inner legs pull up at a horizontal angles forming almost pleat-like folds when I walk. Can I fix this problem?
Can you send me a photo of the slacks and the fabric content of them? Thanks
I sent a picture… Not sure how to do it…. Usually there are multiple folds on inner legs on all my pants, except leggings. Fabrics….. Cotton, jeans, gaberdine, polyester,cotton, etc. if I pinch up fabric horizontally where the bottom of my panty leg, it seems to help get rid of the angular folds. Help!!!
I didn’t receive the photo. Did you send it to my email? Also, I’m not quite sure what you’re asking and describing here. Perhaps you could spell it all out in more detail. Thanks!
Bought a few clearance jumpsuits online. 2 fit well, two are too big, thru chest and bottom. I was thinking of using the ‘good fit’ as a guide, as they are similar fabrics. The major difference being the tops. The jumpsuits that fit well have sleeves. The loose suits have halter tops. One is surplice cut and it seems very crooked/ Asymmetrical. Any suggestions would be greatly appreciated. Thanks.
i.e. If I line up the waistline, can I follow the rise of the well fitting jumpsuit? Then adjust top accordingly?? I feel like the top will be better proportioned after the seat is adjusted. Am I wrong??? Is it smarter to ptoprtion the top and then adjust the seat???? ♥
I’m not exactly sure what you are asking in your first question. Also, what alterations need to be made on this jumpsuit? Is there a way you can email me some photos?
I am wondering if I can use a jumpsuit that fits well as a template, follow the seaming as a guide to take in the crotch of the bigger ones. They are droopy in the seat and loose on top, maybe a size big? Since it is one piece, with a halter top, I am wondering if I should do “breast darts or adjust the side/back seaming, as opposed to just shortening the straps.
Greta and I communicated by email on this question, but basically my answer was that doing the needed alterations on the lower half would definitely help. Always wait to trim seams until after you’ve tried the item on to make sure you like the fit. Here jumpsuits have elastic waists, so it’s hard to predict what will happen with the fit on top, but my guess is she’ll have to make adjustments on the top as well. I do like to use current garments as patterns, but those may only work so far as a completed garment is different than making one from scratch.
Hi there, I have made up a pair of pants with front pockets and tucks.. but they are a little too big. So I plan to use your method to shorten crotch/rise but I also need to take them in all the way down the out leg and I want to reduce the inner seam as well so that they are not baggie legs. Question, would I raise the crotch and then run the inner seam in starting narrow and working wider towards leg end ? would it work ?
thanks
Yes, I think I understand your question. Continue taking in that inseam all the way down the pant leg. If you don’t want to change the hem area, then taper your new inseam back to meet the original inseam several inches above the hem area. If you want the pants to be skinnier all the way down, then stitch parallel to the original inseam all the way through the hem. That means you need to take apart the hem to do it. To put it back together after your alteration, you might need this post:
https://sewfordough.wordpress.com/2009/06/01/how-to-hem-without-puckers-for-flared-and-tapered-pants/
There are other posts on hemming as well and you just need to type “hem” in the search box and you’ll find a few pages worth of different posts on the subject. Hope that helps!
What a great posts on pinterest. Please explain how to add a gusset to lengthen crotch/rise on pants. Thank you. Also I don’t know how to make a gusset. Hèlp.
Hi Jo,
Thank you for your nice comment. Someone must have linked one of my posts on to their Pinterest board and you found it. If you go to my blog, you’ll find many posts there on over 100 different alteration and sewing techniques. To find a particular subject, just type it into the search box and you’ll find your answers. To find how to make gussets, just click on this link:
https://sewfordough.wordpress.com/2010/10/07/how-to-put-in-gussets/
Hope that helps!
Linda
Thank you from the bottom of my wickedly short waist. This one has eluded me for years!
Kind regards
Megan
I worship at the foot pedal of your sewing machine!
Hi Megan,
I’m sorry it’s taken me a few days to reply. I’m so glad this post helped you. It’s one of the most read posts on the blog, so I know alot of people struggle with this alteration. I love your fun comments. You made my day!!
I love your post! Made me giggle.
Oh good! 😊
Hi. Really Love this post, I am newbie, and trying to fix a jean high waisted but the crotch is too long. I found this post too late, I think. I sewed directly over the crotch and Extended through the inseam, but now I have awful creases on the crotch that extends down, and they are in front and behind… I dont know what to do. I wish I found this post before.
Hi Dayna,
If you’d like to, take out the stitches you put in and then follow the steps on the post. It’s not too late to fix the problem!
Hi, Linda, thank you for providing such clear instructions! Just fixed 4 pairs of pants I had bought for my son!
Thanks for letting me know, Gina. That’s awesome!
Hi!
I just made a jumpsuit out of interlock knit. My first time using a commercial pattern, and of course, I am regretting not using size 10 instead of 14 for the crotch area. I love my creation, but the crotch is a few inches too low, I keep wanting to pull the pants up. I wouldn’t mind except that it is rubbing against my legs and is getting on my nerves LOL.
The thought of having to take it apart and start over makes me want to cry.
I can’t wait to get home and try this tutorial. This is the only one i found that makes any kind of sense. I will gladly report back!
Thanks!
Hi Ali, thanks so much for leaving this comment. First of all, I’m so proud of you trying a commercial pattern on something as difficult as a jumpsuit! I’m glad to hear that the only problem you e encountered has been the crotch area. Sometimes, you can alter up to 3 sizes and then that may be the limit, but that should be a huge encouragement to you! Don’t be discouraged if it’s not perfect, because it should help so much.
One of my favorite sites for pattern alteration is Sewing With Nancy archives. The company is called Nancy’s Notions and their phone number is. tel:18002455116. When you call, just describe what you’re looking for and I’m sure they can tell you if it’s available by book or CD or download. The instructions are extremely helpful in teaching you how to alter a pattern before you cut out the fabric. I’m sure there are other great sites as well. Hopefully, another reader will jump on here and let us know.
I Can’t wait to hear how your alteration turns out. Send me a photo by email when you get it done. I’d love to see it!
The limit for altering clothes is 2 sizes. Otherwise, the design is changed with the appearance affected.
Hi. I just did this on a pair of pants. I might be crazy but if I’m taking one half inch from either side of the inseam and then matching the seams up. Isn’t that only taking one inch out of the rise? Please help!
That is a great question!! I can see why this is confusing! So, if you think of it, you have a front and back right leg and a front and back left leg. So, in my example, you would be taking 1/2″ from the front and back of the right leg (which equals 1″) and 1/2″ from the front and back of the left leg (which also equals 1″) and if you add the 2 together, you get 2″. There’s an intersection of 4 sections there and you want to divide the total amount you need by 4, in order to come up with the amount you need to take from each of the 4 sections. If that is still confusing, email me again! Thank you!
Hello! I’m trying to take the crotch up in a pair of jeans. Any advice on how to go about that with the seams all being double stitched.
Thank You!!
Hi Nancy, That’s a great question! I have a post that deals with taking in the waist on jeans with double stitched seams and it may help. You can find it here: https://sewinggarden.wordpress.com/2009/11/05/taking-in-the-waist-and-center-back-on-denim-pants-and-skirts/
But with this type of alteration, follow the general instructions on the “How to Take in the Crotch Seam on Pants” post but take out the double stitching where ever it is appropriate and proceed with the alteration. Then, when you go to stitch the seam back up, use a Jean a ma jig or just some tightly rolled up fabric under the presser foot to maintain the presser foot at the same hight. Read this post for more detail on why it will be important for you: https://sewinggarden.wordpress.com/2009/05/07/jean-a-ma-jigwhat-is-that/
It also might matter to you that you get a thread that matches well with the thread you are taking out. Depending on what color it is, I like to buy a thicker thread for this alteration. If you are altering a pair of jeans like Levi, I like to use a copper shade (which sounds funny, but it is the correct shade!). Anyway, please comment again if you have further questions as I really want you to have success!
Hi SewforDough,
I have a pair of pajama pants that are too big, especially in the crotch. I know how to adjust the waist, and taper the legs.
I have removed several inches from the center (crotch seam), then I cut 2 inches off each leg. The problem I have is small as they are pajama, but they don’t quite fit back together, because there is a little extra fabric, 1/4 inch I’d say that is extra on each leg, so that when I sew everything back together on the center seam, it is a little off. So close, but I wonder if you know what I’m doing wrong.
See reply at the end of the next comment…
As a P.S. I have not cut anything from the center seam, just picked it out. As the pants are already together, the back is larger, so I couldn’t cut it evenly front leg and back leg. Hope that makes sense. Thanks!
Hi Cherry,
Thank you for your question. I’ve read both of your comments and I’m not quite sure where you cut the 2″ off. I’m guessing you mean that you cut off the two inches from the leg piece at the crotch area (not the hem of the pajamas.) Being “off” just 1/4″ is not a problem. What I suggest is that you pin the crotch seam so that it matches the leg seam perfectly. When you go to stitch the pieces back together, be sure to put the larger fabric on the bottom closest to the feed dogs of your machine. Then, as you sew, hold the two layers in such a way as to “stretch” the top layer to meet the larger bottom area. Don’t move the pin until you’re all finished sewing. Even if your fabric is not a stretchy fabric, like a knit, it should still stretch enough to sew together perfectly. It could be that the manufacturer eased the fabric when they made the pajama bottoms. in any case, please let me know if you’re still having trouble and I’ll be happy to help you further.
REPLY
After struggling for hours I found your article. It worked awesomely!
So glad to hear this! Thanks for letting me know. 🙂
I have a couple of questions: I have had ‘professional’ alterations people do this and the leg ends up being reduced so much I can’t even get the pants on. So how do you avoid that? The other question – how far down the leg do you suggest easing in the new seam? I have seen posts that say 7 inches or down to the knee. thanks so much for the help. Luckily I have some pants I won’t be wearing that I can test this on. Can’t wait to get started!
Hi Karen, those are great questions! My general rule of thumb is that if the pants are more than two sizes too big, it is really difficult to alter them because you throw off the integrity and fit of the garment. If your pants were taken in more than you asked, you can always go back and ask them to make it right. Not all professional sewists know what they are doing, so it’s always a good idea to get references and ask alot of questions before you trust them with your clothes. As to your second question, I have never taken in a crotch area 7 inches or all the way to the knee. I am guessing those pants are too big all over and they won’t look good if you have to take in that much in the crotch area. The other areas most likely will look odd and the garment won’t fit properly. I hope that answers your questions. If not, be sure and ask again! And let me know if you have any questions while you do this alteration!
oh sorry. I didn’t phrase that right. but first let me tell you that my ‘professional’ surged off the excess so there is no way to fix. so I will have a few pairs to donate. what I meant to say/ask is this: I need to take up about 3/4 of an inch in the crotch area. if I follow what I’ve read in other posts: I would mark off 3/4 of an inch in the center of the crotch area but as I stitch, I would be easing back into the original inseam stich either 7″ down the inseam or down to the knee. (which I’m so short 7″ may be down to my knee – lol) does that make more sense? so I was wondering how far down you suggest I go to ease back into the original inseam stitch line? I hope that makes more sense. my apologies for the confusion
First, I am so sorry that you are going to have to donate those pants. That’s a bummer. Gosh, I’m not sure if you’re referring to my posts or other posts you’ve read on the internet. But, I definitely think 7″ or to the knee is way more than you need if all you’re going to take in is 3/4″. I’m not sure what you mean by “in the center of the crotch area”. If I’m understanding your alteration correctly, you should only need to take in that 3/4″ and then taper your seam back to the original seamline and my guess is that it shouldn’t be more than 2-3″ altogether. That’s a rough estimate, but I would love to help you get it right if you’d like to send me some photos by email. That would help me see what you’re seeing. My email is: TheSewingGarden@gmail.com Thanks Karen!
Thank you, this is the clearest explanation I have come across. AND it works.
Thats great to hear! So glad it was easy to understand and implement! Thanks for leaving your comment.
Thank you, great instructions and will work for over weight boy having to wear men’s slacks. Question; can I sew the inseam further than the picture shows, maybe down to the knee?
Thank you Donna. Yes, you can sew a new inseam to the knee. That will work fine.
Hi SewingGarden Friend! My son thought he was getting a bargain buying XL rainpants and he is a medium/large sized man. I took in the sides, but we realized that the crotch it wwwaaaaayyyy too bulky . He is using them as he rides his bike, so this is a big problem. What do you recommend? Is it possible to remake these pants enough for them to fit? Also, I had to sew this material by hand because the nylon/plastic material would not run through my sewing machine. (I could try using a smaller needle)HELP!
Hi, thank you for reaching out! I am not sure from your question if you have tried to make this crotch alteration on the pants yet or not. If so, it might be best for you to send me a photo of the pants on him and also a photo of the crotch area where you made the alteration. I can answer your question better when I can see them. Taking in the sides was not a bad idea as I’m sure the pants are too big all over.
OMG thank you so much for these wonderful instructions!!! I needed to remove 5 inches of material from the crotch and wondered if the technique would work with that much — it does, and I have a perfect result!!! It’s truly magic, I am so pleased 🙂
Oh, so glad it was so helpful! I love to hear these stories! Thank you so much for letting me know. It’s a great encouragement to others to try this alteration themselves.
Hello, thank you so much for this tutorial! You are helping people over 10 years later! However, I had a couple questions, because I still can’t achieve a result I’m pleased with. 1. Am I supposed to completely open the crotch seam? Even where it intersects with the inseam? 2. My jeans are very loose. I want to maintain the bagginess, but reduce how low it hangs. Every time I attempt this alteration, I’m left with uncomfortable and obvious folds in the crotch region. I think I could curb this by taking in most of it through the front, but I just don’t know how to take in more of the front without taking in the same amount from the back. Please help! I’m also a sewing newbie
Hi, I’m so sorry i didn’t see this until today. Not sure why I didn’t receive a notification that your comment was here. Anyway, yes, you’ll need to open the intersection of where the crotch seam and the inseam cross. If you just want to take in the front, then you can do that and stitch it all back together again. As long as you take in the same amount on the left front as the right front, you won’t have any trouble. Just don’t trim the seam until you’ve tried the pants back on and make sure they fit! If that doesn’t do the trick, try just taking more out of the back inseams and then stitch the intersection together again. Does that make sense?