A big thanks to Christy, at Alterations By Christy, for telling me about an even easier way to put French bustles in your gown!
Many of you have seen the post I wrote on How To Put Bustles on Your Wedding Gown. Christy saw it too and wrote to tell me about a step in the process that will save you lots of time.
Please read the original post How to Put Bustles on Your Wedding Gown and then come back here for the short cut.
This time I am using a red formal gown that came with some bustling on the back already as part of the design.
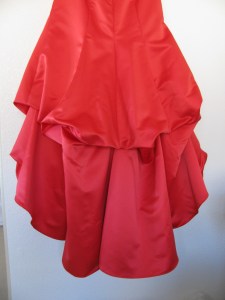
Don’t let that throw you, if your dress back doesn’t have this poofing.
Your dress can have a simple plain train or a fancy one. The technique is the same.
This dress needed three bustles to keep it off the ground and the dress had three seams in the back, so it worked perfectly.
I always try to pin along the seams so I can hide the mechanics of the bustles under the dress.
If you don’t have seams that align with your needed bustles, you can still make bustles easily in your train. I like to make them toward the hem of the dress so the dress hangs well and the stitches are not easily seen when the dress isn’t bustled.
Here is one of the bustles I pinned up.

Then, I put a pin to mark the upper part of the bustle and a pin to mark the lower part of the bustle. (In other words, when you pin a bustle up, you are catching two parts of the dress, does that make sense?)
So, before you take out the original pin, use pins to mark the two parts of that one pinned bustle.
Are you following me so far?
The photo below should help you see the two pins that come from the one bustle:

Then, I transferred the pin marks to the underside of the skirt where I need to work on the bustles.
To do this, take an extra pin, and poke it through the front of the dress so that it shows up on the back side. If you have lining, treat the two as one fabric. Just make sure you line everything up well.

Instead of creating the loops like I did in my first post How To Put Bustles On Your Wedding Gown, Christy suggests using these instead:

Brilliant!
You can find them at your local JoAnn Fabric store for about $4.00. They are in the section where the snaps are.
Ideally, you want the ring to sit above the top pin’s mark.
However, sometimes, that isn’t possible, as in this case:

Because of a previously sewn in bustle, my ring can’t sit above the pin mark.
You may find that this situation arises if your zipper tape is in the way as well.
So, let me tell you how to adjust for this problem.
I went ahead and stitched in the ring by hand onto the seam allowance only.
Then I measured the distance between the bottom of the ring and the pin mark:
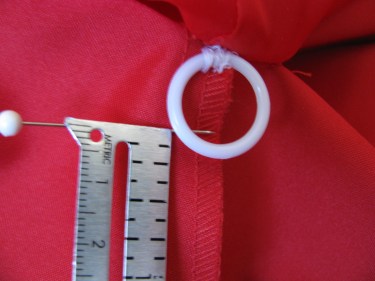
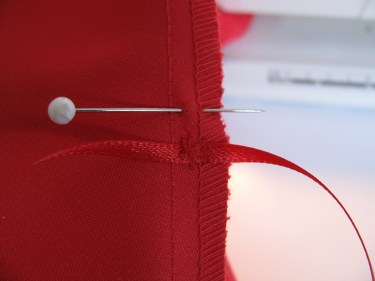
In this case, it’s only 1/4″, which may not seem like enough to bother with, but I do anyway. If yours is a greater amount, you’ll want to make the adjustment or your dress will hang too low when bustled.
So, I take that 1/4″ measurement, and go 1/4″ lower than the bottom pin mark and stitch the ribbon to the seam allowance only at the new mark:
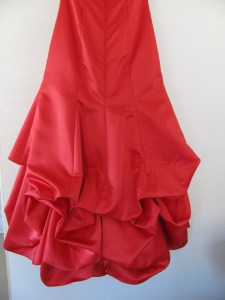
Now, just thread the ribbon ends through the ring…

and tie in a bow like you tie your shoelaces, and you have it!

Show your bridesmaids, mom, or friend how to tie these. It will only take a couple minutes of their time.
These bustles will stay put all through the reception and dance!
Update: I used this method on my daughter’s wedding dress and sometime during the reception, one of the plastic rings broke! Thankfully, I had put 5 safety pins along the seam allowance of her hemline, so I was able to grab one quickly and safety pin her bustle in place. It took only a minute and it saved the day!!
Thanks Christy, for the great idea!

Linda,
Thanks again. I already had some of the rings for another project and was so pleased. What a time saver and it also seems a very secure way to do it. I noticed Christy used satin ribbon. Do you think that would be strong enough for a heavy wedding gown? Maybe I should stick with the grosgrain ribbon.
I can’t tell you how grateful I am for keeping me in mind with this update and bringing it to my attention.
I can use all the help I can get. The entire wedding party has now requested I do all their alterations too.
I work full time as a stained glass artist for construction companies as well so busy, busy, busy!!!
This summer I will be switching and making alterations and construction of gowns my main occupation. Your web site will truly be a blessing.
Tina
Hey, that’s great!! I don’t know what Christy uses, but I think either a wider satin ribbon or the grosgrain would work great. I wish you the best with your new occupation and I’m so glad you like the website!
These instructions are great! My only question is how visible will the rings and ribbon be if I have the train down for my ceremony?
Hi Olivia,
I always use off white ribbon for the ties, even if your dress is white. The off white really is camoflauged. I have never been able to see the white rings or the ribbon underneath. If you find that you do, just tack the ribbons to a seam nearby with loops so you can pull the ribbons out easily when it comes time to bustle. Is your dress lined? If so, you shouldn’t have to worry at all. The bigger problem is if you would wear colored underwear…that shows through every time. Again, wear off white!
Hope that helps!
Linda
Just thought I would add to the conversation and say… I bustle hundreds of white wedding gowns every year and have never had a bride say that they could see the ribbon. I also add a small spot of color to the end of each ribbon and the corresponding ring using a colored permanent fabric marker. This allows the bridesmaids to bustle the gown quickly and without confusion. This is very appreciated when the gown has a very long train and has multiple bustles.*** Add the color to the ribbon and ring BEFORE you attach to the dress.
Thank you Christy! I do the same thing and I’ve thought several times I should add it to the post and never have. Thank you for bringing that up. It does help immensely. You’re the BEST!
Thank you so much for both of these posts! My MOH thought I was very brave when I said I wanted to do my own bustle. Thinking it out in my own mind it did not seem that difficult to me. And when I went searching online and found these posts I found I was right! I can’t wait to get the materials and get to work!
Hi Linda,
I just got a request to alter a wedding gown and bustle it too. Uh, oh, I said to myself. Fortunately, I remembered that you had the instructions on your website. I had ask other sewist, but their explanations were not as clear as yours. You now look forward to doing this with confidence. I am charging the bride $50 which I think is very reasonable. Thanks for your help. As always, you are a blessing.
Linda M.
Custom Alterations
& Sewing Education
What distance do you use between the upper part of the bustle and the lower part?
My dress shop has already done one french bustle (mid back seam) and I don’t find it lifts enough off the ground but don’t have the time to go back into her and leave it there for the work to be done. I’m quiet handy with needle and thread so figured I can do it myself. I in vision a second french bustle below the first.
Thanks for the advice.
Hi Kelly,
That’s a great question. For your situatiuon, there isn’t really a set guide. I would pinch it up where you think it would look good and then make adjustments from there based on what you see.
My guess is that you have princess seams in the back of the dress. Unfortunately, those don’t bustle perfectly very often. Many times you’ll find that one side is higher than the other. Just do the best you can and tuck the shorter areas to the middle as you are wearing the dress. The reason they are off is that the hem is not done perfectly symmetrical, but to change the hem this late in the game is tough.
You can try what you are suggesting and see if that works. If not, try bustling up the dress at the princess seams.
I hope that helps, but if I missed something or it isnt’t clear to you, just let me know and I’ll send you more detailed directions and a photo.
I wish you the best and congratulations!
Thank you so much for the very detailed instructions and step-by-step photos. I have to make a bustle for my daughter’s wedding gown and didn’t even know how to start; so many other instructions aren’t nearly detailed enough but this is perfect! Thank you, Thank You, T H A N K Y O U !
So glad it helped. Yes, I found there weren’t enough instructions and photos out there for many alterations, so I’m glad you found this site.
I hope you have a wonderful time at your daughter’s wedding!
I have been enjoying reading this web site and am so thankful for all the details you provide. I am working on a wedding gown right now that is high waisted and the bride wants a French bustle. I realize I have to do the middle bustle under the zipper. I am having a huge problem with the sides. There is a chiffon overlay skirt, over the satin train. Do I take tiny stitches and attach this overlay to the train. Otherwise I have the chiffon dripping all over the place. It almost seems, also, that I am going to need to have 5 bustle points due to the curve of the train. I have done the outside bustling on many dresses and never had a problem. I am going to use the curtain ring idea for the loops but I am stuck as to what to do with the outer layer.
thanks for any advice you can give me. Diane
Yes, I should have mentioned that in my post. You will need to anchor the outer layer of chiffon first before you pull up the bustle points. To do that, I lay the dress out as flat as I can and line up all the seam lines of all the layers and pin it well. Then I just stitch in the “ditch” of the outer seamline being careful not to catch any unwanted layers and stitch down about 4 stitches and then backstitch right back to the original spot. That holds it together well.
Another thing I have noticed with those slimmer dresses is that sometimes it looks better to put the bustles even farther down the dress than right below the zipper tape. Sometimes, I’ll make those bustles halfway down the calf. It looks real pretty and there isn’t a pouf at or below the seat area, where none of us want accentuated anyway. Try it sometime and see if you agree.
You said you have done the outer bustling before and not had a problem. I think certain dresses look much better with the over bustle, but brides really want the under or French bustle and so the dresses don’t always cooperate. We just have to do the best we can. I often tell my customers to pin some safety pins along the inside side seam close to the bottom of the dress. That way, if there is still some dress dragging or someone steps on the train, they can pin up whatever they need to without having to go hunting for pins or needle and thread.
Hope that helps. Let me know if I missed anything or you come across another challenge.
thank you for your response. My problem is that the chiffon doesn’t have a seam in between the side seam and back center seam so I am not sure how I should anchor the chiffon in that area. Maybe a couple teeny, tiny stitches but I am afraid the chiffon might rip. I really need a bustle point in between.
Hi Diane,
I’m guessing there isn’t any trim or anything on that chiffon. If there is, let me know and I’ll give you a suggestion for that. But I am going to assume that there isn’t. What about putting a thread loop along the very bottom rollled hem edge of the chiffon and then a clear button (or something that isn’t real noticeable) on the dress. Then put that loop over the button. Would that work? It won’t be the perfect solution, but at least it would get that fabric up off the floor. The only other thing I can think of is to rig something from the waist area, but you’d see the loop or whatever on the chiffon. It may work if you can hide that loop real well. If you have access to a digital camera, you can send me a picture if you want and then I can see what you’re dealing with.
Thanks,
Linda
Hi Linda!
I have the bridal hanging up and ready for the next fitting. The chiffon had no trim (where I needed it) plus there was a bunch of gathering on each side in the back that I think was causing a huge problem of too much chiffon hanging down when I started bustling it. Thank you for all your help. I ended up using a clear snap on each side seam and one where I needed to pull the extra chiffon up. It seems to have helped the problem out immensely plus it gives it a sweeping effect across the back next to the bustle. We’ll see if the bride likes it or not. I already gave her a price of $25. for the bustle. I think I will have to change by price a bit.
Your website is GREAT plus I love the ads for Beth Moore and Compassion INt., etc. Thank you. Diane
Well, see, you didn’t need my help at all. You figured it out yourself! Awesome!
So glad you like the website and the ads. When I started this blog, I didn’t realize how many people would be reading it and learning from it. That’s been an added blessing. Thanks for your sweet commments.
Thank you so much for this. I am blogging about making a wedding dress and have come to the end and the bustle. My book only says how to do a traditiona bustle so thanks again.
You’re welcome! Glad it helped.
Linda
I also wanted to suggest to everyone who is new to bustling – please attach the upper bustle points to the lining or crinoline only – not the outer dress. This will ensure that you have a lovely smooth drape to the dress and no bustle “dents”. the lower points, of course, must go through all layers to be lifted. Don’t be afraid to bustle layers separately, a ballroom bustle on the under satin layer combined with an overbustle on the chiffon looks great too!
Good point! Some dresses need those layers to be bustled separatley.
I have, however, had great success bustling 2 layers together. You just have to pin them and let the dress hang to make sure there isn’t going to be that “dimple”. If there is, just repin until you get it to hang smoothly. Then sew your ribbons in place. For many dresses, it makes bustling alot easier than if tying up one layer at a time.
Thanks!
Linda
Another helpful hint is to number the bustle points so the maid of honor will have an easier time tying it up. #1 ribbon ties to #1 ring, etc. Or, you could bustle with one long continuous grossgrain ribbon from top point to bottom point leaving a tail at each end and simply tie the ends together. I use sharp pencil to number my bustles
Thank you. That is a good idea! I have also used different colored ribbons and tied matching embroidery floss to the rings to show them how to match up the correct corresponding bustles.
I find your site very helpful but was wondering if there is no seam at the back of the dress how do you tie the strings for the bustles without it showing on the outside part of the dress.
You can rig them from the waist or sometimes it works to bustle at the side center seams, if you have them. I have put the rings on the hemline and then attached ribbons to the waist. See if that helps.
Linda
I do multiple bustles on dresses per year. I also worked in a drycleaner for many years. The plastic rings are great but are not always drycleanable. Sometimes they melt. I stopped using them because of this. Hooks tear heavy fabrics. Those fabric inks are great for marking but bleed and fade when the dresses are cleaned. I use pastel ribbons to color code french bustles with loops and ties all in grosgain ribbon. The grosgain weave prevents the ribbon from splitting the way a satin ribbon does. The weight of a fabric should determine the number of points a dress should need.
Thanks for your site and I also do alterations and have for many years and I am glad to learn something new every day. I will put several new ideas to work right now!
Hi Linda! Once again I am coming to you with some much needed help. My niece wants a ballroom bustle in her wedding gown to keep a very sleek outline in her dress. I have never seen this done before so wondered if you have any ideas. It’s not a super long train but long enough with a “v” in the back and the sides which adds extra fabric into the equation for the bustle. It seems to me that I would have to have 10-12 bustles underneath to hold all that fabric under so it looks like the dress is just hemmed the same length as the front. Life always has some challenges. Thank you for giving me your thoughts. Diane
Since I can’t see the dress, you would know much better than me how many bustles she needs. I’m not sure if you have seams in the back of the dress to anchor the bustles to. If not, you can put loops at the hemline and anchor them to the waist area. Just be sure the loops don’t show from the outside, of course.
The ring idea was great. I took it one step farther. The dress I bustled had 3 back seams and 2 side seams–5 seams total. After tying the 5 seams with the ribbons and rings, we still had some drooping on either side of the center back seam. The bride did not want any stitching to show. I brought the seams on either side of the center back together and that seemed to lift the droop. So I sewed another ring on each of these two seams and tied ribbon to one of the rings. After rigging all of the vertical ribbon and ring combinations we tied the two extra rings together horizontally across the center back seam and the skirt was perfectly even with the floor. Doing this also added some extra bustle folds to the original bustle and the look was very attractive. If you need a drawing or picture, let me know.
Bravo…love it! Yes, send a visual. That will help my readers picture what you are describing. Thanks!
I, too, would love to see a picture of the final result. I wish David’s Bridal would stop with their $99 ads and explain that EVERY step costs money… 🙂
Thank you so much for this I used a ribbon & button method for my daughters dress several years ago and found that it did not hold through the entire reception and ended up just sewing it into place. I knew I needed a different method for the next wedding.
Did Sherry Johnston ever send you a picture of the gown she bustled and wrote in about on 7/8/2014?
Hi! I don’t remember her following up with a photo. I checked my deleted emails and didn’t find one there. What she is describing is that she added two more rings across from each other on two side seams. Then, she tied the two rings together with a ribbon. Many times, bustling is a matter of playing with the train until you get the look you need. You’ll often find that hems are not even all the way around and bustling isn’t always symmetrical. It can mean that a bustle on one side is lower or higher than on the other side of the dress. Or you name it….that’s what makes this fun and challenging! Hope that helps!
Wow I could have used this information 10 days ago when I started this French bustle on a wedding dress (ball gown) with yards and yards of lace. So far I have tried every method I read about elsewhere. All the responses have helped me put together a solution (I hope). Wish me luck.
Hi Jan, Thanks so much for your comment. I’m sorry it was a little late for your needs, but feel free to check back here for any future alteration and sewing questions or email me!