Are the sleeves on your shirts too long?
Shortening sleeves is a quick alteration.
This technique will work for men’s or ladies shirts that have cuffs on them.
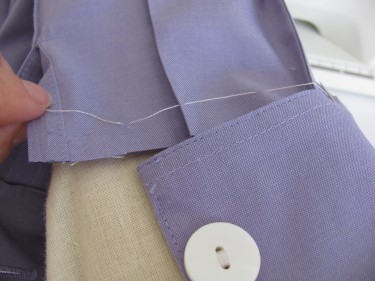
Let me show you what I did on this purple shirt:

There are two rows of stitching on the top edge of the cuff
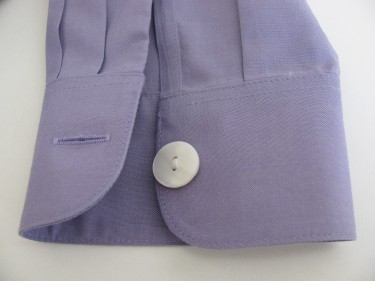
It’s a little hard to see in that photo above, but you have seen them on your own shirts.
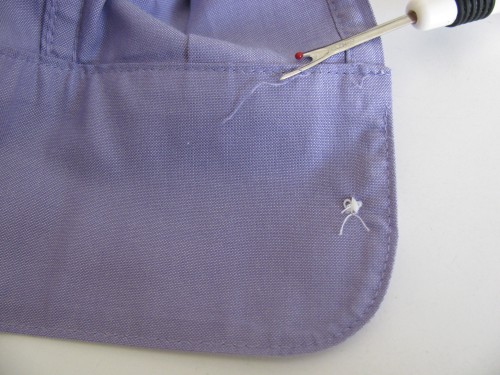
I flipped the cuff over to look at the underside of it.
It only has one row of stitching on the underside.
I began by removing that row of stitching with my seam ripper.
(You might have to remove two rows of stitching on your shirt. In that case, later on, you’ll stitch the cuff back on with two rows instead of one.)
Take off one cuff at a time so you don’t get confused as to which cuff goes back on which sleeve.
This customer wanted the sleeves raised 1 5/8″.
So, that’s how much I cut off from the cut edge of the sleeve:
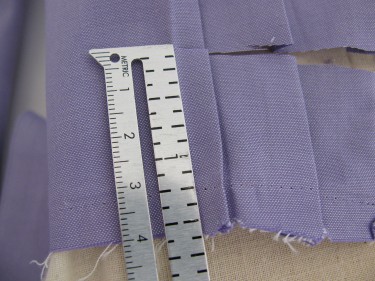
Continue cutting off the correct amount. When you get around to the other side of the cuff, make sure that the two edges match in length before you cut the rest off. Otherwise you’ll have unevenness.
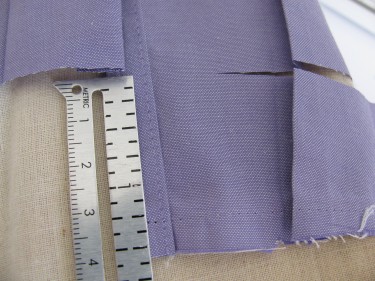
The original seam allowance was 3/8″ on this shirt.
You don’t have to do this next step, but I do it because it makes the job easier.
I hand baste a line just above that 3/8″ mark.
This allows me to line the cuff up easily before I stitch it back on.

Pin the cuff to the shirt.

When you pin, start by pinning the buttonhole end of the cuff first. That way, any adjustments you have to make are on the underside of the sleeve and won’t show.
When you get around to the button end of the cuff, you will most likely have extra fabric that doesn’t fit into the cuff. (However, in very rare instances, you might come up short and not have enough shirt fabric to fit into the cuff. If that is true in your case, let out one of the tucks (or pleats) and that will give you some extra fabric.)
The photo below shows that I had more fabric than I needed. (The reason you have extra fabric is that the sleeve is wider in circumference as you move up the sleeve. Down by the cuff, it is more narrow.)
Just make an extra tuck (or pleat) with that extra fabric. Make sure it is the same width and size as the other pleats. Make it just the right size to fit back into the cuff.
In the photo below, the new tuck is above the middle pin:

Adding a pleat will make it fit right in with the original design of the shirt. No one will suspect that you added it.
Check to make sure that the tucks look good from the top and underneath. Sometimes those tucks get twisted and then stitched down and that doesn’t look good if you roll up your sleeves.
Stitch the cuff in place stitching over the holes made by the original stitches.

That didn’t take long, did it?
It’ll take you just a few minutes to alter those long shirts in your closet and they’ll feel better when they hang at the proper length on your wrist!

Great tip! (Although, I always have problems with the sleeves not being long ENOUGH…. the curse of being tall!)
This is a good thing to be able to do. Looks totally professional!
Shortening cuffed sleeves on a jacket or shirt is one of my favorite alterations because it’s quick. I agree that you do need a guide in order to re-attach the cuff, however, I mark with chalk instead of hand-basting; that makes this alteration even faster.
Did I tell you that I just love your blog? There’s really not much out there on this treasured skill. Thanks for taking the time to do this. I hope it pays off for you.
You did a great job of describing the process! I wonder if you have any suggestions for a difficulty I experience. When I reattach the cuff, my machine (a 15+ year-old New Home in great condition) will not advance the material. Pressure and feed are in adjustment. When I use a commercial machine, I never have this difficulty…sigh!
Hi Donna,
Do you think it’s because the presser foot isn’t lying flat (horozontal) as you sew that thick seam? I have heard that some machines just don’t handle thickness as well as others. That’s my guess only because I experience that on thick seams myself. I hope that helps. And, wow, you are blessed to have an industrial machine!
This is such an excellent explanation and great photos. So clearly rendered. Thank you so much!
As an extreme newbie making my first shirt (first project), I discovered the pattern had the sleeves 2″ too long so I took of the cuff and removed the placket I’d just put on, cut off 2″, replaced the placket 2″ higher and then put the cuff back on.
How much do you feel you can shorten a sleeve without the placket being too short when you finish. Love your site. I’m been here all day reading and learning. Thank you.
Roger
Hi Roger, First, I am totally impressed that you chose to make a shirt as your first project! That’s awesome! I’m sorry you had to take the placket off after you had just sewn it on. Bummer. The short answer to your question is that there are two variables in determining how much to take off a placket. First, you need to make sure it’s not so small that you can’t fit your hand into the shirt. Second, you want it to look good too. I imagine that 2 inches was not too much to shorten them.
I’m so glad to hear that you like my blog and you’re learning alot. I’m happy to know it is a helpful site. Thanks for your question. I’m hoping to answer it in more detail as a post soon. Have fun in the process of constructing your shirt!
Linda
How do you manage to do this without making the sleeve really poofy? Most shirt sleeves are larger as you go up the arm. When I have attempted this, the shirt sleeves ends up looking like parachute pants.
Taper (take in) the sleeves from the elbow to the wrist area or put in a pleat if there isn’t already one there. To get an idea of where you would place a pleat, look at a dress shirt and copy what you see. I hope that helps. Let me know if it doesn’t.
I loved your tutorial. However, I had 4 inches to remove in sleeve length, so the sleeve placket (on both the buttonhole and button sides) need to be removed and PRIOR to cutting off the 4 inches.
Yes, sometimes you have to do that!
Is it necessary to adjust the placket as well, or can the sleeve just be cut off and the cuff sewn back on? I am taking up a dress shirt 1″
If you’re just taking off one inch, you shouldn’t have to move the placket. However,you could pin it and see if you can fit your wrist through it before you sew it up.
What is the placket?
The placket is the narrow strip at the bottom of the sleeve where you find the buttons and buttonholes.
Thanks for telling me what a placket is. I always called it a cuff. I’m learning as I go here. Thank you!!!
The cuff is just below the placket. The placket runs vertically on a sleeve and the cuff runs horozontally and also has buttons and buttonholes on it! It’s a little confusing.
What would you
Charge for shortening a sleeve like in the pictures you provided?
If you read my “Sew For Dough” tab at the top of the page and also my pricing post, I think that will help you. Just type “Pricing” in the search box and you’ll find it. Hope those help. I don’t give out prices because each part of the country is different and the time it takes is different for each seamstress. Hope that helps.
I just now found this awesome page or site or group. Not sure what to call it. But it’s awesome. I’ve just signed up so I’ll be able to explore it. I just don’t want to overcharge anyone. You’ve shown me how to do a cuff shortening the easy way. And I sure appreciate it. Thank you so much!!! I’m going to go explore some more.
🙂
Glad you found my site. I am the main writer on it, but as you can tell, there are lots of people who add to the comment section, so it is a worldwide community here!
I got a bargain at Land’s End. Recently discovered that although they carry few items in maternity, I am NOT the only one to not be needing maternity items but have found the sizing allows for a heavier midsection and fits rather nicely. But the cuffed sleeves are way too long…how far can you go on the placket in cutting off the length? Wondering if I would be better off just hemming it and turning it into a 3/4 sleeve!
I privately emailed Robin with this answer, which was not a simple yes or no. It depends on the placket length and other factors. Are any of you interested in me writing a post on how to shorten a placket?
Yes, I think that would also be a good tutorial, “how to shorten a placket” . This is my first time to your site and I think it is great!
Yes, I would love to see a post on shortening a placket. This is my first time to your site and I found it very informative! Thank you.
Thank you! I’ll keep that in mind. I usually do a tutorial when I get a particular alteration from a customer. That one is very rare for me.
Thanks, you’ve helped a quilter that was asked to help a neighbor shorten her husbands sleeves. Extra thanks.
Yay!